1. Introduction
Thank you for choosing the Roca a327476000 Standby Porcelain Washbasin. This manual provides essential information for the proper installation, operation, maintenance, and troubleshooting of your new washbasin. Please read these instructions carefully before installation and keep them for future reference.
The Roca Standby washbasin is a modern, wall-mounted design crafted from high-quality porcelain, offering durability and a sleek aesthetic for your bathroom.
2. Product Overview
The Roca a327476000 Standby washbasin features a contemporary square shape with a single central tap hole, designed for efficient space utilization and easy integration into various bathroom styles.

Figure 2.1: Front view of the Roca Standby Porcelain Washbasin. This image shows the washbasin's clean lines, the central tap hole, and the integrated overflow. A chrome faucet and drain pipe are visible, indicating a typical installation setup.
3. Setup and Installation
This washbasin is designed for wall-mounted installation. Professional installation is recommended to ensure proper and secure fitting.
3.1. Tools and Materials (Not Included)
- Drill with appropriate drill bits
- Level
- Measuring tape
- Pencil
- Wrenches
- Sealant (silicone)
- Mounting bolts/brackets (check package contents)
- Plumbing connections (faucet, drain, P-trap)
3.2. Installation Steps
- Prepare the Wall: Ensure the wall is structurally sound and capable of supporting the weight of the washbasin when filled with water. Identify water supply lines and drain pipe location.
- Mark Mounting Points: Refer to the dimensions diagram (Figure 3.1) for precise measurements. Using a level and measuring tape, mark the drilling points on the wall for the mounting bolts. The standard height for a washbasin rim is typically 80-85 cm from the floor, but adjust according to user preference.
- Drill Holes: Drill holes at the marked points using an appropriate drill bit for your wall type (e.g., masonry bit for concrete/brick). Insert wall plugs if necessary.
- Install Mounting Bolts/Brackets: Securely fasten the mounting bolts or brackets into the drilled holes. Ensure they are firmly anchored and level.
- Install Faucet and Drain Assembly: Before mounting the basin to the wall, install the faucet and drain assembly into the designated holes on the washbasin according to their respective manufacturer's instructions. Apply plumber's putty or sealant as required to ensure watertight connections.
- Mount the Washbasin: Carefully lift the washbasin and align it with the mounting bolts/brackets on the wall. Slide the basin onto the bolts/brackets until it is securely seated. Tighten any securing nuts or screws, being careful not to overtighten and damage the porcelain.
- Connect Plumbing: Connect the hot and cold water supply lines to the faucet. Connect the drain assembly to the P-trap and then to the wall drain pipe. Ensure all connections are tight and leak-free.
- Seal Edges: Apply a bead of silicone sealant along the back edge where the washbasin meets the wall to prevent water ingress and provide a finished look.
- Test for Leaks: Turn on the water supply and check all connections for any leaks. Run water through the faucet and observe the drain for proper function.
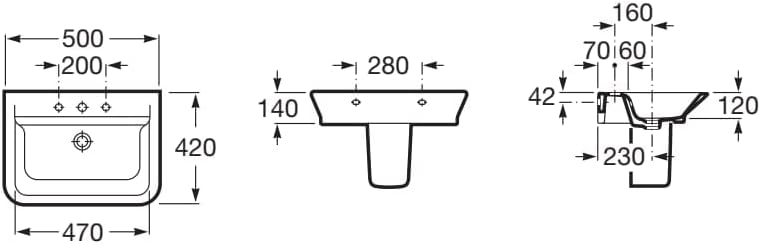
Figure 3.1: Technical dimensions of the Roca Standby Porcelain Washbasin. This diagram provides detailed measurements in millimeters for the top view (length 500mm, width 470mm, tap hole spacing 200mm), front view (height 140mm, tap hole depth 280mm), and side view (depth 420mm, rim height 120mm, mounting points 230mm from back, 160mm from top, 60mm from front edge).
4. Operating Instructions
The Roca Standby washbasin is designed for standard domestic use. Operate the faucet according to its manufacturer's instructions to control water flow and temperature. Ensure the drain stopper (if applicable) is functioning correctly to retain or release water as needed.
5. Maintenance and Care
Proper care will ensure the longevity and appearance of your porcelain washbasin.
- Regular Cleaning: Clean the washbasin regularly with a soft cloth or sponge and a mild, non-abrasive cleaner. Rinse thoroughly with water after cleaning.
- Avoid Harsh Chemicals: Do not use abrasive cleaners, scouring pads, strong acids, alkalis, or bleach, as these can damage the porcelain surface.
- Prevent Stains: Wipe away spills immediately, especially those from cosmetics, hair dyes, or strong chemicals, to prevent staining.
- Check for Leaks: Periodically inspect plumbing connections for any signs of leaks and tighten if necessary.
- Avoid Heavy Impact: While porcelain is durable, avoid dropping heavy objects into the basin, which could cause chips or cracks.
6. Troubleshooting
6.1. Leaks Around Faucet or Drain
- Cause: Loose connections, worn washers/gaskets, or improper sealant application.
- Solution: Tighten connections. If leaks persist, disassemble, inspect and replace washers/gaskets, and reapply plumber's putty or silicone sealant as needed.
6.2. Slow Drainage
- Cause: Clog in the drain pipe or P-trap, or issues with the drain stopper mechanism.
- Solution: Remove the drain stopper and clear any hair or debris. If necessary, remove and clean the P-trap. Avoid pouring grease or large debris down the drain.
6.3. Water Stains/Mineral Deposits
- Cause: Hard water or infrequent cleaning.
- Solution: Use a mild descaling solution specifically designed for bathroom fixtures, or a mixture of white vinegar and water. Apply, let sit briefly, then scrub gently and rinse thoroughly.
7. Specifications
| Feature | Detail |
|---|---|
| Brand | Roca |
| Model Number | A327476000 |
| Product Dimensions (LxWxH) | 500 mm x 420 mm x 140 mm (50 x 42 x 14 cm) |
| Item Weight | 14.28 kg |
| Material | Porcelain |
| Shape | Square |
| Tap Holes | 1 central hole |
| Finish | Painted |
| Installation Type | Wall-mounted |
8. Warranty and Support
For warranty information and customer support, please refer to the documentation provided with your purchase or visit the official Roca website. Keep your proof of purchase for any warranty claims.
If you encounter issues not covered in this manual, please contact Roca customer service or a qualified plumber.


