1. Introduction
This manual provides instructions for the safe and efficient operation of your Mitsubishi FD730U Mobile Multimedia HD DLP Projector. Please read this manual thoroughly before using the projector and keep it for future reference.
The FD730U projector is designed for portability and ease of setup, featuring a vertical lens shift function for image correction and a top-loaded lamp for simplified replacement. It offers a native 1080p resolution, 4100 lumens brightness, and a 3000:1 contrast ratio, suitable for various presentation environments. The Mitsubishi Electric color wheel and BrilliantColor ensure accurate color reproduction. The projector also includes energy-saving features such as automatic power off and selectable lamp modes for extended lamp life.
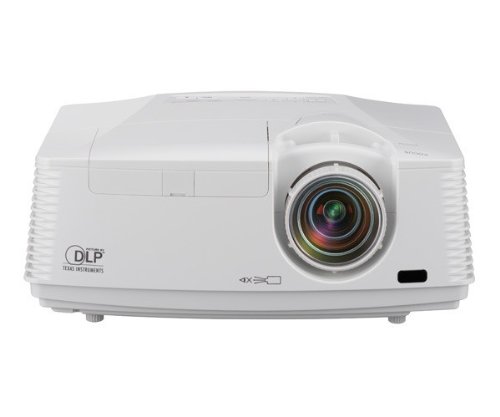
Figure 1: Front view of the Mitsubishi FD730U Projector.
2. Safety Information
Observe the following safety precautions to prevent fire, electric shock, or injury.
- Do not block ventilation openings. Ensure adequate space around the projector for airflow.
- Do not look directly into the projector lens when the lamp is on. The bright light can damage your eyes.
- Do not place the projector on an unstable cart, stand, or table.
- Unplug the projector from the wall outlet before cleaning.
- Refer all servicing to qualified service personnel.
3. Package Contents
Verify that all items listed below are included in your package. If any items are missing or damaged, contact your dealer immediately.
- Mitsubishi FD730U Projector
- Power Cord
- Remote Control with Batteries
- VGA Cable
- User Manual (this document)
- CD-ROM (if applicable)
4. Product Overview
4.1 Projector Components
Familiarize yourself with the main components of your projector.
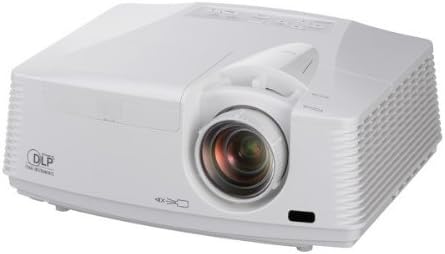
Figure 2: Top and front view of the projector, showing the lens, control panel, and ventilation.
4.2 Rear Panel Connections
The rear panel provides various input and output ports for connecting external devices.
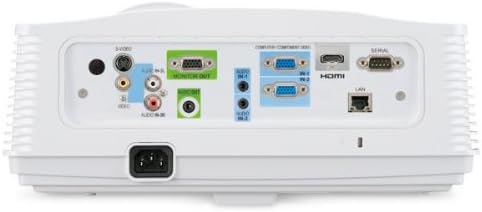
Figure 3: Rear panel of the projector, illustrating the various connection ports including HDMI, VGA, S-Video, and audio inputs/outputs.
4.3 Remote Control
The remote control allows you to operate the projector from a distance. Insert two AAA batteries (included) into the remote control before use.

Figure 4: The remote control for the FD730U projector, showing various function buttons for power, menu navigation, input selection, and image adjustments.
5. Setup
5.1 Projector Placement
Place the projector on a stable, level surface or mount it securely. Ensure the projector is positioned at an appropriate distance from the screen to achieve the desired image size. Maintain adequate ventilation space around the projector.
5.2 Connecting Power
- Connect the power cord to the AC inlet on the projector's rear panel.
- Plug the other end of the power cord into a grounded electrical outlet.
5.3 Connecting Input Sources
Connect your video source (e.g., computer, DVD player, gaming console) to the appropriate input port on the projector's rear panel (refer to Figure 3).
- HDMI: For high-definition digital video and audio.
- VGA (Computer In): For analog computer signals.
- S-Video/Composite Video: For standard definition video sources.
- Audio In: Connect audio cables from your source device if not using HDMI.
5.4 Initial Power On
After connecting all cables, press the POWER button on the projector's control panel or remote control to turn on the projector. The power indicator light will change color, and the lamp will illuminate.
6. Operating Instructions
6.1 Powering On and Off
- To Power On: Press the POWER button once.
- To Power Off: Press the POWER button twice. The projector will enter a cooling cycle before fully shutting down. Do not unplug the projector during the cooling cycle.
6.2 Input Source Selection
Press the INPUT button on the remote or control panel to cycle through available input sources (HDMI, VGA, S-Video, etc.) until your desired source is displayed.
6.3 Image Adjustment
- Focus: Rotate the focus ring on the projector lens until the image is sharp.
- Zoom: Adjust the zoom ring on the projector lens to change the image size without moving the projector.
- Vertical Lens Shift: Use the manual lens shift adjustment toggle (typically located near the lens) to vertically adjust the image position without tilting the projector. This helps correct offset images during installation.
- Keystone Correction: If the image appears trapezoidal, use the KEYSTONE buttons on the remote control to correct the image shape.
6.4 Menu Navigation
Press the MENU button on the remote or control panel to access the on-screen display (OSD) menu. Use the arrow buttons to navigate and the ENTER button to select options. Press MENU again to exit.
6.5 Picture Settings
Within the OSD menu, you can adjust various picture settings:
- Brightness/Contrast: Adjust for optimal image clarity.
- Color/Tint: Fine-tune color reproduction.
- Aspect Ratio: Select the appropriate aspect ratio (e.g., 16:9, 4:3) for your content.
- Lamp Mode: Switch between Normal and Low modes. Low mode extends lamp life to an estimated 5000 hours and reduces fan noise, though it slightly lowers brightness.
7. Maintenance
7.1 Cleaning the Projector
- Lens: Gently wipe the lens with a soft, lint-free cloth specifically designed for optical surfaces. Do not use abrasive cleaners.
- Cabinet: Wipe the projector's exterior with a soft, dry cloth. For stubborn stains, use a slightly damp cloth with a mild detergent, then wipe dry.
7.2 Lamp Replacement
The projector lamp has an estimated life of 5000 hours in Low mode. When the lamp reaches the end of its life, a warning message may appear, or the lamp indicator light may illuminate. The FD730U features a top-loaded lamp for easy replacement.
- Turn off the projector and unplug the power cord. Allow the projector to cool down for at least 30 minutes.
- Locate the lamp cover on the top of the projector.
- Unscrew the retaining screw(s) and remove the lamp cover.
- Carefully remove the old lamp module by pulling its handle.
- Insert the new lamp module, ensuring it is seated correctly.
- Replace the lamp cover and secure it with the screw(s).
- Plug in the power cord and reset the lamp timer in the projector's OSD menu.
7.3 Air Filter Cleaning
Regularly clean the air filter to maintain optimal performance and prevent overheating. The filter is typically located on the side or bottom of the projector.
- Turn off the projector and unplug the power cord.
- Locate and remove the air filter cover.
- Remove the air filter and clean it using a small vacuum cleaner or by gently tapping it to dislodge dust. If heavily soiled, replace it.
- Reinsert the clean filter and replace the cover.
8. Troubleshooting
| Problem | Possible Cause | Solution |
|---|---|---|
| No image displayed |
|
|
| Image is blurry |
|
|
| Image is trapezoidal |
|
|
| Projector overheats or shuts down |
|
|
9. Specifications
| Feature | Description |
|---|---|
| Model Number | FD730U |
| Display Type | DLP |
| Display Resolution Maximum | 1920 x 1080 (Native 1080p) |
| Brightness | 4100 lumens |
| Contrast Ratio | 3000:1 |
| Lamp Life (Estimated) | 5000 hours (in Low mode) |
| Lens Shift | Vertical only |
| Product Dimensions | 13.6 x 10.6 x 5.3 inches |
| Item Weight | 9.5 pounds |
| Form Factor | Portable |
| Special Feature | Pico (Note: This feature description may be a misclassification given the product's weight and dimensions.) |
10. Warranty and Support
For warranty information and technical support, please refer to the warranty card included with your product or visit the official Mitsubishi Projectors website. Keep your purchase receipt as proof of purchase for warranty claims.
For further assistance, contact Mitsubishi customer service.


