1. Introduction
This manual provides essential instructions for the safe and effective use of your TACWISE 880 Z3-13 Staple Tacker. Designed for versatility and user comfort, this tool is suitable for various applications including upholstery, insulation, and general DIY tasks. Please read this manual thoroughly before operation to ensure proper handling and to maximize the tool's performance and longevity.
2. Safety Instructions
Always wear appropriate personal protective equipment, including safety glasses, when operating the tacker. Ensure the work area is clear and well-lit. Never point the tacker at yourself or others. Ensure the tool is unloaded before performing maintenance or clearing jams. Keep hands and body parts away from the firing mechanism. Store the tool in a secure place, out of reach of children.
3. Product Overview
The TACWISE 880 Z3-13 is a compact, die-cast metal-bodied staple and nail gun. It features a cut-away nose for precise firing, an impact depth adjuster for various materials, and an ergonomic grip for comfortable use. The tool is designed with a low grasp height to reduce hand strain.
Key Features:
- Heavy-duty metal construction, suitable for semi-professional use.
- Fires Type 13 staples (6-14mm) and Tacwise 180/18G nails & pins (15mm).
- Integrated belt hook for convenient carrying.
- Personalization window for identification.
- Staple viewing window to monitor fastener levels.
- Lock-down handle for safe and compact storage.
- Impact-resistant die-cast body with a cut-away nose for enhanced firing access.
- Linear Power Curve mechanism to maintain user comfort during operation.
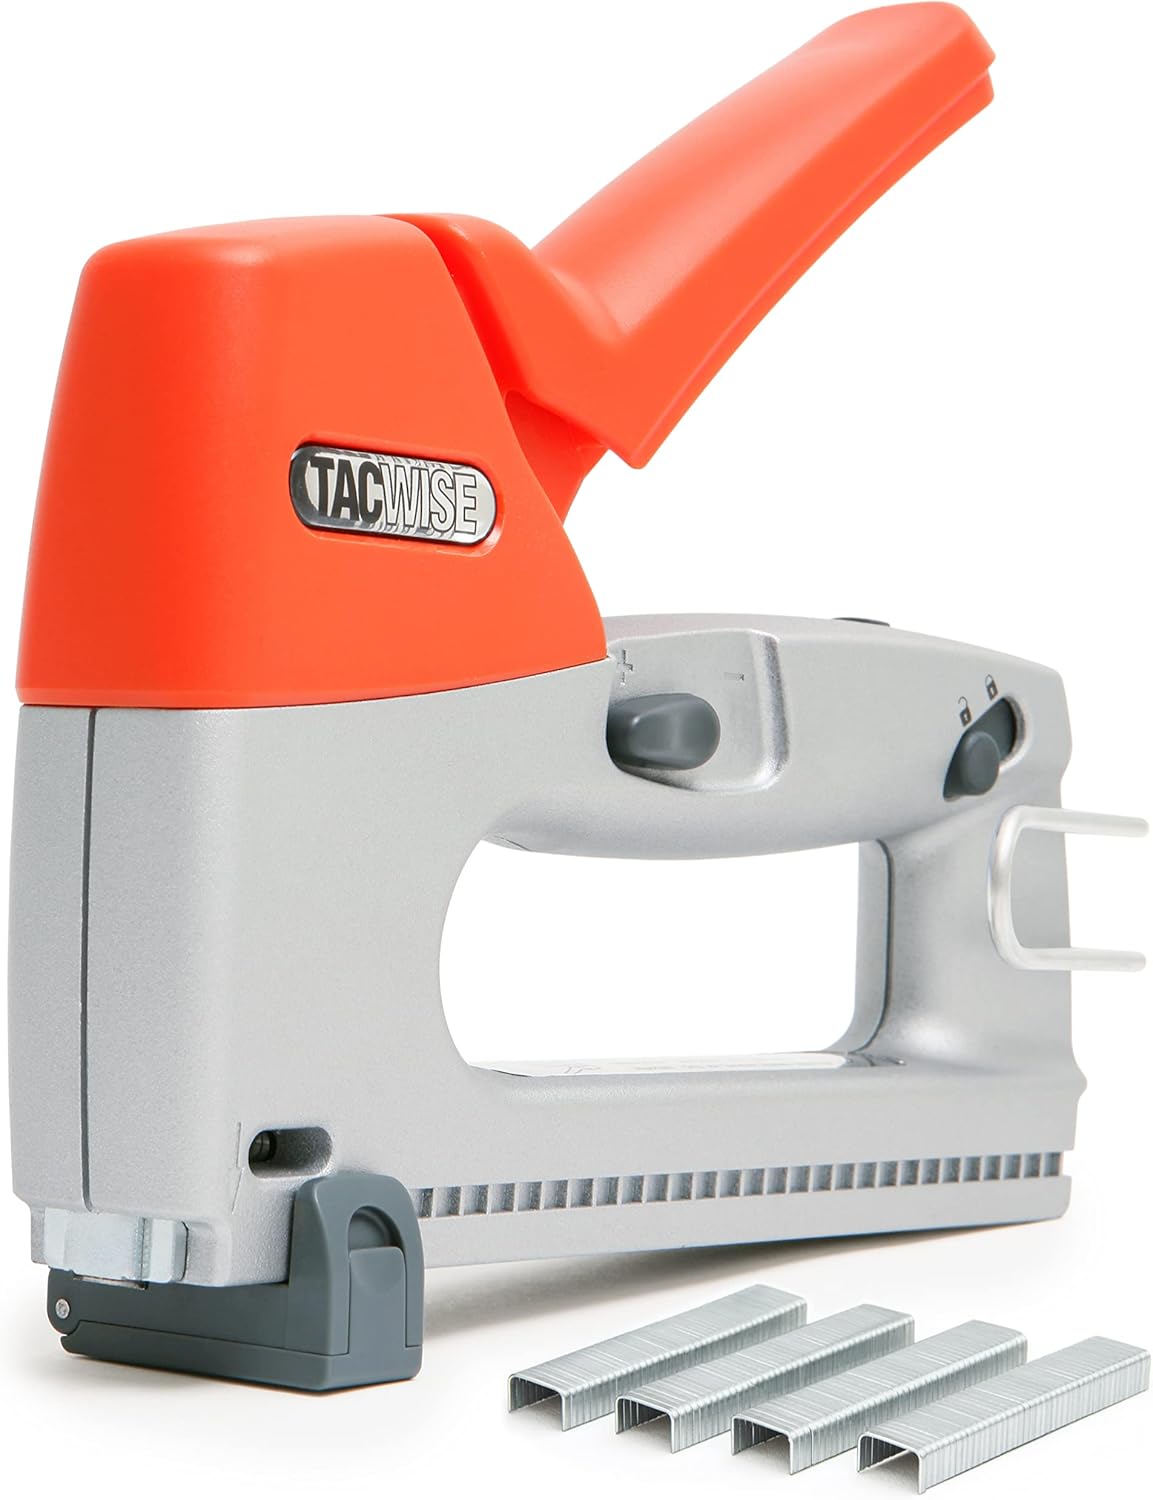
Figure 1: Front view of the TACWISE 880 Z3-13 Staple Tacker with included staples.

Figure 2: Ergonomic design of the tacker for comfortable handling.
4. Setup: Loading Staples and Nails
The TACWISE 880 Z3-13 is compatible with Type 13 staples (6-14mm) and Tacwise 180/18G nails and pins (15mm). Always ensure the tacker is unloaded and pointed away from yourself and others before loading.
- Open the Magazine: Locate the magazine release mechanism, typically at the rear or bottom of the tool. Slide it open to expose the staple channel.
- Insert Fasteners: Place a strip of Type 13 staples or 18G nails into the magazine with the points facing downwards. Ensure they are seated correctly within the channel.
- Close the Magazine: Slide the magazine cover back into place until it locks securely.
- Check Fastener Window: The staple viewing window allows you to monitor the remaining fastener supply, indicating when a reload is necessary.

Figure 3: Detail of the staple loading mechanism.

Figure 4: Side view indicating the magazine area for fastener insertion.
5. Operating the Tacker
Follow these steps for effective operation of your staple tacker:
- Adjust Impact Depth: Use the impact depth adjuster, located on the side of the tool, to set the desired penetration depth. Turn the adjuster to increase or decrease the impact force based on the material hardness (e.g., harder wood requires more force).
- Position the Tacker: Place the nose of the tacker firmly against the workpiece where the fastener is to be driven. Ensure the tool is perpendicular to the surface for optimal results.
- Fire the Tacker: Squeeze the handle firmly and smoothly to drive the staple or nail. The Linear Power Curve design minimizes recoil for user comfort.
- Verify Placement: After firing, check that the fastener is properly seated. If not, adjust the depth setting and re-fire in a new location.

Figure 5: Impact depth adjuster for varying material hardness.

Figure 6: Tacker being used for upholstery application.

Figure 7: Tacker being used for insulation application.
6. Maintenance
Regular maintenance ensures optimal performance and extends the life of your TACWISE 880 Z3-13.
- Cleaning: Periodically clean the tool, especially the firing mechanism and magazine, to remove dust, debris, or adhesive residue. Use a dry cloth; avoid solvents.
- Storage: When not in use, engage the lock-down handle for safe and compact storage. Store the tacker in a dry environment, away from extreme temperatures.
- Inspection: Before each use, inspect the tool for any signs of damage or wear. Do not use if any parts are loose or broken.

Figure 8: The tacker features a belt hook for convenient carrying and a personalization window.
7. Troubleshooting
If you encounter issues with your TACWISE 880 Z3-13, refer to the following common solutions:
- Staples/Nails Jamming: If fasteners jam, ensure the tool is unloaded. Carefully open the magazine and remove any bent or misaligned fasteners. Check the firing channel for obstructions and clear them. Ensure you are using the correct type and size of fasteners (Type 13 staples 6-14mm, 18G nails 15mm).
- Fasteners Not Firing or Poor Penetration:
- Check if the magazine is loaded correctly and has enough fasteners.
- Ensure the tacker is pressed firmly against the workpiece.
- Adjust the impact depth setting to a higher force for harder materials.
- Inspect fasteners for damage or incorrect size.
8. Specifications
This section details the technical specifications of the TACWISE 880 Z3-13 Staple Tacker.
| Feature | Specification |
|---|---|
| Manufacturer | Tacwise |
| Part Number | 0880 |
| Item Weight | 2.2 pounds |
| Product Dimensions | 1.3 x 8.66 x 9.06 inches |
| Item Model Number | 880 |
| Color | Orange / Grey |
| Style | Curve, Compact, Ergonomic |
| Material | Metal |
| Item Package Quantity | 1 |
| Number Of Pieces | 1 |
| Capacity Description | Full Strip |
| Included Components | Z3-13, 200 x 13/6mm Staples, Margin Edge Adjuster, Operators Manual |
| Batteries Required? | No |
| Number of Fasteners | 200 (initial included) |
9. Warranty and Support
The TACWISE 880 Z3-13 Staple Tacker comes with a 3-year guarantee. For warranty claims, technical assistance, or to purchase replacement parts, please contact TACWISE customer support through their official website or authorized retailers. Keep your proof of purchase for warranty validation.


