
1. Product Overview
The LiftMaster 892LT is a two-button remote control designed for use with LiftMaster Security+ 2.0 garage door openers and gate operators. This versatile remote allows you to control two separate devices, such as two garage doors, two gates, or a combination of both, eliminating the need for multiple remote controls.
It features Security+ 2.0 technology, which sends a new, secure code every time a button is pressed, enhancing security. The 892LT is also capable of cloning existing LiftMaster or Chamberlain branded Dip-Switch codes, offering broad compatibility.

Figure 1: LiftMaster 892LT Two-Button Remote Control. This image shows the compact, black remote control with two gray buttons and a red indicator light, along with a metal visor clip attached at the top.
2. Compatibility
The LiftMaster 892LT remote control is compatible with:
- LiftMaster Security+ 2.0 garage door openers or gate operators that feature a yellow programming button.
- LiftMaster Security+ 315MHz systems.
- LiftMaster Security+ 390MHz systems.
- Existing LiftMaster or Chamberlain branded Dip-Switch remote controls for cloning purposes.
Important: Ensure your garage door opener or gate operator has a yellow programming button for direct programming with Security+ 2.0.
3. Setup and Programming
The 892LT remote offers multiple programming methods. Choose the method that best suits your existing equipment.
3.1. Programming to a Security+ 2.0 Garage Door Opener (Yellow Learn Button)
- Locate the yellow learn button on your garage door opener motor head. This button is typically found on the back or side panel.
- Press and immediately release the yellow learn button. The learn indicator light will glow steadily for 30 seconds.
- Within 30 seconds, press and hold the button on the 892LT remote control that you wish to program.
- Release the remote control button when the garage door opener lights flash or two clicks are heard. This indicates that the remote has been successfully programmed.
- Test the remote by pressing the programmed button. The garage door should activate.
Note: If your opener uses the MyQ app for setup, select "Smart Garage Hub" in the app's device list, not "Garage Door." Follow the app prompts to enter the serial number of the unit.
3.2. Cloning an Existing Remote Control (Dip-Switch or Older Security+ Systems)
This method is useful for duplicating the code from an existing, working remote control, especially for gate operators or older systems without a learn button.
- Open the battery compartment of the 892LT remote control. Inside, you will find a small programming button.
- Press and release the programming button on the 892LT. The LED on the 892LT will illuminate.
- Hold your existing, working remote control approximately 1-2 inches away from the 892LT.
- Press and hold the button on your existing remote that you wish to clone.
- While still holding the button on the existing remote, press the desired button on the 892LT remote for approximately one second, then release it.
- The LED on the 892LT will flash rapidly and then turn off, indicating successful cloning.
- Repeat for the second button if desired.
- Test the newly programmed 892LT remote control.

Figure 2: Programming Features of 892LT/894LT Learning Remote Controls. This diagram illustrates the independent button programming and cloning capabilities, showing different frequency options and compatibility with various LiftMaster/Chamberlain systems.
4. Operation
Once programmed, operating the LiftMaster 892LT remote control is straightforward:
- Press the programmed button on the remote control to activate your garage door opener or gate operator.
- The remote sends a new, secure code with each press, ensuring reliable and secure operation.

Figure 3: Included Visor Clip. The image displays a silver metal visor clip, designed to securely attach the remote control to a vehicle's sun visor for easy access.
5. Maintenance
5.1. Battery Replacement
The 892LT remote control is powered by one AAA battery. The typical battery life is up to 3 years under normal usage conditions.
- When the remote's range decreases or the LED indicator light becomes dim, it's time to replace the battery.
- Open the battery compartment cover on the back of the remote control.
- Remove the old AAA battery.
- Insert a new AAA battery, ensuring correct polarity (+/-).
- Close the battery compartment cover securely.
Caution: Dispose of old batteries properly according to local regulations.
6. Troubleshooting
- Remote not working after programming:
- Ensure your garage door opener has a yellow learn button for Security+ 2.0 compatibility.
- Verify that you followed the programming steps correctly, especially the timing for pressing and releasing buttons.
- Check the battery in the remote. Replace if necessary.
- If cloning, ensure the existing remote is working and held close enough during the cloning process.
- For some older systems or specific frequencies (e.g., 390MHz Security+ 2.0), you may need to consult additional online documentation or your opener's manual for specific programming modes.
- As a last resort for stubborn programming issues, try using the "learn" or "reset" button directly on your garage door opener motor head, following its specific instructions.
- Reduced operating range:
- Replace the AAA battery in the remote control.
- Ensure there are no obstructions between the remote and the garage door opener's antenna.
- Check for sources of interference, such as other electronic devices.
- Remote activates the wrong device:
- Reprogram the remote control, ensuring you select the correct button for each device during the programming process.
7. Specifications
| Feature | Specification |
|---|---|
| Model Number | 892LT |
| Product Dimensions | 4.75 x 2.75 x 1.13 inches (12.07 x 6.99 x 2.87 cm) |
| Item Weight | 2.08 ounces (59 grams) |
| Battery Type | 1 x AAA (included) |
| Battery Life | Up to 3 years |
| Frequency Capability | Security+ 2.0 (Tri-Band 310/315/390 MHz), Security+ 315 MHz, Security+ 390 MHz |
| Clone Capability | 811LM, 361LM, 61LM Dip Switch codes |
| Operating Temperature | -40°C to +65°C (-40°F to +149°F) @ 50% Rh |
| Storage/Ship Temperature | -40°C to +85°C (-40°F to +185°F) @ 50% Rh |
| Color | Black |
| Max Number of Supported Devices | 2 (two buttons) |
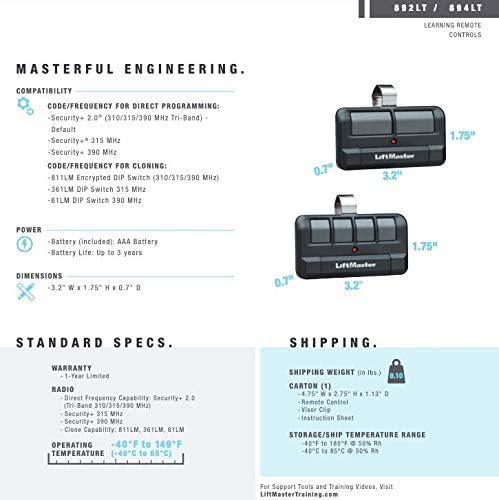
Figure 4: Technical Specifications for LiftMaster 892LT. This image provides a detailed spec sheet including dimensions, weight, battery type, frequency capabilities, and operating conditions.
8. Warranty Information
The LiftMaster 892LT remote control comes with a one-year limited warranty from the date of purchase. This warranty covers defects in materials and workmanship under normal use. Please retain your proof of purchase for warranty claims.
For detailed warranty terms and conditions, please refer to the official LiftMaster website or contact customer support.
9. Customer Support
If you encounter any issues or have questions not covered in this manual, please contact LiftMaster customer support. You can find contact information on the official LiftMaster website:
When contacting support, please have your product model number (892LT) and any relevant details about your garage door opener or gate operator readily available.


