1. Introduction
This user manual provides detailed instructions for the safe and proper installation, operation, and maintenance of your NB P6 Full Motion Cantilever TV Wall Mount. Please read this manual thoroughly before beginning installation to ensure correct setup and to prevent damage to the product or your television.
The NB P6 mount is designed to securely hold flat panel displays, including LED, LCD, and Plasma TVs, ranging from 40 to 70 inches in size and weighing up to 45.5 kg (100 lbs). It offers full motion capabilities, allowing for extension, tilt, and swivel adjustments to achieve optimal viewing angles from various positions in your room.
2. Safety Information
WARNING: Failure to read and follow all instructions may result in personal injury, property damage, or voiding of your warranty. If you do not understand these instructions or have doubts about the safety of the installation, please contact a qualified installer.
- Do not install this product on walls that are not structurally sound or that exceed the maximum weight capacity of the mount.
- Ensure the mounting surface can safely support the combined weight of the mount and the television.
- Always use the provided hardware. If any parts are missing or defective, contact customer support for replacements.
- Do not overtighten screws, as this may cause damage to the mount or your television.
- Keep children and pets away during installation.
- This product is intended for indoor use only.
3. Package Contents
Before installation, verify that all components are present and undamaged. While specific quantities may vary, a typical package includes:
- Wall Plate Assembly
- TV Bracket Arms (Left and Right)
- Mounting Hardware Kit (various screws, washers, spacers for TV and wall)
- Integrated Cable Management Covers
- Installation Template
- User Manual
- All necessary tools for assembly (e.g., wrench, hex key)

Figure 3.1: Overview of the NB P6 Full Motion Cantilever TV Wall Mount. This image shows the main components of the wall mount, including the wall plate, articulated arms, and the TV mounting bracket.
4. Setup and Installation
The NB P6 mount is designed for easy installation. All necessary tools are included. Follow these steps carefully:
4.1 Pre-Installation Checks
- Wall Type: This mount is suitable for solid concrete walls, brick walls, or wood stud walls. Do not install on drywall alone.
- TV VESA Compatibility: Ensure your TV's VESA mounting pattern matches the mount's supported patterns: 200x200mm, 400x200mm, 400x400mm, and 600x400mm.
- Weight Capacity: Confirm your TV's weight does not exceed 45.5 kg (100 lbs).

Figure 4.1: Dimensional drawing of the NB P6 TV mount. This image illustrates the various dimensions of the mount, including extension range (2.2 to 19.5 inches from the wall), screen size compatibility (40-70 inches), and VESA patterns.
4.2 Attaching Brackets to TV
- Carefully place your TV face down on a soft, clean surface.
- Identify the VESA mounting holes on the back of your TV.
- Select the appropriate screws, washers, and spacers from the hardware kit that fit your TV's mounting holes.
- Attach the TV bracket arms to the back of your TV, ensuring they are level and securely fastened. The 'UP' indicator on the bracket should point upwards.
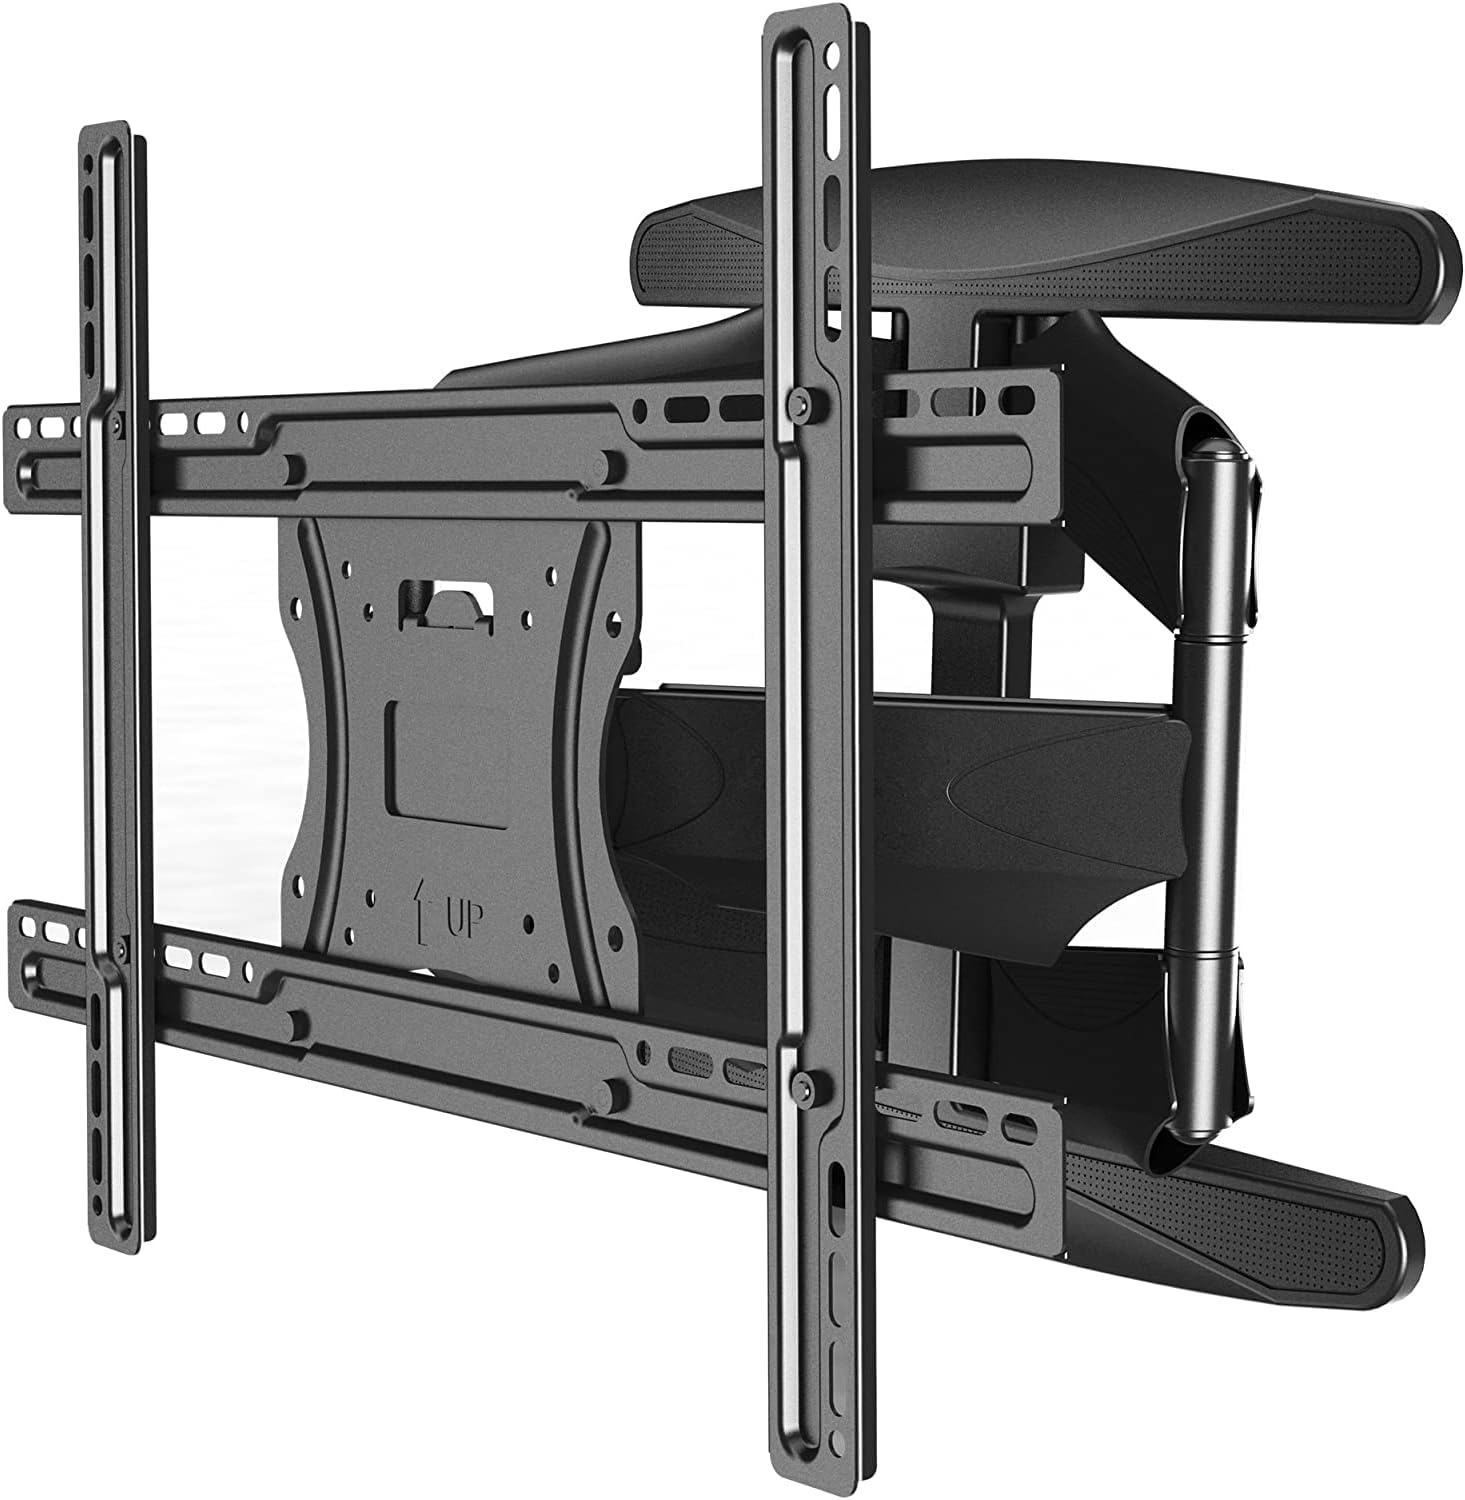
Figure 4.2: Rear view of the NB P6 TV mount with the TV bracket. This image shows the back of the TV mounting plate, highlighting the VESA holes and the 'UP' indicator for correct orientation.
4.3 Mounting the Wall Plate
- Determine the desired height for your TV. Use a stud finder to locate wood studs if applicable. The wall plate features a double stud design for strong and rigid wall installation.
- Place the wall plate against the wall at the desired height and mark the drilling locations through the holes. Use a level to ensure it is perfectly horizontal.
- Drill pilot holes at the marked locations. The size of the drill bit will depend on your wall type and the anchors used.
- Secure the wall plate to the wall using the appropriate lag bolts and washers. Ensure it is firmly attached and level.
4.4 Hanging the TV and Final Adjustments
- With assistance, carefully lift the TV with the attached brackets and hook them onto the wall plate. Ensure the TV is securely seated on the mount.
- Engage any safety locks or screws to prevent accidental dislodgement of the TV.
- Integrated Cable Management: Route your TV cables through the integrated cable management system within the mount's arms. This system neatly conceals cables and wires within the frame for a clean look.
- Screen Leveling Adjustment: To set parallelism of your screen after installation, simply release the two security nuts behind the tilt mechanism and tighten once the parallel of the screen has been set.

Figure 4.3: NB P6 TV mount features diagram. This image highlights key features such as low profile design, integrated cable management, arm extension, tilt angle adjustment, and screen leveling adjustment.
5. Operating Instructions
The NB P6 mount offers full motion flexibility to optimize your viewing experience:
- Extension: The articulated arm can extend your TV from 2.2 inches (ultra-slim low profile) up to 19.5 inches from the wall, allowing for easy access to cables or pulling the TV forward for viewing.
- Swivel: The mount allows for a 160-degree swivel (80 degrees left and 80 degrees right, depending on TV size and wall clearance). Gently push or pull the TV to the desired angle.
- Tilt: The tilt angle can be adjusted between +8 degrees (upwards) and -5 degrees (downwards) to reduce glare or achieve a comfortable viewing angle. To adjust the tilt, simply release the two nylon nuts at the side of the tilt mechanism, set to your desired angle, and then tighten the nuts to secure the position.

Figure 5.1: Angled view of the NB P6 TV mount. This image demonstrates the range of motion and articulation possible with the mount, showcasing its full-motion capabilities.
6. Maintenance
Regular maintenance ensures the longevity and safe operation of your TV wall mount:
- Periodically check all screws and bolts to ensure they remain tight and secure.
- Clean the mount with a soft, dry cloth. Avoid using abrasive cleaners or solvents.
- If the mount's movement becomes stiff, a small amount of silicone-based lubricant can be applied to the pivot points, avoiding contact with plastic parts.
7. Troubleshooting
If you encounter issues with your NB P6 TV Wall Mount, refer to the following common problems and solutions:
| Problem | Possible Cause | Solution |
|---|---|---|
| TV is not level after installation. | Mounting brackets or wall plate not perfectly level. | Use the screen leveling adjustment feature by loosening the two security nuts behind the tilt mechanism, adjusting the screen, and re-tightening. |
| Mount feels loose or wobbly. | Screws or bolts are not tightened sufficiently. | Check and tighten all mounting screws and bolts on both the wall plate and TV brackets. Ensure wall anchors are secure. |
| Difficulty moving the TV (swivel/extension). | Joints are stiff or overtightened. | Ensure no cables are obstructing movement. Apply a small amount of silicone-based lubricant to the pivot points if necessary. Do not force movement. |
| TV slides off the mount. | Safety locks/screws not engaged. | Ensure all safety mechanisms are properly engaged after hanging the TV. Re-read installation steps carefully. |
8. Specifications
| Feature | Specification |
|---|---|
| Brand | NB North Bayou |
| Model Number | 1001030579 (P6) |
| Compatible TV Sizes | 40 - 70 inches |
| Maximum Load Capacity | 45.5 kg (100 lbs) |
| VESA Compatibility | 200x200mm, 400x200mm, 400x400mm, 600x400mm |
| Tilt Angle | +8° to -5° |
| Swivel Angle | 160° |
| Extension from Wall | 2.2 inches (min) to 19.5 inches (max) |
| Mount Type | Wall Mount, Full Motion, Articulated Arm |
| Material | Plastic (likely referring to covers/trim, main structure is metal) |
| Color | Black |
| Product Dimensions | 95 x 55 x 55 cm; 3 kg (Shipping/Package dimensions) |
9. Warranty and Support
For warranty information or technical support, please refer to the product packaging or contact the manufacturer directly. Keep your purchase receipt as proof of purchase for any warranty claims.
For further assistance, you may also visit the official NB North Bayou website or contact their customer service department.