1. Introduction
The YATO YT-73091 Digital Clamp Meter is a versatile electrical testing instrument designed for basic electrical measurements. It features an automatic ranging function for most indications and specialized clamps for measuring alternating current (AC) in a single conductor using the induction method. This allows for current measurement without disconnecting the circuit or power source, enabling the measurement of higher currents than conventional multimeters. This manual provides essential information for the safe and effective use of your device.
2. Safety Information
Always observe basic safety precautions when using this device to reduce the risk of fire, electric shock, or personal injury. Read all instructions carefully before use.
- Do not attempt to measure voltages or currents exceeding the specified maximum limits of the device.
- Ensure the test leads are in good condition and properly connected before making any measurements.
- Never touch the bare wires or terminals when the circuit is live.
- Use caution when working with voltages above 60V DC or 30V AC RMS, as these pose a shock hazard.
- Always turn off the power to the circuit before connecting or disconnecting test leads for resistance or continuity measurements.
- Do not operate the meter if it appears damaged or if the casing is open.
- Replace batteries promptly when the low battery indicator appears to ensure accurate readings.
3. Product Overview
The YATO YT-73091 Digital Clamp Meter consists of the main unit, test leads, and a temperature probe. Familiarize yourself with the components shown below.

This image displays the YATO YT-73091 Digital Clamp Meter, highlighting its main body with the clamp jaws, rotary dial, LCD screen, and input jacks. The red and black test leads, along with a temperature probe, are also shown alongside the meter.
3.1 Key Components
- Clamp Jaws: Used for non-contact measurement of AC current.
- Rotary Function Dial: Selects the desired measurement function (Voltage, Current, Resistance, etc.).
- LCD Display: Shows measurement readings, units, and function indicators.
- Input Jacks: For connecting test leads (COM, VΩ, mA).
- Function Buttons: Include FUNC (function selection), RANGE (manual range), MAX (maximum value hold), DATA (data hold).

This image provides a closer look at the operational face of the YATO YT-73091, showing the LCD screen, the central rotary dial with various measurement settings (V, A, Ω, T, diode, continuity), and the control buttons for functions like RANGE, MAX, and DATA. Icons for Auto Power Off and Auto Range are also visible.
4. Setup
4.1 Battery Installation
The YATO YT-73091 typically uses standard batteries. To install or replace batteries:
- Ensure the meter is turned OFF.
- Locate the battery compartment cover on the back of the meter.
- Unscrew the retaining screw(s) and remove the cover.
- Insert new batteries, observing the correct polarity (+ and -).
- Replace the battery compartment cover and secure it with the screw(s).
4.2 Connecting Test Leads
For most voltage, resistance, continuity, and temperature measurements, connect the test leads as follows:
- Insert the black test lead into the COM (common) input jack.
- Insert the red test lead into the VΩ input jack for voltage, resistance, continuity, and temperature measurements.
For AC current measurements, the clamp jaws are used, and test leads are generally not required unless simultaneous voltage measurement is needed.
5. Operating Instructions
This section details how to perform various measurements with your YATO YT-73091 Digital Clamp Meter.
5.1 Automatic Ranging (AUTO Function)
The meter features an AUTO function, which automatically adjusts the measuring range. This is beneficial when measuring unknown values, as it eliminates the need to manually select ranges from largest to smallest to avoid damaging the device. By default, the meter starts in AUTO mode.
5.2 Manual Ranging (RANGE Function)
While AUTO mode is convenient, you can manually change the measuring range using the RANGE button if a specific range is desired or for faster readings in a known range.
5.3 AC Current Measurement (0-600A)
To measure AC current:
- Turn the rotary dial to the AC Current (A~) position.
- Open the clamp jaws by pressing the trigger.
- Encircle only one conductor of the circuit with the clamp jaws. Ensure the jaws are fully closed around the conductor.
- Read the current value on the LCD display.
Important: The clamp meter measures current inductively. For accurate readings, only a single conductor should be placed within the jaws. Placing multiple conductors (e.g., both live and neutral wires) will result in a zero or incorrect reading.
5.4 AC/DC Voltage Measurement (0-600V)
To measure AC or DC voltage:
- Connect the black test lead to the COM jack and the red test lead to the VΩ jack.
- Turn the rotary dial to the AC Voltage (V~) or DC Voltage (V-) position.
- Carefully touch the test probes to the points in the circuit where you want to measure voltage.
- Read the voltage value on the LCD display.
5.5 Resistance Measurement (0-20MΩ)
To measure resistance:
- Ensure the circuit is de-energized before connecting the test leads.
- Connect the black test lead to the COM jack and the red test lead to the VΩ jack.
- Turn the rotary dial to the Resistance (Ω) position.
- Touch the test probes across the component or circuit path you wish to measure.
- Read the resistance value on the LCD display.
5.6 Continuity Test (0-120Ω)
To perform a continuity test:
- Ensure the circuit is de-energized.
- Connect the black test lead to the COM jack and the red test lead to the VΩ jack.
- Turn the rotary dial to the Continuity (speaker icon) position.
- Touch the test probes across the component or circuit path. If continuity exists (resistance below approximately 120Ω), the meter will emit an audible beep.
5.7 Temperature Measurement (-20 to 1000 °C)
To measure temperature:
- Connect the temperature probe to the appropriate input jacks (usually the COM and VΩ jacks, or dedicated temperature jacks if present).
- Turn the rotary dial to the Temperature (°C) position.
- Place the tip of the temperature probe on or near the object whose temperature you wish to measure.
- Read the temperature value on the LCD display.
5.8 Measurement Accuracy and Error
The accuracy of the YT-73091 meter is specified as a percentage of the reading plus a number of digits. For example, for AC current measurement, the accuracy is ± (2.5% + 5 digits), with a resolution of 0.1A.
To calculate the measurement error for a reading of 30A AC:
- Error = (30A * 2.5%) + (5 * 0.1A) = 0.75A + 0.5A = 1.25A
- Therefore, a reading of 30A would be 30A ± 1.25A.
Note: The YT-73091 meter does not feature True RMS measurement. Therefore, the displayed RMS voltage and AC current values are accurate only for pure sinusoidal waveforms.
6. Maintenance
6.1 Cleaning
Wipe the meter casing with a damp cloth and mild detergent. Do not use abrasives or solvents. Ensure the meter is dry before use.
6.2 Battery Replacement
Replace batteries as described in Section 4.1 when the low battery indicator appears on the display. Always use the specified battery type.
6.3 Storage
When not in use for extended periods, remove the batteries to prevent leakage. Store the meter in a cool, dry place, away from direct sunlight and extreme temperatures.
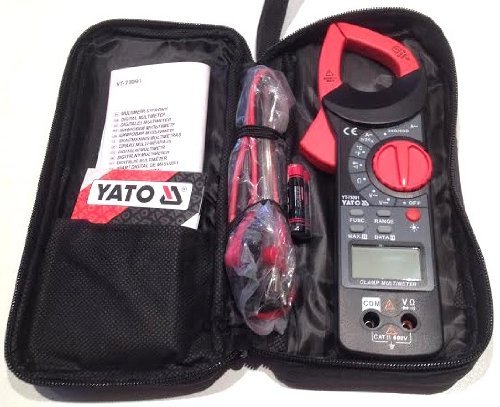
This image shows the YATO YT-73091 clamp meter, test leads, and instruction manual neatly organized within a black zippered carrying case, demonstrating proper storage for protection and portability.
7. Troubleshooting
- No Display / Weak Display: Check battery installation and replace batteries if necessary. Ensure the rotary dial is not in the OFF position.
- Incorrect Readings:
- Ensure the correct function is selected on the rotary dial.
- Verify test leads are properly connected and not damaged.
- For AC current, ensure only one conductor is within the clamp jaws.
- For resistance/continuity, ensure the circuit is de-energized.
- Consider the accuracy specifications and potential measurement error.
- No Continuity Beep: Ensure the circuit is de-energized and the resistance is below the continuity threshold (approx. 120Ω).
8. Specifications
| Feature | Specification |
|---|---|
| Model Number | YT-73091 |
| AC Voltage Measurement | 0-600V |
| DC Voltage Measurement | 0-600V |
| AC Current Measurement | 0-600A |
| Resistance Measurement | 0-20MΩ |
| Continuity Test | 0-120Ω |
| Temperature Measurement | -20 to 1000 °C |
| Power Source | Corded Electric (Note: This refers to the type of circuits it can measure, the meter itself is typically battery-powered.) |
| Item Weight | 0.34 Kilograms (337 g) |
| Dimensions (L x W x H) | 23 x 8 x 2.9 Centimeters |
| Manufacturer | YATO |
| Country of Origin | China |
Note: Specifications are subject to change without notice. Refer to the product packaging or official Yato website for the most current information.
9. Warranty and Support
For warranty information, technical support, or service inquiries regarding your YATO YT-73091 Digital Clamp Meter, please refer to the warranty card included with your product or contact Yato customer service directly. Contact details can typically be found on the manufacturer's official website or product packaging.


