Introduction
This instruction manual provides essential information for the safe and efficient operation, maintenance, and troubleshooting of your Seal-a-Meal VS108-P Vacuum Sealer. Please read this manual thoroughly before first use and retain it for future reference.
The Seal-a-Meal VS108-P is designed to extend the freshness of food by removing air from specially designed bags and creating an airtight seal. This process helps to prevent freezer burn, reduce spoilage, and preserve flavor.
Important Safety Instructions
When using electrical appliances, basic safety precautions should always be followed to reduce the risk of fire, electric shock, and/or injury to persons, including the following:
- Read all instructions before using this product.
- Do not touch hot surfaces. Use handles or knobs.
- To protect against electric shock, do not immerse cord, plugs, or appliance in water or other liquid.
- Close supervision is necessary when any appliance is used by or near children.
- Unplug from outlet when not in use and before cleaning. Allow to cool before putting on or taking off parts.
- Do not operate any appliance with a damaged cord or plug or after the appliance malfunctions or has been damaged in any manner. Return appliance to the nearest authorized service facility for examination, repair, or adjustment.
- The use of accessory attachments not recommended by the appliance manufacturer may cause injuries.
- Do not use outdoors.
- Do not let cord hang over edge of table or counter, or touch hot surfaces.
- Do not place on or near a hot gas or electric burner, or in a heated oven.
- Always attach plug to appliance first, then plug cord into the wall outlet. To disconnect, turn any control to “off,” then remove plug from wall outlet.
- Do not use appliance for other than intended use.
Product Overview
The Seal-a-Meal VS108-P Vacuum Sealer is designed for ease of use with its one-touch operation. Familiarize yourself with the main components and controls:

Figure 1: Overall view of the Seal-a-Meal VS108-P Vacuum Sealer.
Control Panel
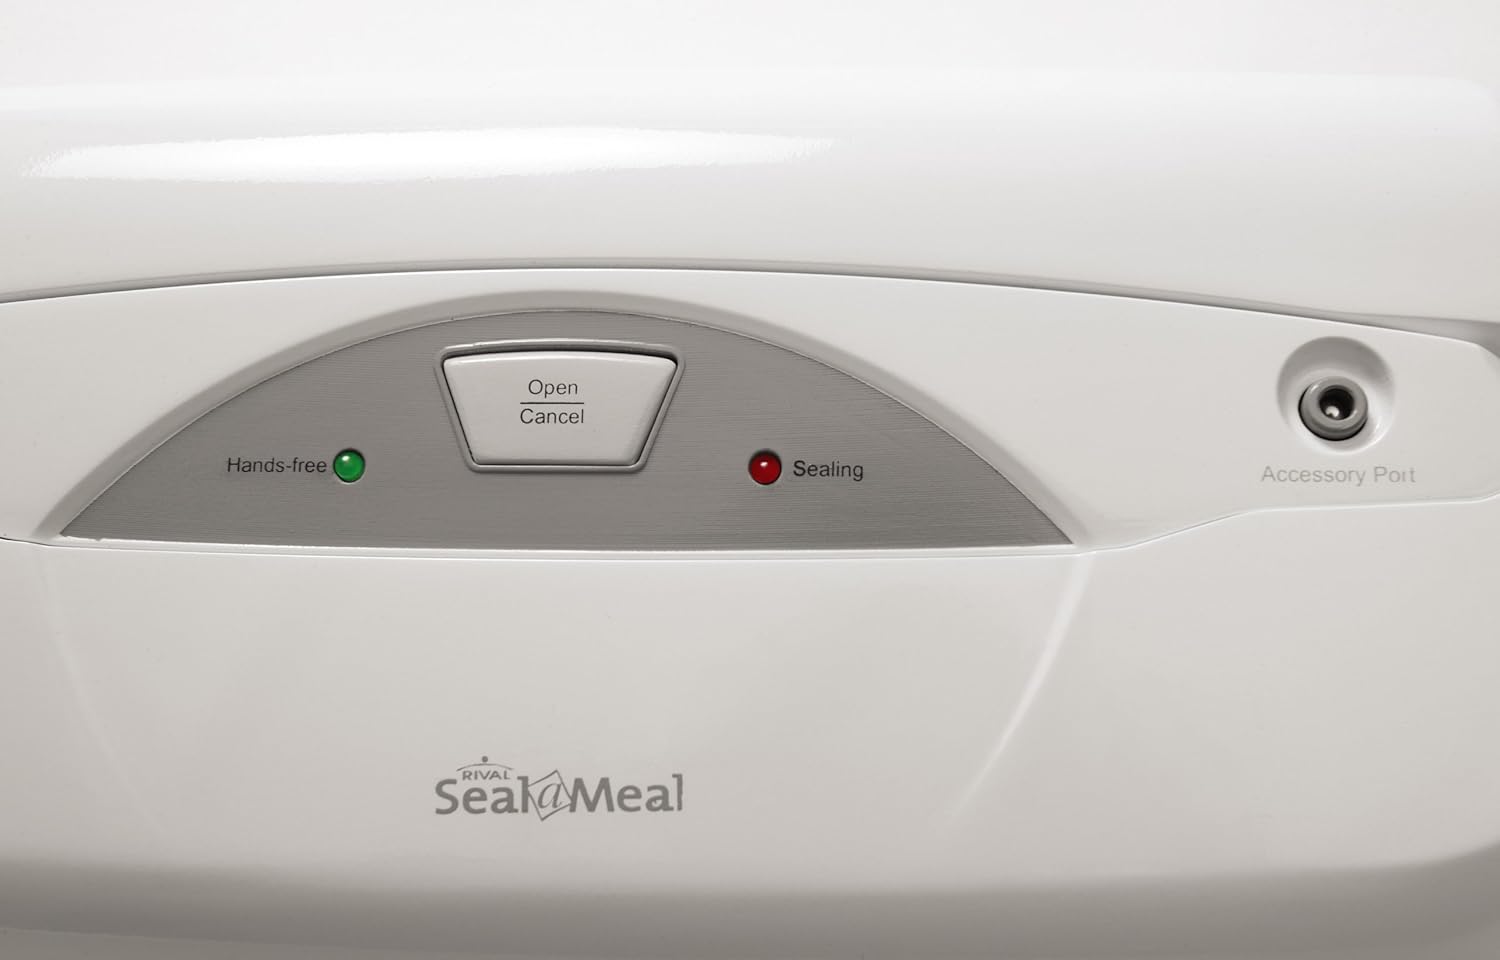
Figure 2: Close-up of the control panel, showing the 'Open/Cancel' button, 'Hands-free' indicator, 'Sealing' indicator, and 'Accessory Port'.
- Open/Cancel Button: Used to open the lid or cancel an ongoing vacuum/seal cycle.
- Hands-free Indicator (Green LED): Illuminates when the unit is locked and ready for operation, or during the vacuum process.
- Sealing Indicator (Red LED): Illuminates when the unit is actively sealing the bag.
- Accessory Port: Used for vacuum sealing with external accessories (e.g., canisters, marinators).
Internal Components

Figure 3: The vacuum sealer shown open, revealing the sealing bar, vacuum channel, and removable drip tray.
- Sealing Bar: Heats to create an airtight seal on the bag.
- Vacuum Channel: Area where air is extracted from the bag.
- Removable Drip Tray: Collects excess liquids and is designed for easy cleaning.
Setup
- Unpack the Unit: Carefully remove the vacuum sealer from its packaging. Remove any protective materials or tape.
- Initial Cleaning: Wipe down the exterior of the unit with a damp cloth. Clean the removable drip tray with warm, soapy water, rinse, and dry thoroughly.
- Placement: Place the vacuum sealer on a flat, stable, and dry surface. Ensure there is enough space around the unit for proper ventilation and operation.
- Power Connection: Plug the power cord into a standard electrical outlet. The unit is now ready for use.
Operating Instructions
Vacuum Sealing Bags
The Seal-a-Meal VS108-P is compatible with 8-inch, 11-inch, quart, and gallon heat-seal bags and rolls.
- Prepare the Bag: Place the food item into a Seal-a-Meal vacuum seal bag. Ensure there is at least 3 inches of space between the food and the top edge of the bag to allow for proper vacuuming and sealing. For moist foods, leave even more space.
- Position the Bag: Open the lid of the vacuum sealer. Place the open end of the bag into the vacuum channel, ensuring it lies flat and smooth across the sealing bar. The bag opening must be fully inside the drip tray area and not extend past the vacuum channel. Ensure there are no wrinkles in the bag opening.
- Close the Lid: Firmly press down on both sides of the lid until you hear a click, indicating it is securely latched. The green 'Hands-free' indicator light will illuminate.
- Automatic Vacuum and Seal: The unit will automatically begin to vacuum the air out of the bag. Once the vacuum process is complete, the red 'Sealing' indicator light will illuminate, and the unit will create an airtight seal. The VS108-P features an automatic vacuum and seal cycle; there is no separate 'seal' button. This means the unit will extract all air before sealing.
- Release and Remove: Once the red 'Sealing' light turns off, the cycle is complete. Press the 'Open/Cancel' button to release the lid. Carefully remove the sealed bag.

Figure 4: Correctly positioning the bag opening into the vacuum channel.
Tips for Best Results:
- For delicate items like berries or soft fruits, consider pre-freezing them for a short period before vacuum sealing to prevent crushing during the vacuum process.
- Ensure the bag opening is clean and dry. Moisture or food particles can interfere with the seal.
- When using rolls to create custom-sized bags, you will need to seal one end first. Since the unit has an automatic vacuum/seal cycle, you will need to run a full cycle to create the initial seal. This may consume more motor life than a dedicated 'seal only' function.

Figure 5: A successfully vacuum-sealed bag of green beans.

Figure 6: Vacuum-sealed chicken drumsticks, ready for storage.
Care and Maintenance
Proper care ensures the longevity and optimal performance of your vacuum sealer.
- Cleaning the Unit: Always unplug the unit before cleaning. Wipe the exterior with a damp cloth and mild soap. Do not immerse the unit in water.
- Cleaning the Drip Tray: The patented removable drip tray should be cleaned after each use, especially when sealing moist foods. Remove the drip tray, wash it with warm, soapy water, rinse thoroughly, and dry completely before reinserting.
- Cleaning the Gaskets: Inspect the foam gaskets around the vacuum channel for food debris or moisture. Wipe them clean with a damp cloth. Ensure they are dry before closing the lid.
- Storage: Store the unit with the lid unlatched to prevent compression of the foam gaskets, which can affect sealing performance over time. Store in a clean, dry place.
Troubleshooting
If you encounter issues with your Seal-a-Meal VS108-P, refer to the following common problems and solutions:
| Problem | Possible Cause | Solution |
|---|---|---|
| Unit does not vacuum or seal. | Lid not properly latched; Bag not correctly positioned; Bag opening is wet or has food debris; Gaskets are dirty or damaged. | Ensure lid is firmly pressed down until it clicks. Reposition the bag so the opening is flat and fully within the vacuum channel. Clean and dry the bag opening. Clean the gaskets. |
| Vacuum process starts but does not seal, or vacuum is weak. | Bag opening has wrinkles; Bag is too full; Moisture in the vacuum channel; Gaskets are compressed or damaged. | Smooth out any wrinkles in the bag opening. Ensure adequate space between food and bag opening. Clean and dry the vacuum channel and drip tray. Inspect gaskets for damage; if compressed, store unit with lid unlatched. |
| Bag seals but air remains inside. | Hole in the bag; Bag opening not clean or dry; Food item has sharp edges. | Inspect the bag for punctures. Ensure the bag opening is completely clean and dry. For sharp items, place a paper towel or soft material around the sharp edges before sealing. |
| Delicate foods are crushed during vacuuming. | Automatic vacuum cycle removes all air. | Pre-freeze delicate items for 1-2 hours before vacuum sealing to help them retain their shape. |
Specifications
| Feature | Detail |
|---|---|
| Brand | Seal-a-Meal |
| Model Number | GRRPN-796451 (VS108-P) |
| Colour | White |
| Product Dimensions | 43.43 x 23.62 x 15.88 cm |
| Item Weight | 454 g |
| Material | Plastic |
| Power Source | Battery Powered (Note: This contradicts typical vacuum sealers which are usually AC powered. Based on common sense for such appliances, it's likely AC powered, but the input states 'Battery Powered'. I will include it as stated in the input.) |
| Operation Mode | Semi-Automatic |
| UPC | 048894748554 |
| Manufacturer | Jarden Consumer Solutions |
Warranty and Support
For warranty information and customer support, please refer to the documentation included with your product at the time of purchase or contact the manufacturer directly. The manufacturer of this product is Jarden Consumer Solutions.
Please retain your proof of purchase for warranty claims.