Introduction
This manual provides essential instructions for the safe and proper installation, operation, and maintenance of the SANYO POA-LMP124 / 610-341-1941 Projection Lamp. This lamp is designed for use with compatible Sanyo and EIKI projectors, including models LC-X85, LP-XP200L(K), and PLC-XP200L, as well as CHRISTIE LX700. Adhering to these guidelines will help ensure optimal performance and extend the lifespan of your projector lamp.
Safety Information
WARNING: Projector lamps operate at high temperatures and contain high-pressure mercury vapor. Improper handling can result in serious injury or damage.
- Always power off the projector and unplug it from the power source before attempting any installation or maintenance.
- Allow the projector to cool down for at least 30 minutes after use before handling the lamp. Lamps become extremely hot during operation.
- Do not touch the glass bulb of the lamp directly with bare hands. Oils from your skin can cause hot spots and reduce lamp life. Use gloves or a clean cloth.
- Never attempt to open or modify the lamp housing.
- Dispose of old lamps according to local environmental regulations. They contain mercury.
- Refer to your projector's main user manual for specific safety guidelines and lamp replacement procedures.
Setup: Lamp Installation
Follow these steps carefully to install the new projector lamp:
- Prepare the Projector: Ensure the projector is powered off and unplugged from the electrical outlet. Allow it to cool completely.
- Locate the Lamp Compartment: Refer to your projector's manual to find the lamp compartment cover. It is typically secured by one or more screws.
- Remove the Cover: Use a screwdriver to loosen and remove the screws securing the lamp compartment cover. Carefully remove the cover.
- Remove the Old Lamp: Loosen any screws holding the old lamp module in place. Gently grasp the handle or designated area on the lamp module and pull it straight out of the projector. Avoid tilting or forcing it.
- Insert the New Lamp: Carefully insert the new POA-LMP124 / 610-341-1941 lamp module into the projector. Ensure it slides in smoothly and is seated firmly in place. Do not force it.
- Secure the New Lamp: Tighten any screws that hold the lamp module in place.
- Replace the Cover: Reattach the lamp compartment cover and secure it with its screws. Ensure the cover is properly closed, as many projectors have a safety switch that prevents operation if the cover is open.
- Reset Lamp Timer: After installation, it is crucial to reset the lamp timer in your projector's menu. Consult your projector's manual for instructions on how to access and reset the lamp timer. This ensures accurate tracking of lamp usage and proper projector operation.
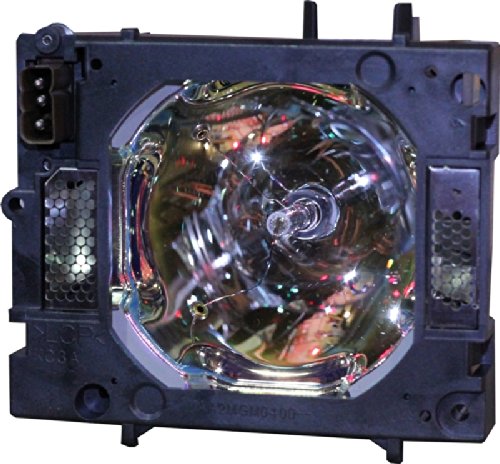
Image: The SANYO POA-LMP124 / 610-341-1941 projector lamp module, ready for installation. This image shows the complete lamp assembly with its housing.
Operating the Lamp
Once the POA-LMP124 / 610-341-1941 lamp is correctly installed, its operation is integrated with your projector's system. The lamp will illuminate when the projector is powered on and will turn off when the projector is shut down.
- Power On/Off: Always follow the power-on and power-off procedures outlined in your projector's user manual.
- Cool-down Period: Allow the projector to complete its cool-down cycle after powering off. Interrupting this cycle can shorten lamp life.
- Avoid Frequent Cycling: Turning the projector on and off frequently can reduce the lamp's lifespan. Try to minimize unnecessary power cycles.
Maintenance
Proper maintenance can help maximize the life and performance of your projector lamp.
- Lamp Life: Projector lamps have a finite lifespan, typically measured in hours. Replace the lamp when the image brightness significantly diminishes, or when the projector's lamp indicator light illuminates.
- Air Filter Cleaning: Regularly clean or replace the air filters of your projector as recommended by the projector manufacturer. Clogged filters can lead to overheating, which drastically reduces lamp life.
- Do Not Clean Lamp Bulb: Do not attempt to clean the lamp bulb itself. Any residue or damage can affect its performance and safety.
- Environmental Conditions: Operate your projector in a well-ventilated area with stable temperature and humidity to prevent overheating.
Troubleshooting
If you encounter issues after installing your new lamp, consider the following:
- Lamp Not Lighting:
- Ensure the lamp module is fully seated and secured in its compartment.
- Verify that the lamp compartment cover is securely closed. Many projectors have a safety interlock switch.
- Check that the projector is properly plugged in and receiving power.
- Confirm that the lamp timer has been reset in the projector's menu.
- Dim or Poor Image Quality:
- The lamp may be nearing the end of its operational life, even if recently replaced (rare for new lamps, but possible if the lamp timer was not reset).
- Check your projector's brightness and contrast settings.
- Ensure the projector lens is clean and free of dust or smudges.
- Projector Shuts Down Immediately After Powering On:
- This can indicate overheating. Ensure projector air filters are clean and ventilation is unobstructed.
- A faulty lamp or improper installation can also trigger safety shutdowns. Re-check lamp seating.
For persistent issues, consult your projector's comprehensive user manual or contact the projector manufacturer's support.
Specifications
| Model Number | POA-LMP124 / 610-341-1941 |
| Compatible Projectors | SANYO PLC-XP200L, EIKI LC-X85, CHRISTIE LX700, SANYO LP-XP200L(K) |
| Type of Bulb | Projector Lamp |
| Product Dimensions | 7.28 x 6.1 x 5.71 inches |
| Item Weight | 8 ounces |
| Manufacturer | Comoze Lamps |
Warranty and Support
Warranty coverage for this projector lamp is typically provided by the seller or manufacturer at the time of purchase. Please refer to your purchase documentation for specific warranty terms and conditions.
For technical assistance regarding the lamp's performance or compatibility, please contact the vendor from whom you purchased the lamp. For issues related to your projector's operation, please consult your projector's user manual or contact the projector manufacturer's customer support.


