
Introduction
The Cleanblend Commercial Blender is a high-performance countertop appliance designed for a wide range of blending tasks, from pulverizing ice to preparing hot soups. Featuring a powerful 3 HP, 1800-watt motor and an 8-blade stainless steel system, it delivers smooth and consistent results. Its 64oz BPA-free pitcher is ideal for large batches, making it suitable for both home and commercial use. This manual provides essential information for safe and effective operation, maintenance, and troubleshooting.
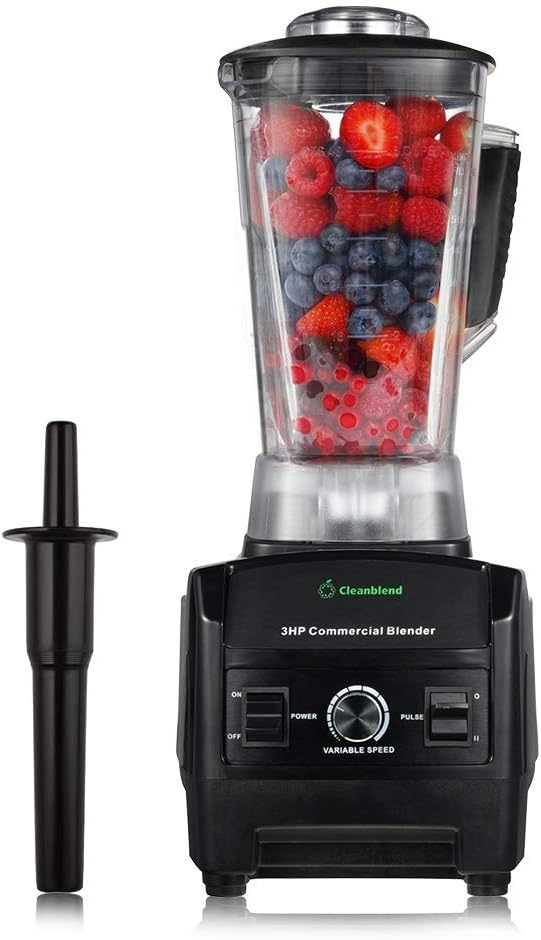
Figure 1: The Cleanblend Commercial Blender, featuring a powerful 3 HP, 1800-watt motor, a 64oz BPA-free pitcher, and stainless steel blades. It is designed for high-performance blending of various ingredients.
Important Safety Information
Please read all instructions carefully before using the Cleanblend Commercial Blender. Failure to follow these instructions may result in injury or damage to the appliance.
- General Safety: NOT FOR USE FOR ANYTHING OTHER THAN FOODS. DO NOT BLEND YOUR PHONE. PLEASE READ USER MANUAL FULLY BEFORE USE. 120V USE ONLY. NOT TO BE USED OUTSIDE THE USA OR CANADA.
- Always ensure the lid is securely in place before operating the blender.
- Do not operate the blender with damaged cord or plug.
- Keep hands and utensils out of the container while blending to reduce the risk of severe injury to persons or damage to the blender.
- Never immerse the motor base in water or other liquids.
- Unplug the blender from the outlet when not in use, before putting on or taking off parts, and before cleaning.
- Supervise children closely when the appliance is in use.
Setup
Unpacking
- Carefully remove all components from the packaging.
- Inspect all parts for any signs of damage. If any damage is found, do not use the blender and contact customer support.
- Remove any protective materials or stickers from the blender.
Assembly
- Place the motor base on a clean, dry, and stable surface.
- Ensure the 64oz pitcher is clean and dry. Place it securely onto the motor base, aligning the pitcher with the base.
- Place the lid firmly onto the pitcher. Ensure the lid is properly sealed to prevent spills during operation.
- The tamper can be inserted through the opening in the lid when needed during blending.

Figure 2: Ensure all components are securely assembled before operation. The 64oz pitcher is designed for large batches.
Operating Instructions
Controls Overview
The Cleanblend Commercial Blender features intuitive controls for precise blending:
- Power Switch: Located on the left, this switch turns the blender ON or OFF.
- Variable Speed Dial: The central dial allows you to adjust the blending speed from low to high, providing control over consistency.
- Pulse Switch: Located on the right, this switch provides short bursts of high-speed blending, ideal for chopping or quick mixing.
Basic Blending
- Add ingredients to the pitcher. For best results, add liquids first, followed by soft ingredients, then harder ingredients, and finally ice or frozen items.
- Securely place the lid on the pitcher.
- Ensure the power switch is in the OFF position before plugging the blender into a 120V outlet.
- Turn the power switch to ON.
- Start with a low speed using the variable speed dial and gradually increase to your desired speed.
- For quick bursts, use the Pulse switch.
- Once blending is complete, turn the power switch to OFF and unplug the blender.
Using the Tamper
The tamper is designed to push thick or frozen ingredients down towards the blades without interfering with their operation. Use it when ingredients are not circulating freely.
- With the blender running, remove the small cap from the center of the lid.
- Insert the tamper through the opening and use it to push ingredients towards the blades.
- Never use any other utensil or your hand to push ingredients while the blender is operating.
- Always replace the small cap after using the tamper.

Figure 3: The tamper allows you to push ingredients towards the blades without stopping the machine, especially useful for thick mixtures.
Maintenance and Cleaning
Daily Cleaning
- After each use, rinse the pitcher and lid with warm water.
- For a quick clean, fill the pitcher halfway with warm water and a drop of dish soap. Secure the lid and run the blender on high speed for 30-60 seconds.
- Rinse thoroughly and allow to air dry.
Deep Cleaning
- Unplug the blender.
- Separate the pitcher from the motor base.
- Wash the pitcher, lid, and tamper with warm, soapy water. The BPA-free pitcher and stainless steel blades are designed for easy cleaning.
- Wipe the motor base with a damp cloth. Never immerse the motor base in water.
- Ensure all parts are completely dry before reassembling or storing.

Figure 4: The 64oz BPA-free pitcher is designed for easy cleaning after use.
Troubleshooting
If you encounter any issues with your Cleanblend Commercial Blender, refer to the table below for common problems and their solutions.
| Problem | Solution |
|---|---|
| Blender not turning on. | Ensure the power cord is securely plugged into a working 120V outlet. Check that the pitcher is correctly seated on the motor base. |
| Ingredients not blending smoothly. | Add more liquid to the mixture. Use the tamper to push ingredients towards the blades. Increase the blending speed gradually. |
| Motor smells burnt or overheats. | Stop operation immediately and unplug the blender. Allow the motor to cool down for at least 30 minutes. Ensure the blender is not overloaded with ingredients. |
| Leaking from pitcher base. | Ensure the pitcher is securely attached to the motor base. Check the pitcher for any cracks or damage. |
Specifications
| Feature | Detail |
|---|---|
| Brand | Cleanblend |
| Model | 2001 |
| Power | 1800 Watts (3 HP) |
| Capacity | 64 Fluid Ounces |
| Product Dimensions | 8"D x 8"W x 19"H |
| Blade Material | Stainless Steel |
| Material Type Free | BPA Free |
| Voltage | 120 Volts |
| Included Components | Blender, 64 ounce container, lid, tamper, warranty booklet |
Warranty and Support
The Cleanblend Commercial Blender comes with a comprehensive 5-year warranty, covering defects in materials and workmanship under normal household use. This warranty reflects Cleanblend's commitment to quality and customer satisfaction.
For warranty claims, technical support, or any inquiries, please refer to the warranty booklet included with your product or visit the official Cleanblend website for contact information.

Figure 5: Cleanblend offers a 5-year warranty, reflecting confidence in the product's durability and performance.