1. Introduction
The Velleman MK188 is a versatile 1S-60H Pulse/Pause Timer kit designed for various timing applications. This kit requires assembly, including soldering, and provides a wide range of timing options for both pulse and pause durations. It can operate in 'single shot' or 'loop' modes, making it suitable for diverse control tasks.
This manual provides essential information for the assembly, operation, and maintenance of your Velleman MK188 timer.
2. Product Features
- Wide timing range: 1 second to 60 hours.
- Easy time setting via onboard potentiometers.
- Selectable start with 'pulse' or 'pause' function.
- 'Single shot' or 'loop' operation mode selection.
3. Assembly Instructions
The Velleman MK188 is supplied as a kit and requires assembly, including soldering of electronic components onto the printed circuit board (PCB). Detailed, step-by-step assembly instructions are included with the physical product packaging. Please refer to those specific instructions for component placement, soldering techniques, and wiring diagrams.
Important: Basic soldering skills are required for the successful assembly of this kit. Ensure all components are correctly oriented before soldering, especially polarized components like diodes, electrolytic capacitors, and integrated circuits (ICs).
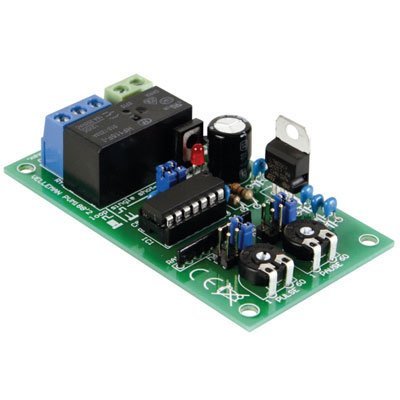
Figure 3.1: Assembled Velleman MK188 Pulse/Pause Timer Kit. This image shows the completed circuit board with all components mounted, including the relay, IC, potentiometers, and terminal blocks.
4. Operating Instructions
4.1 Power Supply
Connect a suitable DC power supply (typically 12V to 24V DC, refer to the kit's specific documentation for exact voltage range) to the designated power input terminals on the PCB. Ensure correct polarity.
4.2 Time Setting
The MK188 features two potentiometers (variable resistors) for setting the pulse (ON) and pause (OFF) durations. These are typically labeled "PULSE" and "PAUSE".
- Pulse Duration: Adjust the "PULSE" potentiometer to set the desired ON time.
- Pause Duration: Adjust the "PAUSE" potentiometer to set the desired OFF time.
The timing range is from 1 second to 60 hours, adjustable via these controls. Fine-tuning may require experimentation to achieve precise timings.
4.3 Mode Selection
The timer offers different operational modes, typically selected via jumpers or switches on the PCB:
- Start with Pulse/Pause: Select whether the timer begins its cycle with the ON (pulse) state or the OFF (pause) state.
- Single Shot/Loop:
- Single Shot: The timer executes one complete pulse/pause cycle and then stops.
- Loop (Continuous): The timer continuously repeats the pulse/pause cycle until power is removed.
Refer to the specific documentation included with your kit for the exact location and configuration of these mode selection jumpers or switches.
4.4 Output Connection
The timer typically provides a relay output. Connect the device you wish to control to the relay's normally open (NO) or normally closed (NC) contacts and the common (COM) terminal, according to your application's requirements. Ensure the load's voltage and current ratings do not exceed the relay's specifications.
5. Applications
The Velleman MK188 timer is suitable for a variety of applications requiring precise pulse and pause timing:
- Blinking of lights or indicator LEDs.
- Pulsed operation of buzzers or alarms.
- Automatic irrigation systems.
- Cycling control for various electronic devices.
6. Specifications

Figure 6.1: Velleman MK188 Pulse/Pause Timer Kit with key dimensions indicated.
| Feature | Value |
|---|---|
| Model Number | MK188 |
| Timing Range | 1 second to 60 hours |
| Power Supply | Typically 12V to 24V DC (refer to kit documentation) |
| Output Type | Relay output |
| Product Dimensions | 0.86"D x 1.78"W x 3.15"H (approx. 2.18cm D x 4.52cm W x 8.00cm H) |
| Item Weight | 2.4 ounces (approx. 68 grams) |
| Number of Settings | 3 (Pulse, Pause, Mode) |
| Manufacturer | Velleman |
7. Maintenance
The Velleman MK188 timer is designed for reliable operation with minimal maintenance. However, periodic checks can help ensure longevity:
- Cleaning: Keep the circuit board free from dust and debris. Use a soft, dry brush or compressed air for cleaning. Avoid liquids.
- Connections: Periodically inspect all wire connections to the terminal blocks to ensure they are secure and free from corrosion.
- Environment: Operate the timer within its specified environmental conditions (temperature, humidity) to prevent damage.
8. Troubleshooting
If the Velleman MK188 timer does not function as expected, consider the following troubleshooting steps:
- No Power/Indicator Light Off:
- Verify the power supply is connected correctly and providing the specified voltage (e.g., 12-24V DC).
- Check for correct polarity of the power connection.
- Inspect all soldered joints for continuity and cold solder joints, especially around the power input and IC.
- Incorrect Timing:
- Ensure the "PULSE" and "PAUSE" potentiometers are correctly adjusted.
- Verify that the mode selection jumpers/switches (Start with Pulse/Pause, Single Shot/Loop) are set as desired.
- Check for any short circuits or open circuits on the PCB that might affect timing components.
- Relay Not Activating:
- Confirm the timer is receiving power and the indicator LED (if present) is functioning.
- Check the connections to the relay output terminals (COM, NO, NC).
- Ensure the load connected to the relay is within its voltage and current specifications.
- General Assembly Issues:
- Double-check all component orientations, especially diodes, electrolytic capacitors, and ICs.
- Inspect for any solder bridges between traces or component leads.
- Ensure all components are fully seated and soldered securely.
If issues persist after following these steps, contact Velleman technical support for further assistance.
9. Warranty and Support
Velleman products are typically covered by a manufacturer's warranty against defects in materials and workmanship. The specific terms and duration of the warranty may vary. Please refer to the warranty information provided with your product packaging or visit the official Velleman website for details.
For technical support, assembly assistance, or warranty claims, please contact Velleman customer service through their official website or the contact information provided in your product documentation.


