Introduction
The Carex Transfer Bench is designed to provide a safe and stable seating solution for individuals requiring assistance with transferring into and out of a bathtub or shower. This manual provides essential information for the proper assembly, operation, maintenance, and care of your transfer bench to ensure safe and effective use.

Figure 1: The Carex Transfer Bench, showing its overall design with a white seat, backrest, and aluminum frame.
Safety Information
Please read all instructions carefully before assembly and use. Failure to follow these instructions may result in injury.
- Weight Capacity: Do not exceed the maximum weight capacity of 300 lbs (136 kg).
- Stability: Ensure all legs are properly adjusted and the bench is stable before each use. The oversized slip-resistant tips are designed for increased stability.
- Surface: Always use the transfer bench on a flat, level surface.
- Inspection: Regularly inspect the bench for any signs of wear, damage, or loose components. Do not use if damaged.
- Non-Slip Surface: The seat and backrest feature a non-slip texture to prevent slipping. However, exercise caution when wet.
- Professional Advice: Consult with a healthcare professional or therapist for proper transfer techniques.
Assembly Instructions
The Carex Transfer Bench features tool-free assembly and can typically be assembled in 10 minutes or less.
- Unpack Components: Carefully remove all parts from the packaging. Verify all components are present: seat, backrest, frame sections, and legs.
- Assemble Frame: Connect the frame sections as per the included diagrams. Ensure all locking pins or buttons snap securely into place.
- Attach Seat: Position the seat onto the assembled frame. Secure it using the provided fasteners, ensuring they are tightened by hand until snug.
- Attach Backrest: Insert the backrest into the designated slots on the seat. The backrest is reversible for left or right-hand entry. Ensure it clicks into position.
- Install Legs: Insert the legs into the frame. Adjust the height of each leg by pressing the push-button and sliding the leg to the desired height. Ensure all four legs are set to the same height for stability.

Figure 2: Illustration highlighting the tool-free assembly and adjustable height feature of the transfer bench, ranging from 17.5" to 23.5".
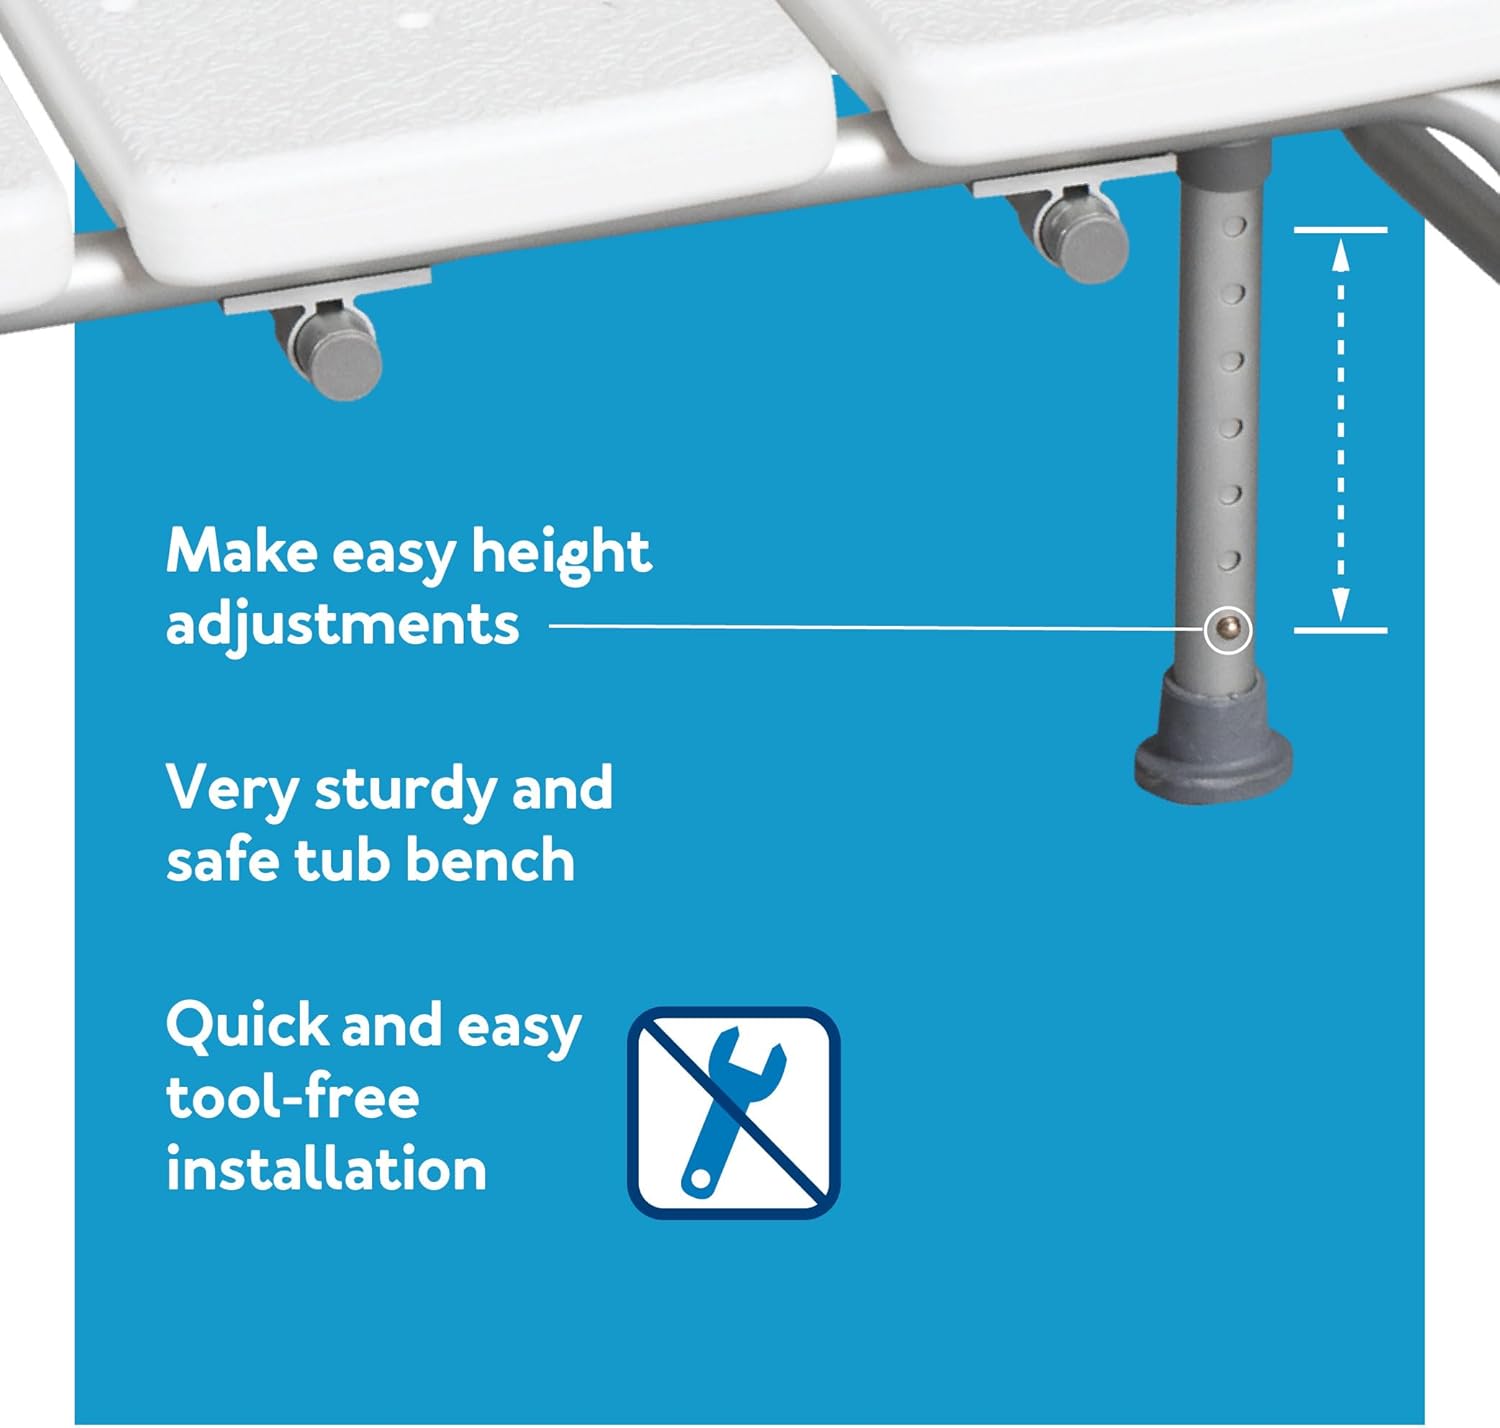
Figure 3: Detailed view of the height adjustment mechanism and the icon indicating quick, tool-free installation.
Operating Instructions
The transfer bench facilitates safe entry and exit from the bathtub or shower.
- Positioning: Place the transfer bench with two legs inside the bathtub/shower and two legs outside. Ensure the bench is stable and does not rock.
- Initial Seating: Sit on the portion of the bench that is outside the tub, facing the tub.
- Transfer: Carefully slide across the seat into the tub. Use the armrest (if attached) for support. Ensure your feet are securely placed inside the tub before fully transferring your weight.
- Exiting: To exit, reverse the process. Slide from inside the tub to the outside portion of the bench, then stand up carefully.

Figure 4: A user demonstrating the safe transfer process into a bathtub with the assistance of the transfer bench.
Adjustments
Height Adjustment
The height of the transfer bench is adjustable to accommodate various user heights and bathtub depths. The height can be adjusted from 17.5 inches to 23.5 inches.
- Ensure the bench is empty and stable.
- Locate the push-buttons on each leg.
- Press the button and slide the leg up or down to the desired height. Ensure the button fully protrudes through the adjustment hole to lock the leg in place.
- Repeat for all four legs, ensuring they are all set to the same height for optimal stability.
Reversible Seat Back
The seat back can be reversed to allow for left or right-hand entry into the tub, providing flexibility for different bathroom layouts or user preferences.
- To reverse the backrest, gently pull it out of its current position.
- Reinsert it into the corresponding slots on the opposite side of the seat until it clicks securely into place.

Figure 5: This image illustrates how the armrest can be adjusted to work on both sides of the bench, and highlights the non-slip surface with drain holes on the seat.
Maintenance and Care
Proper maintenance ensures the longevity and safe operation of your Carex Transfer Bench.
- Cleaning: Clean the bench regularly with a mild soap and water solution. Rinse thoroughly and wipe dry. Do not use abrasive cleaners or solvents.
- Drying: Allow the bench to air dry completely after each use to prevent mildew and maintain hygiene. The non-slip surface drains easily via small drain holes.
- Storage: Store the bench in a dry place when not in use. It can be disassembled quickly for compact storage or travel.
- Inspection: Periodically check all connections, screws, and leg tips for wear or damage. Replace worn parts immediately.
Troubleshooting
- Bench is Unstable/Wobbly:
- Ensure all four legs are adjusted to the same height.
- Verify that the push-buttons on each leg are fully engaged in the adjustment holes.
- Check that the bench is placed on a flat, level surface.
- Backrest is Loose:
- Ensure the backrest is fully inserted into the seat slots and has clicked into place.
- Difficulty Adjusting Legs:
- Ensure the push-button is fully depressed.
- Clean any debris from inside the leg tubes that might obstruct movement.
Specifications
| Feature | Detail |
|---|---|
| Model Number | FGB15577 0000 |
| Maximum Weight Capacity | 300 lbs (136 kg) |
| Adjustable Seat Height | 17.5" to 23.5" (44.5 cm to 59.7 cm) |
| Product Dimensions (Overall) | 26.25" W x 16" D x 17.5" H (minimum height) |
| Materials | Aluminum frame, Plastic seat and backrest |
| Item Weight | 9.1 pounds (4.1 kg) |
| Color | White |

Figure 6: Dimensional overview of the Carex Transfer Bench, indicating seat height range (17.5" to 23.5"), 16" depth, and 26.25" width.
Warranty and Support
For warranty information or technical support, please contact Carex customer service. Keep your purchase receipt for warranty claims.
Visit the official Carex website for the most up-to-date support information and contact details: www.carex.com


