1. Introduction
The Naturewater NW-RO400-E2 Reverse Osmosis System provides clean, filtered water directly from your tap. This system utilizes a multi-stage filtration process, including a reverse osmosis membrane, to remove impurities and provide high-quality drinking water. It is designed for both household and commercial use, as well as for applications requiring demineralized water, such as aquariums.
Reverse osmosis is a natural process that does not require chemicals. Dissolved salts and harmful substances are reliably removed from the water purely physically. The integrated membrane booster pump increases the pressure within the filter system, enhancing the quality and quantity of the produced water.
2. Safety Information
Please read all safety instructions carefully before installation and operation. Failure to follow these instructions may result in property damage or injury.
- Ensure the system is installed by a qualified professional if you are unsure about plumbing or electrical connections.
- Do not operate the system with damaged components or leaks.
- Disconnect power and water supply before performing any maintenance or filter changes.
- Keep the system away from direct sunlight and extreme temperatures (operating temperature range: 4°C to 42°C).
- Ensure proper ventilation around the unit.
- Do not use the system with water that is microbiologically unsafe or of unknown quality without adequate disinfection before or after the system.
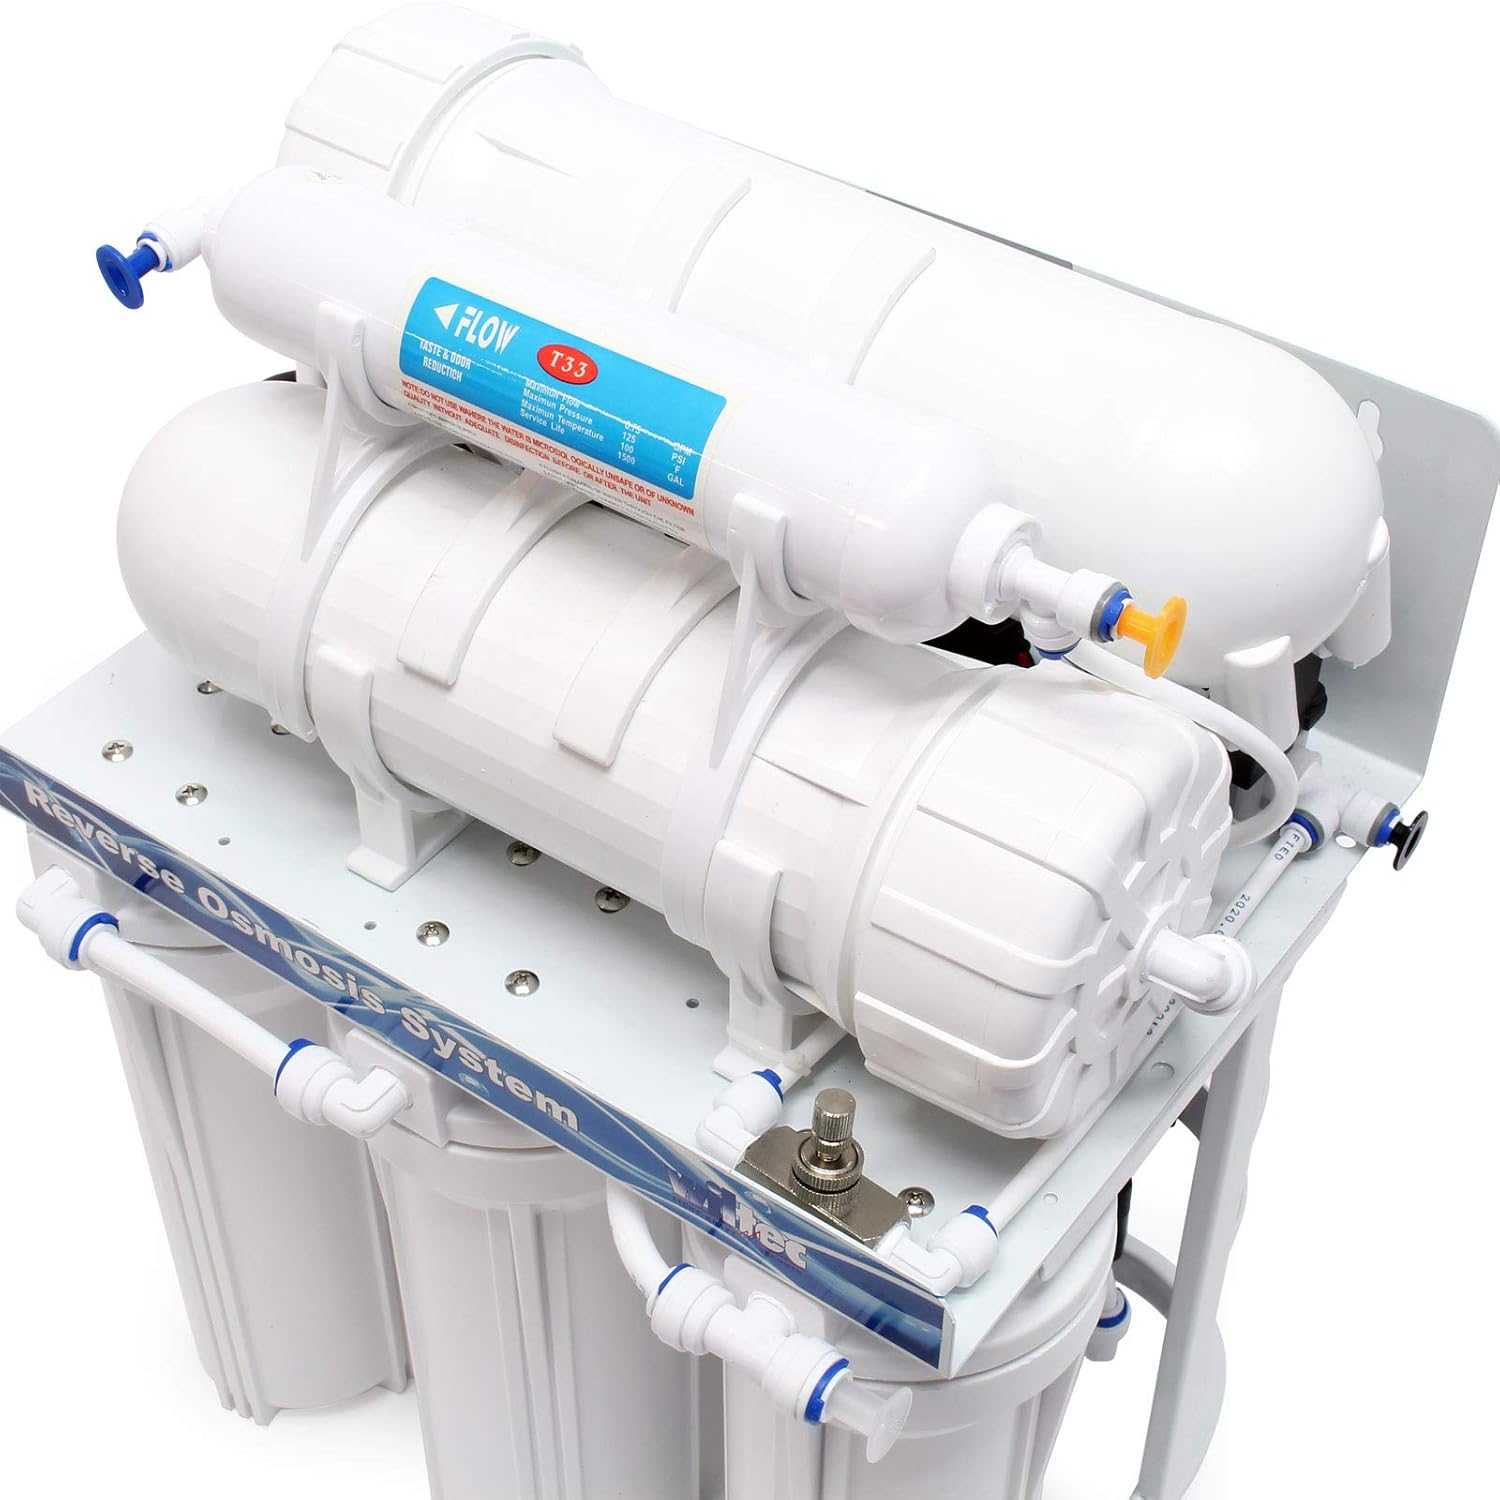
3. Product Overview
The Naturewater NW-RO400-E2 system consists of several key components working together to purify water.


Main Components:
- Pre-filters: Typically sediment and carbon filters to remove larger particles, chlorine, and organic compounds, protecting the RO membrane.
- Reverse Osmosis Membrane: The core of the system, responsible for removing up to 99% of dissolved solids, heavy metals, pesticides, hormones, and other contaminants.
- Post-filter (Activated Carbon): Improves the taste and odor of the purified water before it is dispensed.
- Booster Pump: Increases water pressure to optimize the performance of the RO membrane, especially in areas with low water pressure.
- Storage Tank (Optional, not explicitly shown but implied for purified water): Stores purified water for on-demand use.
- Faucet: Dispenses the purified water.
- Tubing and Connectors: For water flow throughout the system.

4. Setup and Installation
Proper installation is crucial for the optimal performance of your reverse osmosis system. Follow these steps carefully.
4.1 Pre-Installation Checklist:
- Verify all components are present (refer to Figure 3.2).
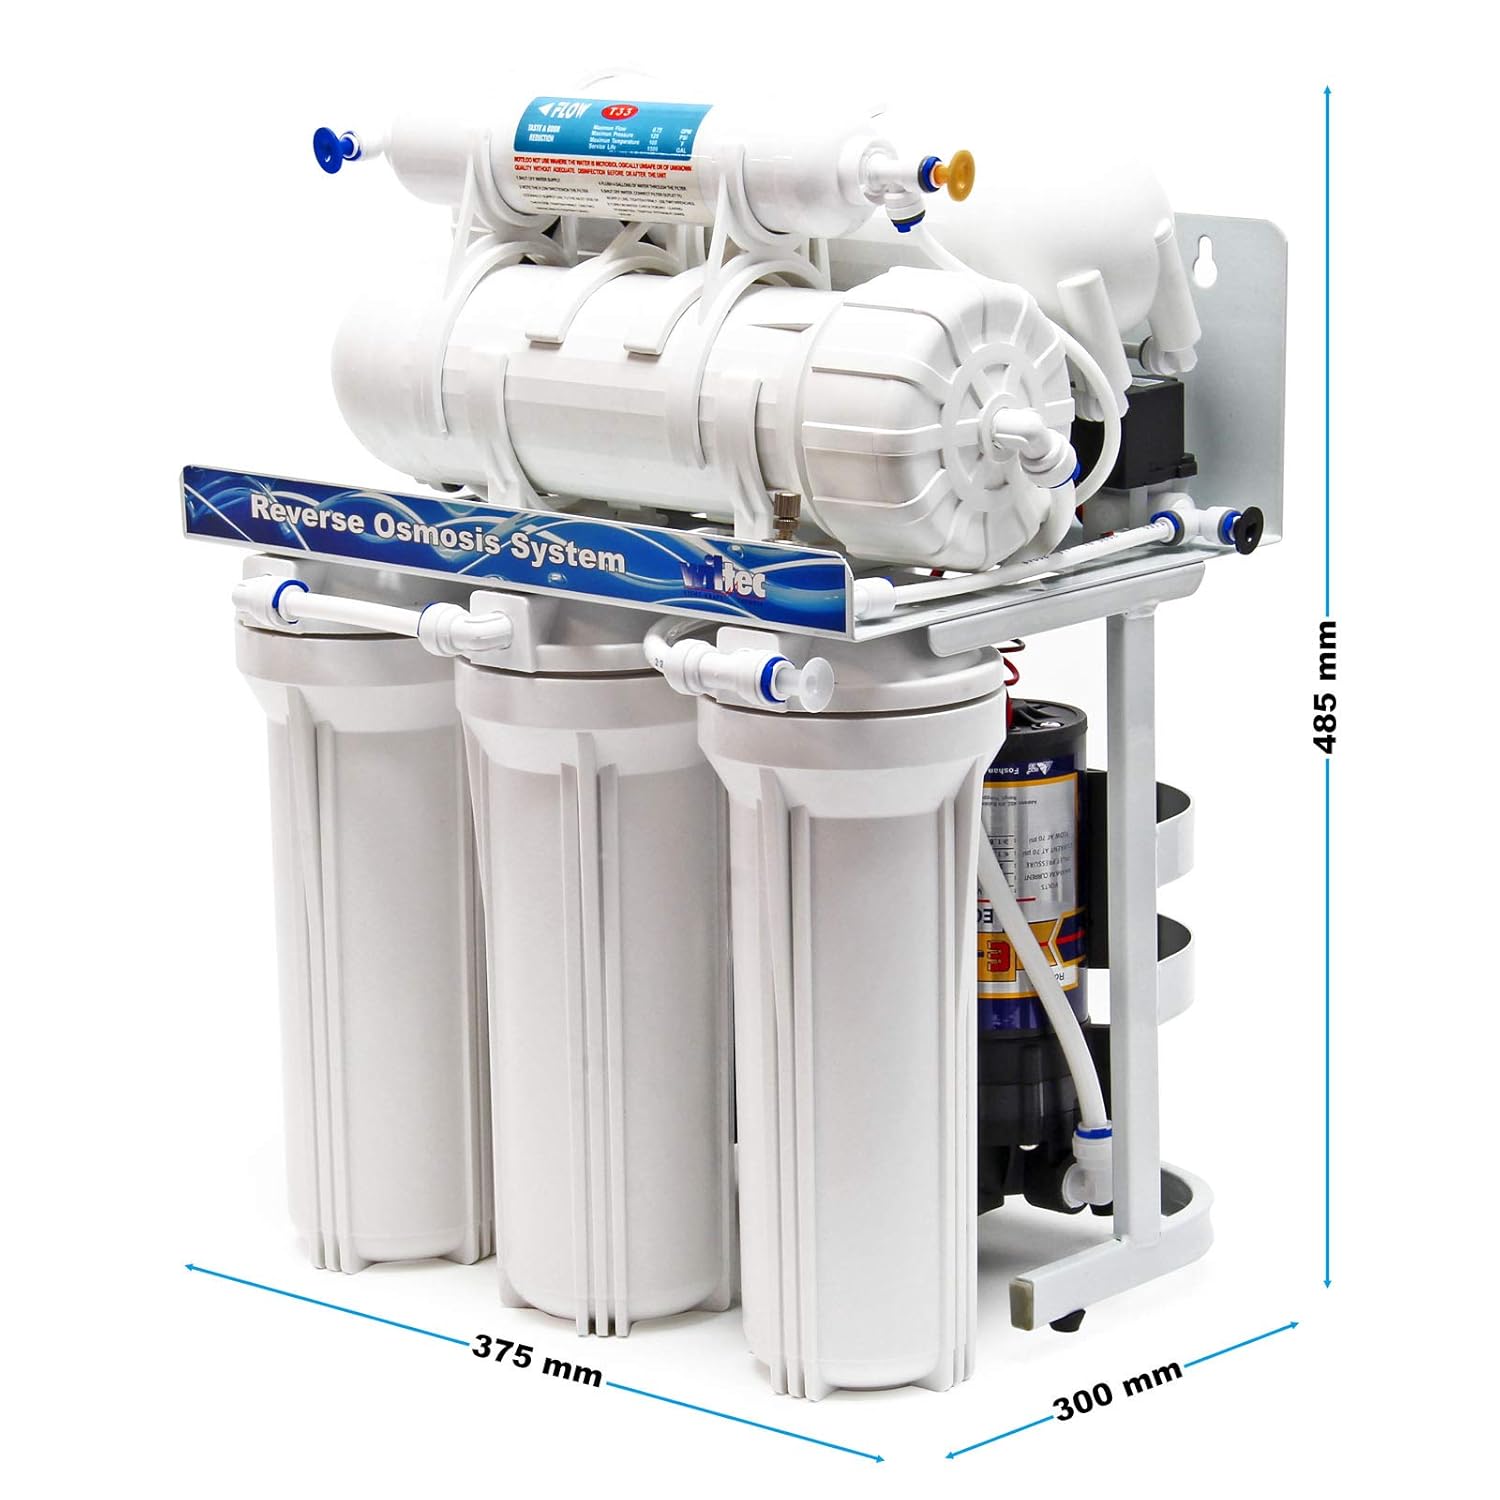
- Ensure adequate space for the unit (refer to dimensions in Specifications).
- Locate a cold water supply line, a drain, and an electrical outlet.
- Gather necessary tools: adjustable wrench, drill, screwdriver, utility knife.

4.2 Installation Steps:
- Mounting the Unit: Choose a suitable location under the sink or in a utility area. Use the provided mounting brackets and hardware to secure the unit to a sturdy surface. Refer to Figure 4.2 for mounting dimensions.
- Connecting to Cold Water Supply: Turn off the main cold water supply. Install the feed water adapter (usually a T-valve) to the cold water line. Connect the system's inlet tubing to this adapter.
- Drain Connection: Install the drain saddle valve onto the drain pipe. Ensure it is positioned above the P-trap. Connect the system's drain tubing to this valve.
- Faucet Installation: Drill a hole in your sink or countertop for the dedicated RO faucet. Install the faucet and connect its tubing to the purified water outlet on the RO system.
- Filter Installation: Insert the pre-filters, RO membrane, and post-filter into their respective housings. Ensure they are correctly oriented and sealed.
- Electrical Connection: Plug the booster pump's power cord into a grounded electrical outlet.
- Leak Check: Slowly turn on the cold water supply. Check all connections for leaks. Tighten any leaking connections.
- System Flush: Before first use, flush the system according to the operating instructions to remove carbon fines and air.
5. Operating Instructions
Once installed, operating your Naturewater NW-RO400-E2 system is straightforward.
5.1 Initial System Flush:
For the first use or after filter replacement, it is essential to flush the system:
- Ensure all connections are secure and water supply is on.
- Open the RO faucet and allow water to flow for at least 15-30 minutes. This flushes out carbon fines from new filters and air from the system.
- Close the faucet. The system will begin to fill the storage tank (if connected).
- Allow the tank to fill completely (this may take 2-4 hours depending on water pressure).
- Once full, open the faucet again and drain the tank completely. Repeat this fill and drain cycle 2-3 times to ensure all impurities from new filters are removed.
5.2 Daily Use:
To dispense purified water, simply open the dedicated RO faucet. The system will automatically produce more water to refill the storage tank as needed.
The booster pump will activate when the system is producing water and turn off when the tank is full or the faucet is closed.
6. Maintenance
Regular maintenance ensures the longevity and efficiency of your Naturewater NW-RO400-E2 system.
6.1 Filter Replacement Schedule:
Filter lifespan depends on water quality and usage, but general guidelines are:
| Filter Type | Replacement Frequency |
|---|---|
| Sediment Filter (Stage 1) | Every 6-12 months |
| Carbon Block Filter (Stage 2 & 3) | Every 6-12 months |
| RO Membrane (Stage 4) | Every 2-3 years (or when water quality degrades significantly) |
| Post-Carbon Filter (Stage 5) | Every 12 months |
6.2 Filter Replacement Procedure:
- Turn off Water Supply: Close the feed water adapter valve and the valve on the storage tank (if applicable).
- Depressurize System: Open the RO faucet to relieve pressure in the system.
- Remove Filter Housings: Use the filter wrench to unscrew the filter housings. Be prepared for some water spillage.
- Replace Filters: Remove old filters and dispose of them. Insert new filters, ensuring correct orientation.
- Reassemble: Screw the filter housings back on, hand-tighten, then use the wrench for a quarter turn. Do not overtighten.
- Restore Water Supply: Slowly open the feed water adapter valve and the tank valve. Check for leaks.
- Flush System: Perform an initial system flush as described in Section 5.1.
7. Troubleshooting
This section addresses common issues you might encounter with your RO system.
| Problem | Possible Cause | Solution |
|---|---|---|
| No water from faucet / Very slow flow |
|
|
| Water tastes bad or has odor |
|
|
| System constantly running / Excessive drain water |
|
|
| Leaks |
|
|
8. Specifications
| Attribute | Value |
|---|---|
| Model Name | NW-RO400-E2 |
| Part Number | 50809 |
| Brand | Naturewater |
| Filtration Stages | 5-stage |
| Daily Production Capacity | Up to 1500 Liters/Day |
| Flow Rate | 63 Liters per hour |
| Product Dimensions (L x W x H) | 37.5 x 30 x 48.5 cm |
| Item Weight | 15.34 Kilograms |
| Operating Pressure Range | Up to 4.83 Bar |
| Operating Temperature Range | 4°C to 42°C |
| Installation Type | Under-sink |
| Power Consumption | 108 Watts |
9. Warranty and Support
For technical assistance, replacement parts, or warranty inquiries, please contact your retailer or the manufacturer directly.
Manufacturer/Seller: Wiltec Wildanger Technik GmbH
Please retain your proof of purchase for warranty claims.
This product is subject to standard consumer return policies, typically allowing returns within 30 days for refund or replacement, as per retailer terms.


