
Introduction
Thank you for choosing the VANGUARD Abeo Plus 323CB Tripod with BBH-200 Professional Ball Head. This manual provides detailed instructions for the proper setup, operation, and maintenance of your equipment. Please read this manual thoroughly before use to ensure optimal performance and longevity of your tripod system.
Safety Information
- Always ensure all locks and adjustments are securely tightened before mounting a camera or leaving the tripod unattended.
- Do not exceed the maximum weight limit of 8.8 pounds (4 kg) for this tripod system.
- Be cautious when adjusting the center column or leg sections to avoid pinching fingers.
- Avoid exposing the tripod to extreme temperatures or corrosive substances.
- Keep the tripod away from children to prevent accidents.
Package Contents
Verify that all components are present:
- VANGUARD Abeo Plus 323CB Tripod Legs
- VANGUARD BBH-200 Professional Ball Head
- Quick Shoe Release Plate
- Spiked Feet (pre-installed or included separately)
- Rubber Feet (pre-installed or included separately)
- Snow and Sand Shoes (bonus set)
- Accessory Hook

Image: The VANGUARD Abeo Plus 323CB Tripod shown fully extended with the BBH-200 ball head detached, illustrating the main components.
Setup
1. Attaching the Ball Head
- Ensure the tripod's center column is fully retracted and locked.
- Carefully screw the BBH-200 Professional Ball Head onto the mounting screw at the top of the center column.
- Rotate until it is finger-tight and securely seated.
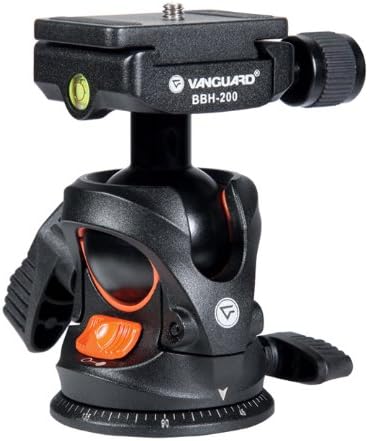
Image: The VANGUARD BBH-200 Professional Ball Head, ready for attachment to the tripod.
2. Adjusting Leg Angles
The Abeo Plus 323CB tripod legs can be independently adjusted to 25, 50, and 80-degree angles for versatile positioning on uneven terrain or for low-angle shots.
- Press the angle adjustment button located at the top of each leg hinge.
- Move the leg to the desired angle until it clicks securely into place.
- Repeat for each leg as needed.

Image: Close-up view of the VANGUARD Abeo Plus 323CB tripod legs, showing the angle adjustment buttons and padded upper sections.
3. Extending and Retracting Legs
Each leg features multiple sections with Tension Adjustable Leg Locks.
- Flip open the leg lock levers to release a leg section.
- Extend or retract the leg section to the desired length.
- Flip the leg lock levers closed to secure the section. Ensure they are firmly closed to prevent slippage.

Image: Close-up of the VANGUARD Abeo Plus 323CB tripod leg locks, showing the flip-lock mechanism.
4. Quick Height Adjustment Center Column
The center column features a Quick Height Adjustment locking mechanism.
- Locate the large lever lock on the center column.
- Flip the lever lock open to release the center column.
- Adjust the center column to the desired height.
- Flip the lever lock closed to secure the center column in position.
5. Changing Feet
The tripod comes with versatile feet for various surfaces.
- Rubber Feet: Ideal for studio use or hard, smooth surfaces.
- Spiked Feet: For soft terrain, grass, or ice, providing enhanced grip.
- Snow and Sand Shoes: For stability in wintery conditions or on beaches.
To change feet, unscrew the current feet and screw on the desired type. Ensure they are tightened securely.

Image: Close-up of a VANGUARD Abeo Plus 323CB tripod foot component, illustrating the interchangeable design.
6. Using the Accessory Hook
An accessory hook is located at the bottom of the center column. This can be used to hang weights (e.g., a camera bag) to increase stability, especially in windy conditions.

Image: Close-up of the accessory hook located at the bottom of the VANGUARD Abeo Plus 323CB tripod's center column.
Operating
1. Mounting Your Camera
The BBH-200 ball head uses a universal 38-mm quick shoe release plate.
- Attach the quick shoe plate to the bottom of your camera by screwing it in securely.
- Ensure the quick shoe clamp on the ball head is open.
- Slide the camera with the attached quick shoe plate into the clamp on the ball head.
- Tighten the quick shoe clamp to secure the camera firmly.

Image: A camera securely mounted on the VANGUARD BBH-200 Professional Ball Head, demonstrating proper attachment.
2. Using the BBH-200 Ball Head
The BBH-200 ball head offers precise control for camera positioning.
- Main Locking Knob: Loosen this knob to allow free movement of the ball for tilting and panning. Tighten to lock the camera in position.
- Friction Control Knob: This smaller knob, often integrated with the main locking knob, adjusts the tension of the ball movement when the main knob is loosened. This helps prevent sudden camera drops.
- Panorama Base Lock: A separate knob or lever at the base of the ball head allows the head to rotate horizontally (panning) while keeping the camera level. Loosen to pan, tighten to lock.
- Rapid Level System: The BBH-200 features an innovative Rapid Level System to quickly guide the camera level with the base for panorama shots. Utilize the built-in bubble levels for accurate leveling.
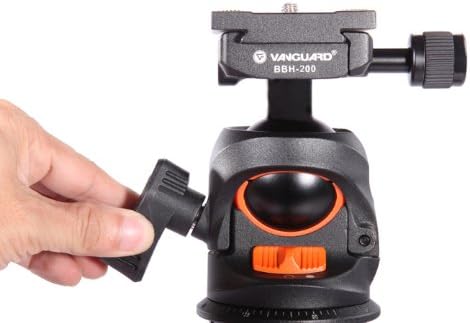
Image: A hand adjusting one of the control knobs on the VANGUARD BBH-200 Professional Ball Head.

Image: A hand pressing a lever or button on the VANGUARD BBH-200 Professional Ball Head, likely for quick release or specific adjustments.
Maintenance
1. Cleaning
- Wipe down the tripod and ball head with a soft, damp cloth after each use, especially if used in dusty, sandy, or wet environments.
- Avoid using harsh chemicals or abrasive cleaners.
- Clean the leg sections and locks to prevent dirt buildup that could affect smooth operation.
2. Adjusting Leg Lock Tension
Over time, the tension of the leg locks may need adjustment due to normal wear and tear. The Abeo Plus features Tension Adjustable Leg Locks.
- Locate the small screws on the side of each leg lock lever.
- Using a suitable screwdriver (often a small Phillips head), turn the screw clockwise to increase tension or counter-clockwise to decrease tension.
- Adjust until the leg locks provide a firm, secure hold without requiring excessive force to open or close.

Image: A hand using a screwdriver to adjust the tension of a leg lock on the VANGUARD Abeo Plus 323CB tripod.
3. Storage
Store the tripod in a dry, cool place, preferably in its carrying case, to protect it from dust and damage.
Troubleshooting
- Tripod instability: Ensure all leg sections are fully extended and their locks are securely closed. Verify leg angles are properly engaged. Use the accessory hook with added weight for extra stability.
- Leg sections slipping: Adjust the tension of the leg locks as described in the Maintenance section. Clean any dirt or debris from the leg sections and inside the locks.
- Ball head movement is too loose/tight: Adjust the friction control knob on the BBH-200 ball head. Ensure the main locking knob is properly tightened or loosened for desired movement.
- Camera not secure on ball head: Ensure the quick shoe plate is firmly attached to the camera and the quick shoe clamp on the ball head is fully tightened.
Specifications
| Brand | VANGUARD |
| Model Number | Abeo Plus 323CB |
| Material | Carbon Fiber |
| Item Weight | 6.6 Pounds (3 kg) |
| Weight Limit | 8.8 Pounds (4 kg) |
| Tripod Head Type | Ball Heads, Pan Heads (BBH-200 included) |
| Compatible Devices | Camera |
| Special Feature | Adjustable Leg Angles (25, 50, 80 degrees), Quick Height Adjustment Center Column, Tension Adjustable Leg Locks, Anti-shock ring |
Warranty and Support
For warranty information and customer support, please refer to the official VANGUARD website or contact your local VANGUARD distributor. Keep your purchase receipt as proof of purchase for warranty claims.
Warranty Description: Warmhoming (as per product specifications)


