Introduction
The Electro-Harmonix Tone Tattoo is an analog multi-effect pedal designed to integrate three distinct effects into a single unit: the Metal Muff Distortion, Neo Clone Chorus, and Memory Toy Analog Delay. This pedal provides a versatile range of guitar tones, from classic analog delays and lush chorus to powerful distortion, all within a compact enclosure.

Image: Front view of the Electro-Harmonix Tone Tattoo multi-effect pedal, showcasing its three distinct effect sections and controls.
Features
- Integrates three classic Electro-Harmonix effects: Metal Muff Distortion, Neo Clone Chorus, and Memory Toy Analog Delay.
- Offers comprehensive tone sculpting capabilities for each effect.
- Includes a two-level scoop switch (HI/LO/OFF) for mid-range modification within the distortion effect.
- Features an integrated Noise Gate for minimizing unwanted noise, particularly at higher gain settings.
- All effects are analog, contributing to a specific tonal character.
Controls and Functions
The Tone Tattoo pedal features a range of controls for each of its integrated effects, along with input/output jacks and power connection. Familiarize yourself with these controls for optimal use.
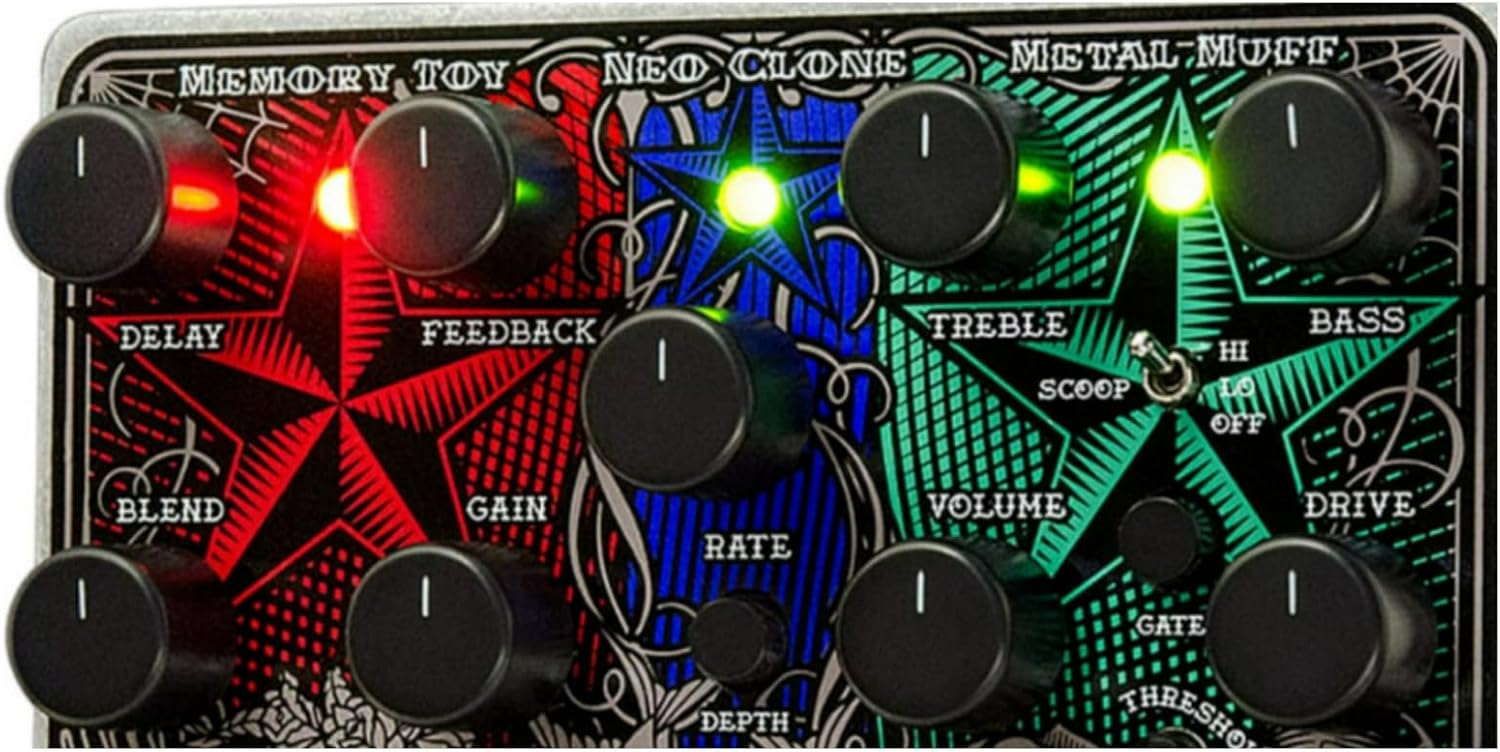
Image: Detailed view of the control knobs and switches on the Electro-Harmonix Tone Tattoo pedal, highlighting the Memory Toy, Neo Clone, and Metal Muff sections.
Global Connections
- IN Jack: Standard 1/4-inch input for your instrument or the output of a preceding effect pedal.
- OUT Jack: Standard 1/4-inch output to your amplifier's input or a subsequent effect pedal.
- 9V Power Jack: Connect the provided 9.6VDC/200mA power adapter here.
Footswitches
- Left Footswitch: Engages or disengages the Memory Toy (Delay) effect. An indicator LED illuminates when active.
- Middle Footswitch: Engages or disengages the Neo Clone (Chorus) effect. An indicator LED illuminates when active.
- Right Footswitch: Engages or disengages the Metal Muff (Distortion) effect. An indicator LED illuminates when active.
Memory Toy (Analog Delay) Section
- DELAY Knob: Adjusts the delay time, ranging from short slapback echoes to longer, more ambient repeats.
- FEEDBACK Knob: Controls the number of delay repeats. Turning clockwise increases the number of repetitions.
- BLEND Knob: Mixes the dry instrument signal with the delayed signal. Fully counter-clockwise is dry signal only; fully clockwise is delayed signal only.
- GAIN Knob: Adjusts the gain level of the delayed signal.
Neo Clone (Chorus) Section
- RATE Knob: Controls the speed of the chorus modulation.
- DEPTH Knob: Adjusts the intensity or sweep range of the chorus effect.
Metal Muff (Distortion) Section
- TREBLE Knob: Adjusts the high-frequency content of the distortion effect.
- VOLUME Knob: Controls the overall output level of the distortion effect.
- BASS Knob: Adjusts the low-frequency content of the distortion effect.
- DRIVE Knob: Sets the amount of distortion applied to the signal.
- SCOOP Switch (HI/LO/OFF): A three-position switch that modifies the mid-range frequencies of the distortion.
- OFF: No mid-range scoop.
- LO: Applies a moderate mid-range scoop.
- HI: Applies a significant mid-range scoop.
- GATE Knob: Controls the threshold of the built-in noise gate. Turning clockwise increases the threshold, requiring a louder input signal to open the gate and reducing noise.
- THRESHOLD Knob: Works in conjunction with the GATE knob to fine-tune the noise gate's response.
Setup
Follow these steps to properly set up your Electro-Harmonix Tone Tattoo pedal:
- Power Connection: Connect the 9.6VDC/200mA power adapter (center positive) to the 9V power jack on the pedal. Ensure the adapter meets the specified voltage and current requirements to prevent damage.
- Instrument Connection: Connect your guitar or other instrument to the "IN" jack located on the right side of the pedal using a standard 1/4-inch instrument cable.
- Amplifier Connection: Connect the "OUT" jack, located on the left side of the pedal, to your amplifier's input using a standard 1/4-inch instrument cable.
- Effects Loop (Optional): For certain tonal characteristics, particularly with the distortion effect, you may consider placing the Tone Tattoo in your amplifier's effects loop if available. Connect the amplifier's "Send" output to the pedal's "IN" jack and the pedal's "OUT" jack to the amplifier's "Return" input.

Image: The Electro-Harmonix Tone Tattoo pedal with a standard 1/4-inch guitar cable connected to its input jack.
Operating Instructions
Once the pedal is set up, follow these general guidelines for operation:
- Power On: The pedal is powered on automatically once the power adapter is connected. There is no separate power switch.
- Engaging Effects: Press the corresponding footswitch to activate each individual effect (Memory Toy, Neo Clone, or Metal Muff). The associated indicator LED will illuminate when an effect is active. Press the footswitch again to bypass the effect.
- Adjusting Effects:
- Memory Toy (Delay): Experiment with the DELAY, FEEDBACK, BLEND, and GAIN knobs to achieve your desired echo effects, from subtle repeats to atmospheric soundscapes.
- Neo Clone (Chorus): Adjust the RATE and DEPTH knobs to control the speed and intensity of the chorus modulation, creating shimmering or swirling textures.
- Metal Muff (Distortion): Use the DRIVE knob to set the distortion level, TREBLE and BASS for tonal shaping, and the SCOOP switch to modify the mid-range character. The VOLUME knob controls the overall output level of the distortion effect.
- Noise Gate Usage: If utilizing the Metal Muff, especially at higher gain settings, adjust the GATE and THRESHOLD knobs to minimize unwanted hum or hiss. Start with the GATE fully counter-clockwise and gradually increase it until noise is suppressed without cutting off desired notes or sustain.
Maintenance
Proper maintenance ensures the longevity and optimal performance of your pedal:
- Cleaning: Wipe the pedal's exterior with a soft, dry cloth. Avoid using abrasive cleaners, solvents, or excessive moisture, which can damage the finish or internal components.
- Power Supply: Always use the specified 9.6VDC/200mA power adapter. Using an incorrect power supply can lead to malfunction, damage the unit, and void the warranty.
- Storage: Store the pedal in a dry environment, away from extreme temperatures, high humidity, and direct sunlight when not in use.
Troubleshooting
If you encounter issues with your Tone Tattoo pedal, refer to the following troubleshooting tips:
- No Sound Output:
- Check all cable connections: instrument to IN, OUT to amplifier, and power adapter.
- Ensure the power adapter is correctly connected and functioning.
- Verify that your instrument and amplifier are working correctly by testing them independently.
- Effect Not Engaging:
- Confirm that the corresponding footswitch LED is illuminated when you press the footswitch. If not, press the footswitch firmly.
- Excessive Noise or Hum:
- Ensure proper grounding of all your audio equipment.
- Adjust the GATE and THRESHOLD knobs in the Metal Muff section to suppress unwanted noise, especially with high gain settings.
- Try a different power outlet or a dedicated, isolated power supply.
- "Popping" Sound when Engaging Neo Clone:
- A slight "pop" when engaging the Neo Clone is a characteristic of some analog chorus circuits and may be normal.
- Undesired Distortion Tone:
- Experiment extensively with the TREBLE, BASS, DRIVE, and SCOOP controls in the Metal Muff section.
- Consider placing the pedal in your amplifier's effects loop for different tonal characteristics, as this can significantly impact distortion response.
Specifications
| Model | TATTOO |
| ASIN | B008P0LJ7U |
| Dimensions | Approximately 5.75" L x 4.75" W x 2.5" H (14.6 cm x 12.1 cm x 6.35 cm) |
| Weight | Approximately 1.95 pounds (0.88 kg) |
| Power | 9.6VDC/200mA power adapter (center positive) |
| Signal Format | Analog |
| Hardware Interface | 1/4-inch Audio Jacks |
| Date First Available | July 25, 2012 |
Warranty and Support
Electro-Harmonix products are typically covered by a one-year warranty from the date of purchase against defects in materials or workmanship. For specific warranty details, service, or technical support, please contact Electro-Harmonix directly or refer to their official website for the most current contact information and return procedures.


