
Introduction
This manual provides essential instructions for the safe and efficient operation, installation, and maintenance of your LEER L612LASX 61 cubic feet LowProfile AutoDefrost SolidDoor Ice Merchandiser. Please read this manual thoroughly before installing or operating the unit. Keep this manual for future reference.
The LEER L612LASX is designed for outdoor use, featuring a robust construction and an automatic defrost system to ensure reliable performance in various conditions. It is equipped with two solid doors and side-mounted refrigeration, offering a capacity of approximately 61 cubic feet, suitable for storing up to 210 (7 lb) bags of ice.
Safety Information
WARNING: Failure to follow these safety instructions could result in fire, electric shock, serious injury, or death.
- Always disconnect power before performing any maintenance or service.
- Ensure the unit is properly grounded to prevent electrical shock.
- Do not store explosive substances such as aerosol cans with a flammable propellant in this appliance.
- This appliance is intended for commercial use only.
- Keep ventilation openings in the appliance enclosure or in the built-in structure clear of obstruction.
- Do not use mechanical devices or other means to accelerate the defrosting process, other than those recommended by the manufacturer.
- Do not damage the refrigerant circuit.
- Only qualified personnel should perform repairs.
Unpacking and Inspection
- Carefully remove all packaging materials, including tape and protective film. Retain packaging for potential future shipping.
- Inspect the merchandiser for any shipping damage. Report any damage immediately to the carrier and your supplier.
- Ensure all components are present: the ice merchandiser unit, instruction manual, and any included accessories.
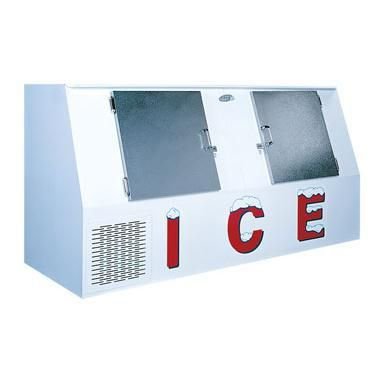
Figure 1: Front view of the LEER L612LASX Ice Merchandiser. This image shows the white exterior, two solid doors, and the overall low-profile design of the unit.
Setup
1. Location
- Place the merchandiser on a firm, level surface capable of supporting its weight when fully loaded.
- As this unit is designed for outdoor use, ensure it is placed in an area with adequate drainage and protection from direct heavy rainfall if possible, though it is built to withstand outdoor elements.
- Allow at least 6 inches (15 cm) of clearance around the sides and rear of the unit for proper ventilation of the refrigeration system. Do not block the air vents.
- Avoid direct sunlight exposure to minimize energy consumption and ensure optimal cooling performance.
2. Electrical Connection
- The merchandiser requires a dedicated 115V, 60Hz, single-phase electrical supply with a minimum 15-amp circuit.
- Ensure the electrical outlet is properly grounded. Do not use extension cords or adapter plugs.
- Verify that the voltage supplied matches the unit's requirements (refer to the serial plate located inside the unit).
- After positioning, wait at least 2 hours before plugging in the unit to allow refrigerants and oils to settle.
Operating Instructions
1. Initial Startup
- Plug the merchandiser into the dedicated electrical outlet.
- The unit will begin to cool immediately. Allow several hours for the interior to reach the desired operating temperature before loading with ice.
- The factory-set temperature is optimized for ice storage. Avoid frequent adjustments unless necessary.
2. Loading Ice
- Open the solid doors and load bagged ice into the merchandiser.
- Distribute the ice evenly to ensure proper air circulation.
- Do not overload the unit beyond its stated capacity of 210 (7 lb) bags or 61 cubic feet. Overloading can impede air flow and reduce cooling efficiency.
- Ensure doors are closed securely after each use to maintain internal temperature.
3. Automatic Defrost
This unit features an automatic defrost system. Frost will periodically melt and drain away, eliminating the need for manual defrosting. During the defrost cycle, the internal temperature may rise slightly, but it will quickly return to the set point. This is normal operation.
Maintenance
1. Cleaning the Exterior
- Disconnect power before cleaning.
- Wipe the exterior surfaces with a mild detergent and warm water. Rinse thoroughly and dry with a soft cloth.
- Do not use abrasive cleaners, scouring pads, or sharp objects, as these can damage the finish.
2. Cleaning the Interior
- Remove all ice bags.
- Clean interior surfaces with a solution of mild soap and water. For stubborn stains, a baking soda solution can be used.
- Rinse with clean water and dry thoroughly. Ensure no water enters electrical components.
- Regular cleaning helps maintain hygiene and prevents odors.
3. Condenser Coil Cleaning
- The condenser coils are located behind the side-mounted refrigeration system.
- Periodically (every 3-6 months, or more often in dusty environments), clean the condenser coils to ensure efficient operation.
- Disconnect power. Use a soft brush or vacuum cleaner with a brush attachment to remove dust and debris from the coils.
- Caution: Do not bend the fins of the condenser coils.
4. Door Gaskets
- Inspect door gaskets regularly for cracks or tears.
- Clean gaskets with mild soap and water to maintain a good seal. A tight seal is crucial for energy efficiency.
Troubleshooting
| Problem | Possible Cause | Solution |
|---|---|---|
| Unit does not run |
|
|
| Unit runs too long or constantly |
|
|
| Insufficient cooling |
|
|
| Excessive noise |
|
|
If troubleshooting steps do not resolve the issue, contact a qualified service technician.
Specifications
| Feature | Detail |
|---|---|
| Model Number | L612LASX |
| Capacity | 61 cubic feet (approx. 210 x 7 lb bags) |
| Doors | 2 Solid Doors |
| Defrost System | Automatic |
| Refrigeration Type | Side Mount Self-Contained, Compressor Cooling |
| Refrigerant | R404a |
| Horsepower | 1/3 HP |
| Amperage | 7.4 Amps |
| Electrical Requirements | 115V, 60Hz, Single Phase |
| Exterior Finish | White |
| Installation Type | Freestanding, Outdoor Use |
| Certifications | UL Listed |
Warranty and Support
For specific warranty information, please refer to the warranty card included with your product or contact LEER customer support. Keep your purchase receipt as proof of purchase for warranty claims.
For technical assistance, parts, or service inquiries, please contact your authorized LEER dealer or visit the official LEER website for contact information.