
ASI 0198-2
ASI 0198-2 Turbo-Dri Jr. High-Speed Hand Dryer User Manual
Model: 0198-2
1. Introduction
This manual provides essential information for the proper installation, operation, and maintenance of your ASI 0198-2 Turbo-Dri Jr. Surface Mounted High-Speed Hand Dryer. Designed for efficiency and durability, this 220-240 volt unit offers rapid hand drying in various commercial and public environments. Please read this manual thoroughly before installation and use to ensure safe and optimal performance.
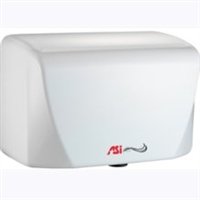
An image showing the compact, white casing of the ASI 0198-2 Turbo-Dri Jr. surface-mounted high-speed hand dryer. The ASI logo is visible on the front.
2. Setup and Installation
The ASI 0198-2 is a surface-mounted unit requiring professional installation. Ensure all local electrical codes and regulations are followed.
2.1 Safety Precautions
- Disconnect power at the circuit breaker before beginning installation.
- Installation must be performed by a qualified electrician.
- Ensure the mounting surface is structurally sound and can support the weight of the unit.
- Do not install in areas where water spray is direct or excessive.
2.2 Mounting Instructions
- Select an appropriate mounting location, ensuring adequate clearance around the unit for air circulation and user access.
- Mark the drilling points on the wall using the provided mounting template (if applicable) or by measuring the unit's mounting holes.
- Drill pilot holes suitable for the mounting hardware.
- Securely attach the hand dryer to the wall using appropriate screws and anchors.
2.3 Electrical Connection
- This unit operates on 220-240 volts. Verify the power supply matches the unit's requirements.
- Connect the electrical wiring according to the wiring diagram located inside the unit's cover. Ensure proper grounding.
- Replace the cover and secure it.
- Restore power at the circuit breaker and test the unit.
3. Operating Instructions
The ASI 0198-2 Turbo-Dri Jr. hand dryer is designed for automatic, touch-free operation.
3.1 Hand Drying Procedure
- Place hands under the air outlet. The infrared sensor will detect your hands.
- The dryer will automatically activate, providing a high-speed air stream.
- Rub hands together under the air stream until dry.
- Remove hands from the sensor's range. The dryer will automatically shut off.
For optimal drying, ensure hands are positioned directly within the sensor's detection zone.
4. Maintenance
Regular maintenance ensures the longevity and hygienic operation of your hand dryer.
4.1 Cleaning the Exterior
- Disconnect power to the unit before cleaning.
- Wipe the exterior surface with a soft, damp cloth and a mild, non-abrasive cleaner.
- Do not use harsh chemicals, abrasive pads, or solvents, as these can damage the finish.
- Ensure the unit is completely dry before restoring power.
4.2 Air Inlet and Sensor Cleaning
- Periodically inspect the air inlet grilles for dust and lint accumulation.
- Gently clean the grilles with a soft brush or vacuum cleaner attachment.
- Wipe the sensor lens with a soft, dry cloth to ensure proper operation. Avoid scratching the lens.
5. Troubleshooting
This section addresses common issues you might encounter with your hand dryer.
| Problem | Possible Cause | Solution |
|---|---|---|
| Dryer does not activate. | No power supply; Sensor obstructed or dirty; Unit malfunction. | Check circuit breaker; Clean sensor lens; Contact qualified service personnel. |
| Airflow is weak. | Air inlet grilles clogged with dust/lint. | Clean air inlet grilles. |
| Dryer runs continuously. | Sensor malfunction; Obstruction in sensor's field of view. | Remove any obstructions; Clean sensor lens; Contact qualified service personnel. |
If the problem persists after attempting the suggested solutions, please contact a qualified service technician or the manufacturer's support.
6. Specifications
- Model: ASI 0198-2
- Type: Surface Mounted, High-Speed Hand Dryer
- Voltage: 220-240 Volts
- Activation: Automatic Infrared Sensor
- Material: (Information not provided, typically durable casing)
- Dimensions: (Refer to product data sheet for exact measurements)
7. Warranty and Support
For specific warranty terms and conditions, please refer to the warranty documentation provided with your purchase or visit the official ASI website. For technical support, replacement parts, or service inquiries, please contact ASI customer service directly.
Note: No official product videos from the seller were available for embedding based on the provided data.
Related documents0198-2


Ask a question about this manual
Ask about setup, troubleshooting, compatibility, parts, safety, or missing instructions. Manuals+ will review the question and use this page’s manual context to help answer it.