Introduction
This manual provides comprehensive instructions for the safe and efficient operation, maintenance, and troubleshooting of your Singer 1409 Electric Sewing Machine. Designed for ease of use, this machine offers 9 built-in stitches and 22 stitch functions, powered by a 70-watt motor, and features a 6-row feed dog system for precise fabric handling. Please read this manual thoroughly before using the machine to ensure optimal performance and longevity.
1. Setup and Assembly
Before operating your sewing machine, ensure it is properly set up and all components are accounted for.
1.1 Unpacking and Components
Carefully remove the sewing machine and all accessories from the packaging. Retain the original packaging for future storage or transport. The box should contain the following items:
- 1 Sewing Machine with Accessories
- 1 Machine Cover
- 1 Foot Controller
- 1 Instruction Manual (this document)
1.2 Power Connection
Place the machine on a stable, flat surface. Connect the foot controller to the machine and then plug the power cord into a suitable electrical outlet. Ensure the power switch is in the OFF position before connecting.
1.3 Initial Setup: Bobbin Winding and Threading
Proper bobbin winding and machine threading are crucial for smooth operation and quality stitches.

Figure 1.1: Front view of the Singer 1409 Electric Sewing Machine, showing the main controls and sewing area.

Figure 1.2: Illustration of the automatic bobbin winding feature. The needle bar automatically disconnects during bobbin winding for safety and convenience.
For detailed steps on bobbin winding and upper thread threading, refer to the diagrams in the included instruction manual (physical copy) or the online resources provided by Singer. The automatic bobbin winding feature simplifies the process, ensuring thread is added smoothly to the bobbin.
2. Operating Instructions
This section details the functions and controls of your Singer 1409 sewing machine.
2.1 Stitch Selection
The Singer 1409 offers 9 built-in stitches and 22 stitch functions, providing versatility for various sewing projects. Use the stitch selector dial to choose your desired stitch pattern. The dial allows for easy switching between essential and decorative stitches.

Figure 2.1: Close-up of the stitch selection dials, showing options for essential and decorative stitches, and the simple stitch selection mechanism.
2.2 Automatic Reverse Option
The machine features an automatic reverse function. This allows you to sew in reverse automatically, which is essential for reinforcing stitches at the beginning and end of seams, ensuring durability.
2.3 4-Step Buttonhole
Create professional-looking buttonholes with the integrated 4-step buttonhole feature. Follow the specific instructions in your detailed manual for precise buttonhole creation.
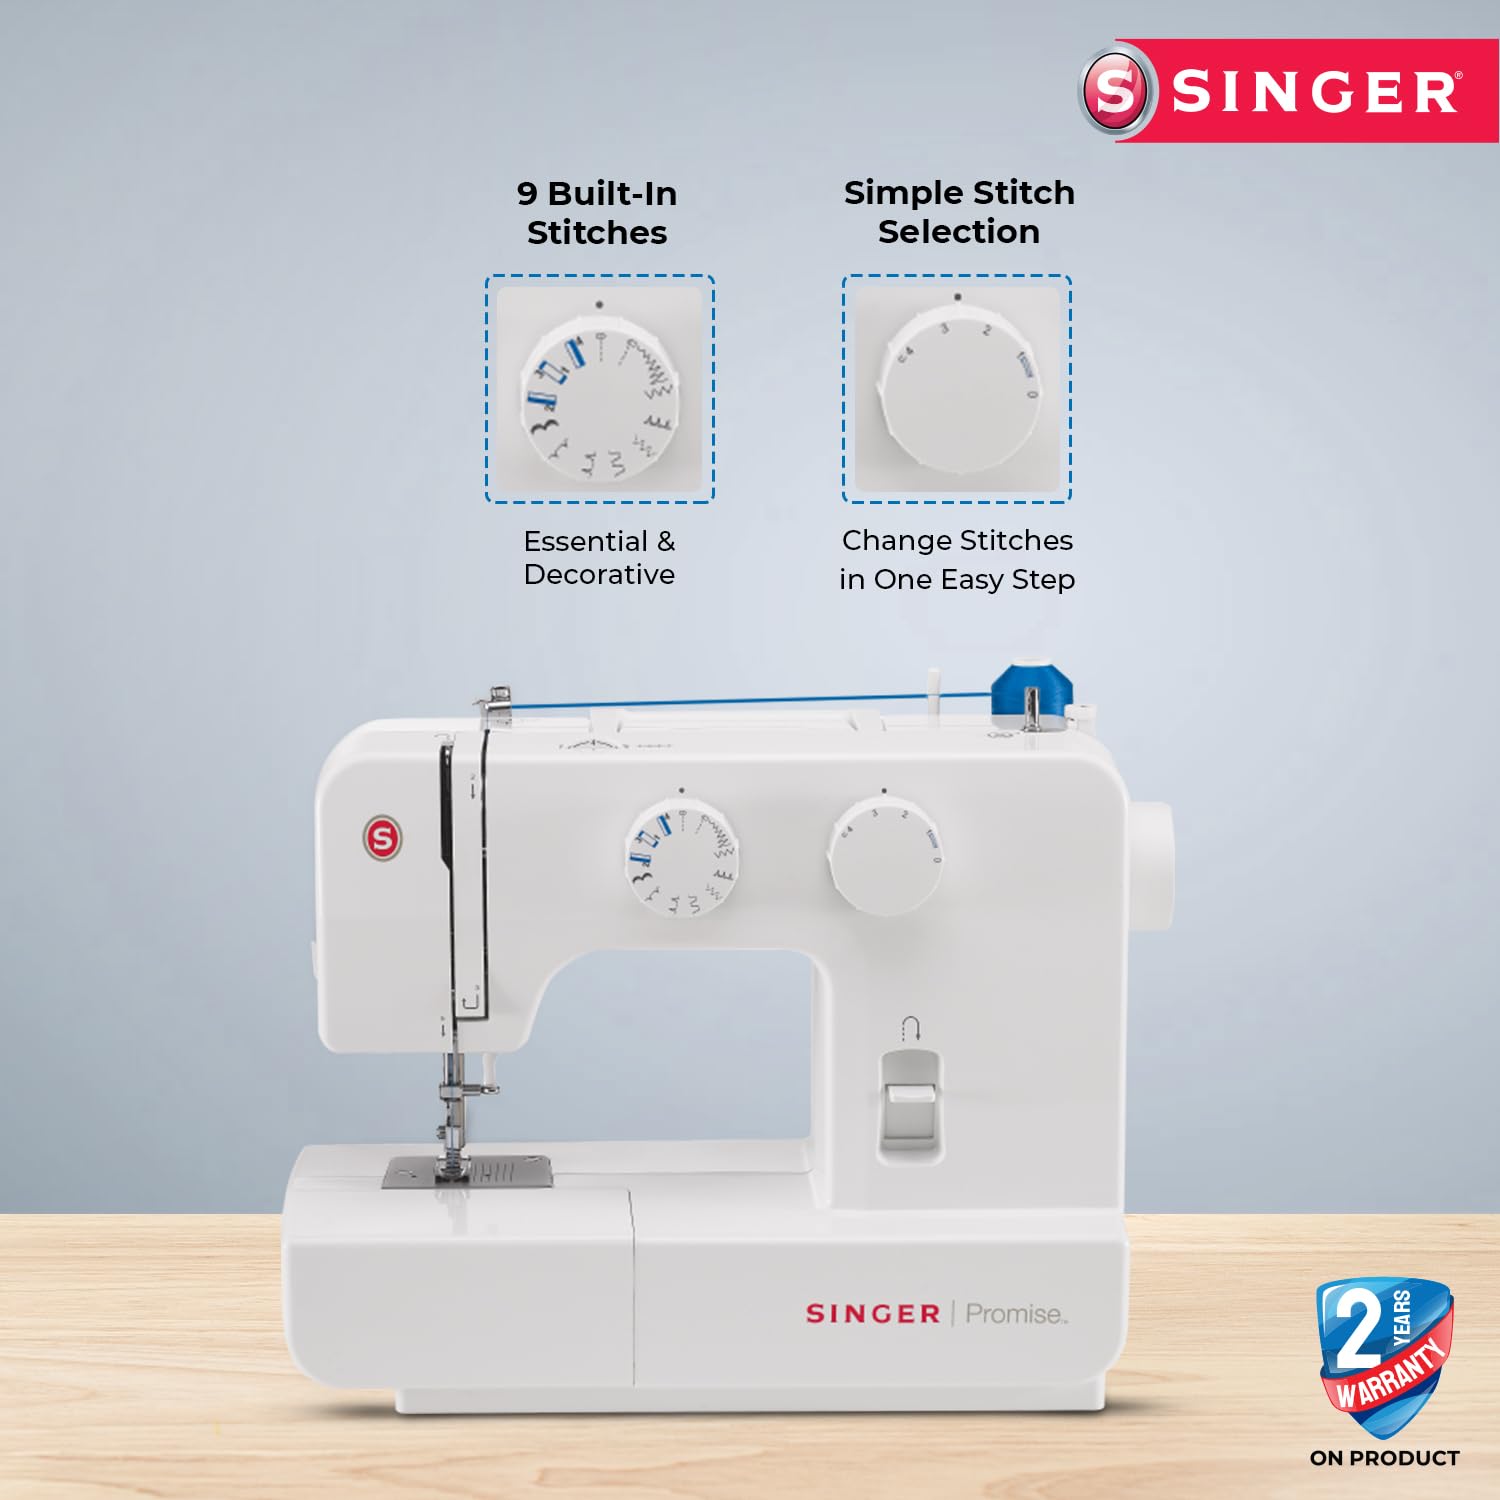
Figure 2.2: Visual representation of quick and easy threading, and the 4-step buttonhole process, designed for professional results.
2.4 Free Arm with Accessories Storage
The retractable free arm simplifies sewing sleeves, cuffs, and collars. It also provides convenient access to a built-in storage compartment for your sewing accessories.
3. Maintenance
Regular maintenance ensures the longevity and optimal performance of your sewing machine.
3.1 Cleaning
Lint and Dust Removal: Regularly remove lint and dust from the bobbin case area, feed dogs, and tension discs using a small brush or lint remover. Accumulation of lint can affect stitch quality and machine performance.
Needle Plate: Remove the needle plate and clean underneath it to clear any fabric fibers or broken needle pieces.
3.2 Lubrication
Refer to your detailed instruction manual for specific lubrication points and recommended sewing machine oil. Over-lubrication can attract more dust, so follow guidelines carefully.
3.3 Needle Replacement
Replace needles frequently, especially when working on new projects or if you notice skipped stitches or fabric damage. A dull or bent needle can cause significant issues.
4. Troubleshooting
This section addresses common issues you might encounter and provides basic solutions. For more complex problems, contact customer support.
| Problem | Possible Cause | Solution |
|---|---|---|
| Skipped Stitches | Incorrect needle, bent needle, improper threading, wrong needle size for fabric. | Replace needle, re-thread machine, ensure correct needle type/size for fabric. |
| Thread Breaking | Improper threading, tension too tight, poor quality thread, bent needle, burr on needle plate. | Re-thread machine, adjust tension, use good quality thread, replace needle, check for burrs. |
| Fabric Jamming/Puckering | Incorrect tension, dull needle, improper presser foot, lint under needle plate. | Adjust tension, replace needle, use correct presser foot, clean feed dogs and needle plate area. |
| Machine Not Starting | Power cord not connected, foot controller not connected, power switch off. | Check all connections, ensure power switch is ON. |
5. Specifications
Key technical specifications for the Singer 1409 Electric Sewing Machine.
| Feature | Detail |
|---|---|
| Model Number | 1409 |
| Built-in Stitches | 9 |
| Stitch Functions | 22 |
| Motor Power | 70 Watts |
| Feed Dog System | 106 teeth in 6 rows |
| Buttonhole Type | 4-step |
| Dimensions (LxWxH) | 41D x 21W x 34H Centimeters |
| Item Weight | 5 kg 850 g |
| Country of Origin | Vietnam |

Figure 5.1: Internal view of the Singer 1409, highlighting its heavy-duty and durable metal frame construction.
6. Warranty and Support
Information regarding product warranty and customer support services.
6.1 Product Warranty
The Singer 1409 Electric Sewing Machine typically comes with a standard manufacturer's warranty. For specific details regarding the warranty period and terms, please refer to the warranty card included with your product or contact Singer customer support. Extended warranty options may also be available for purchase.
- 1 Year Extended Warranty (optional purchase)
- 2 Year Extended Warranty (optional purchase)
- 1 Year Fire Protection Plan (optional purchase)
6.2 Customer Support and Online Resources
For any queries, technical assistance, or service requests, please contact Singer customer support. You can also access online resources and interactive master classes to enhance your sewing skills.
- Customer Care Number: 1800 103 3474 | 8860118855
- Email: customersupport@singerindia.com
- Website: www.singerindia.com

Figure 6.1: Information on Singer Live Assist, providing contact details for free home and online demos, available Monday to Sunday, 10 AM to 7 PM, in multiple languages.

Figure 6.2: Details about the offer for a free 1-month online sewing session upon purchase of any Singer sewing machine. Registration requires an Amazon invoice.
Singer also provides access to an online interactive master class to further enhance your sewing skills and knowledge. Details for accessing this class are typically provided upon product registration or through customer support.


