
Introduction
Thank you for choosing the ORTOFON Kailas-b4 Preamplifier. This manual provides essential information for the safe and efficient operation of your new audio component. Please read this manual thoroughly before using the unit and retain it for future reference.
The Kailas-b4 is designed to process low-level audio signals from various sources and prepare them for amplification by a power amplifier. It features high-quality components for accurate sound reproduction.
Safety Information
- Power Supply: Connect the unit only to an AC power outlet of the specified voltage.
- Ventilation: Ensure adequate ventilation around the unit. Do not block ventilation openings.
- Moisture: Do not expose the unit to rain, moisture, or excessive humidity.
- Heat: Avoid placing the unit near heat sources such as radiators, heat registers, stoves, or other heat-producing appliances.
- Servicing: Do not attempt to service this product yourself. Refer all servicing to qualified service personnel.
Package Contents
Verify that all items are present in the package:
- ORTOFON Kailas-b4 Preamplifier Unit
- Power Cord
- Remote Control (with batteries)
- Instruction Manual (this document)
Product Overview
The ORTOFON Kailas-b4 Preamplifier features a robust chassis and intuitive controls. Key components include input selectors, volume control, and various audio input/output terminals.
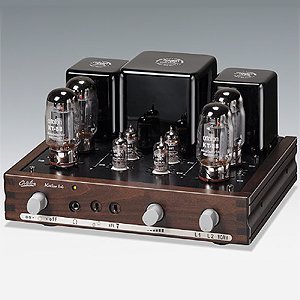
Image: Front view of the ORTOFON Kailas-b4 Preamplifier, showing the main controls and display.
Setup
1. Placement
Place the preamplifier on a stable, level surface away from direct sunlight, heat sources, and excessive vibration. Ensure there is sufficient space around the unit for proper ventilation.
2. Audio Connections
Connect your audio sources (e.g., CD player, turntable, streamer) to the appropriate input terminals on the rear panel of the Kailas-b4 using high-quality RCA cables. Ensure left and right channels are correctly matched.
- Input (Source): Connect your audio source components.
- Output (To Power Amplifier): Connect the preamplifier's output to the input of your power amplifier using RCA cables.
3. Power Connection
After all audio connections are made, connect the supplied power cord to the AC inlet on the rear of the preamplifier, then plug the other end into a suitable wall outlet.
Operating Instructions
1. Power On/Off
Press the power button on the front panel or the remote control to turn the unit on or off. The power indicator will illuminate when the unit is on.
2. Input Selection
Use the input selector knob on the front panel or the input buttons on the remote control to choose your desired audio source (e.g., CD, Phono, Aux).
3. Volume Control
Adjust the volume using the large volume knob on the front panel or the volume up/down buttons on the remote control. Start with a low volume level and gradually increase it to a comfortable listening level.
4. Phono Input (if applicable)
If connecting a turntable, ensure it is connected to the dedicated PHONO input. If your turntable has a built-in phono preamplifier, connect it to a standard line-level input (e.g., AUX) instead of PHONO.
Maintenance
Cleaning
Wipe the unit with a soft, dry cloth. Do not use abrasive cleaners, waxes, or solvents. Ensure the unit is powered off and unplugged before cleaning.
Storage
If storing the unit for an extended period, disconnect it from the power outlet and store it in a cool, dry place, preferably in its original packaging.
Troubleshooting
| Problem | Possible Cause | Solution |
|---|---|---|
| No power | Power cord not connected; Power outlet not active | Check power cord connection; Test power outlet with another device |
| No sound | Incorrect input selected; Volume too low; Cables loose or faulty; Power amplifier off | Select correct input; Increase volume; Check all audio cable connections; Ensure power amplifier is on |
| Distorted sound | Input signal too strong; Faulty cables; Speaker impedance mismatch | Reduce source output level; Replace cables; Consult power amplifier manual for impedance compatibility |
If the problem persists after trying these solutions, please contact ORTOFON customer support.
Specifications
- Model: Kailas-b4
- Input Sensitivity (Line): 200mV
- Input Sensitivity (Phono MM): 2.5mV
- Frequency Response: 20Hz - 20kHz (±0.5dB)
- Signal-to-Noise Ratio (Line): >95dB
- Signal-to-Noise Ratio (Phono MM): >80dB
- Total Harmonic Distortion: <0.01%
- Input Impedance (Line): 47k Ohms
- Output Impedance: 100 Ohms
- Power Consumption: 20W
- Dimensions (W x H x D): 430 x 80 x 300 mm (approx.)
- Weight: 5.5 kg (approx.)
- Power Supply: AC 100-240V, 50/60Hz (region dependent)
Note: Specifications are subject to change without notice for product improvement.
Warranty and Support
Warranty Information
ORTOFON warrants this product against defects in materials and workmanship for a period of one (1) year from the original date of purchase. This warranty does not cover damage caused by misuse, accident, modification, or unauthorized repair. Proof of purchase is required for warranty service.
Customer Support
For technical assistance, service, or warranty inquiries, please contact your authorized ORTOFON dealer or visit the official ORTOFON website for contact information in your region.
Website: www.ortofon.com


