Introduction
This manual provides detailed instructions for assembling the Sankei Miniatuart Studio Ghibli Ponyo on the Cliff Sosuke and Ponyo House 1/150 Scale Paper Craft Kit. This kit allows you to construct a miniature replica of the house and its surroundings as depicted in the film "Ponyo on the Cliff by the Sea." The kit features laser-cut paper components designed for precise assembly, resulting in a detailed, no-paint finish.
Safety Information
- This product contains small parts and is not suitable for young children. Keep out of reach of children under 3 years of age due to choking hazards.
- Assembly requires the use of sharp tools such as craft knives. Exercise extreme caution to prevent injury.
- Use adhesives in a well-ventilated area. Avoid contact with skin and eyes. Refer to the adhesive manufacturer's safety guidelines.
- Dispose of waste materials responsibly.
Package Contents
The kit includes various sheets of laser-cut hard paper components and materials for landscaping. Please verify all components are present before beginning assembly.
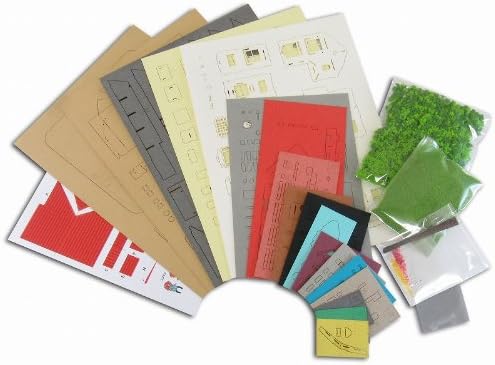
Figure 1: Kit Contents. This image displays the various sheets of pre-cut paper components and landscaping materials included in the kit, ready for assembly.
Setup and Assembly
Assembly of this paper craft kit is an intricate process with a reference production time of approximately 15 hours. Patience and precision are key. The instructions are primarily visual, using clear diagrams.
Recommended Tools:
- Craft Knife: Essential for carefully detaching small components from the paper sheets.
- Precision Tweezers: Highly recommended for handling and positioning small parts.
- Adhesive: A quick-drying craft glue or PVA glue is suitable. Consider a glue pen or applicator bottle for precise application.
- Cutting Mat: To protect your work surface when using a craft knife.
- Small Ruler: For accurate measurements and scoring if needed.
Assembly Steps:
- Review Instructions: Carefully examine the provided diagrams. Although the text may be in Japanese, the visual instructions are comprehensive.
- Prepare Components: Using a craft knife, carefully detach each laser-cut piece from its sheet. Work slowly to avoid tearing.
- Fold and Score: Fold along indicated lines. Some pieces may require scoring with a dull blade or stylus for cleaner folds.
- Assemble Base Structure: Begin by constructing the foundational elements of the house and landscape as per the diagrams.
- Apply Adhesive: Apply a small, even amount of glue to the tabs or designated areas. Use tweezers to hold pieces in place until the glue sets.
- Build Details: Progress to smaller details such as windows, doors, fences, and the car. Some multi-colored elements may require separate cutting and gluing.
- Landscaping: Apply the green flocking material to create grass and foliage effects as shown in the diagrams.
- Add Figures: Assemble the paper figures of Sosuke, Ponyo, and other characters, then place them in their designated positions.

Figure 2: Completed Model (Front View). This image shows the fully assembled paper craft model, highlighting the intricate details of the house, garden, and characters.

Figure 3: Completed Model (Side View). A different perspective of the assembled model, focusing on the side of the house with the carport and surrounding greenery.
Operating and Display
Once assembled, the paper craft model is intended for display. It is a delicate item and should be handled with care.
- Place the model on a stable, flat surface away from direct sunlight, excessive heat, or humidity to prevent warping or fading.
- Avoid placing heavy objects on or near the model.
- The small paper figures can be positioned as desired to create different scenes.
Maintenance and Care
To maintain the appearance of your paper craft model:
- Dusting: Gently dust the model regularly using a soft brush or a can of compressed air. Avoid wiping with cloths that might snag on delicate parts.
- Cleaning: Do not use water or chemical cleaners, as these can damage the paper and adhesive.
- Storage: If storing, place the model in a sturdy box with soft packing material to prevent damage.
Troubleshooting Assembly
Encountering difficulties during assembly is common with intricate models. Here are some tips:
- Parts Not Fitting: Double-check the part numbers against the diagrams. Ensure all tabs are properly folded and any excess paper from cutting is removed.
- Glue Issues: If glue is not holding, ensure surfaces are clean and dry. Allow sufficient drying time. For very small parts, a tiny dab of super glue can be used with extreme caution, but test on a scrap piece first.
- Lost Parts: Due to the small size of many components, work in a well-lit, uncluttered area. If a part is lost, consider carefully crafting a replacement from similar colored paper if possible.
- Complex Sections: Take breaks if you feel frustrated. Sometimes stepping away and returning with fresh eyes can help clarify a difficult step.
Specifications
| Feature | Detail |
|---|---|
| Product Dimensions (Assembled) | 4.1 x 4.1 x 2.76 inches (105 x 105 x 70 mm) |
| Item Weight | 6.4 ounces |
| Model Number | MK07-08 |
| Scale | 1/150 |
| Manufacturer | Sankei |
| Recommended Age | Adult collector/crafter (due to complexity and small parts) |
| Reference Production Time | 15 hours |
| Difficulty Level | High (★★★★★★) |
Warranty and Support
This product is a craft kit. Due to the nature of assembly, specific warranties on the finished product are not typically offered. However, if you encounter missing or defective parts upon opening the package, please contact the retailer or manufacturer for assistance. Keep your proof of purchase.


