
1. Introduction
Thank you for choosing the Soundstream TX1.2000D Mono D Tarantula Car Audio Amplifier. This amplifier is designed to deliver powerful and clear audio performance for your vehicle's sound system. This manual provides essential information for the proper installation, operation, and maintenance of your amplifier. Please read this manual thoroughly before attempting to install or operate the unit.
Proper installation and understanding of the amplifier's features will ensure optimal performance and longevity of the product.
2. Safety Information
To prevent injury or damage to the amplifier, please observe the following safety precautions:
- Always disconnect the vehicle's battery negative terminal before beginning any installation.
- Ensure all wiring is properly routed and secured to prevent pinching or short circuits.
- Use appropriate gauge power and ground wires as specified in the installation section.
- Do not mount the amplifier in areas exposed to direct sunlight, excessive heat, moisture, or dust.
- Never operate the amplifier if it is damaged or malfunctioning. Refer to the troubleshooting section or contact a qualified technician.
- Avoid listening to audio at extremely high volumes for extended periods, as this can cause hearing damage.
3. Product Overview
The Soundstream TX1.2000D is a high-performance mono (single channel) amplifier from the Tarantula series, designed for driving subwoofers with significant power. It features a robust design and advanced circuitry to ensure stable and efficient power delivery.
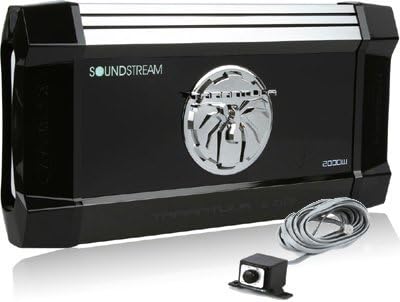
Image: Front view of the Soundstream TX1.2000D Mono D Tarantula Car Audio Amplifier, showcasing its black finish, chrome spider logo, and included remote bass knob with cable.
4. Setup and Installation
4.1 Unpacking
Carefully remove the amplifier from its packaging. Inspect the unit for any signs of damage that may have occurred during shipping. Retain the packaging for future transport or storage.
4.2 Tools Required
- Wire strippers/crimpers
- Screwdrivers (Phillips and flathead)
- Wrench set
- Digital Multimeter (DMM)
- Drill (for mounting)
- Safety glasses
4.3 Mounting Location
Choose a mounting location that is dry, well-ventilated, and away from direct heat sources. Ensure sufficient airflow around the amplifier for proper cooling. Common locations include under seats, in the trunk, or behind rear seats. The amplifier is designed for surface mounting.
4.4 Wiring Connections
Follow these steps for proper wiring:
- Power (B+) Connection: Connect a high-quality power cable (e.g., 0-gauge or 4-gauge depending on system requirements) from the amplifier's B+ terminal directly to the positive terminal of the vehicle's battery. Install an appropriate fuse holder (not included) within 18 inches of the battery.
- Ground (GND) Connection: Connect a power cable of the same gauge as the B+ cable from the amplifier's GND terminal to a clean, unpainted metal surface of the vehicle's chassis. Ensure a solid, low-resistance connection.
- Remote (REM) Turn-On Connection: Connect a small gauge wire (e.g., 18-gauge) from the amplifier's REM terminal to the remote turn-on output of your head unit. This wire signals the amplifier to turn on when the head unit is active.
- RCA Input Connections: Connect RCA cables from your head unit's subwoofer or full-range pre-outs to the amplifier's RCA input jacks.
- Speaker Output Connections: Connect your subwoofer(s) to the amplifier's speaker output terminals. Ensure correct polarity (+ to + and - to -) for optimal performance. Refer to your subwoofer's specifications for impedance matching.
5. Operating the Amplifier
5.1 Initial Power-Up
After all connections are made and verified, reconnect the vehicle's battery negative terminal. Turn on your head unit. The amplifier's power indicator light should illuminate, indicating it is receiving power and is operational.
5.2 Adjusting Controls
- Gain Control: This control matches the amplifier's input sensitivity to the output level of your head unit. Start with the gain control at its minimum setting. Play a familiar track with a strong bass signal. Slowly increase the gain until you hear distortion, then back off slightly.
- Low Pass Filter (LPF): This control allows only frequencies below the set point to pass through to the subwoofer. Adjust this to blend the subwoofer's output seamlessly with your main speakers. A common starting point is 80-100 Hz.
- Subsonic Filter: This filter removes extremely low frequencies that are below the audible range and can cause damage to subwoofers. Set this typically around 20-30 Hz, depending on your subwoofer's capabilities.
- Bass Boost: Use this control sparingly to enhance bass output at a specific frequency. Excessive bass boost can lead to distortion and potential damage to your speakers.
- Remote Bass Knob: The included remote bass knob allows for convenient adjustment of the subwoofer level from the driver's seat.
6. Maintenance
The Soundstream TX1.2000D amplifier requires minimal maintenance. Follow these guidelines to ensure its longevity:
- Cleaning: Periodically wipe the amplifier's exterior with a soft, dry cloth to remove dust and dirt. Do not use harsh chemicals or abrasive cleaners.
- Inspection: Regularly check all wiring connections to ensure they are secure and free from corrosion. Inspect fuses and replace them only with fuses of the correct rating.
- Ventilation: Ensure that the amplifier's cooling fins are not obstructed by debris or other objects to maintain proper heat dissipation.
7. Troubleshooting
If you experience issues with your amplifier, refer to the table below for common problems and their solutions:
| Problem | Possible Cause | Solution |
|---|---|---|
| Amplifier does not turn on | No power, ground, or remote signal; Blown fuse | Check all power, ground, and remote connections. Verify fuse at battery and on amplifier. |
| No sound output | RCA cables disconnected; Speaker wires disconnected; Gain too low; Head unit mute/volume | Check RCA and speaker connections. Adjust gain. Verify head unit settings. |
| Distorted sound | Gain set too high; Improper crossover settings; Speaker impedance mismatch | Reduce gain. Adjust LPF/Subsonic filters. Verify speaker impedance matches amplifier's capabilities. |
| Amplifier goes into protect mode | Overheating; Short circuit in speaker wiring; Low voltage | Ensure proper ventilation. Check speaker wires for shorts. Verify vehicle's charging system. |
If the problem persists after attempting these solutions, please contact Soundstream customer support or a qualified car audio professional.
8. Specifications
Detailed specifications for the Soundstream TX1.2000D amplifier:
| Feature | Value |
|---|---|
| Brand | Soundstream |
| Model | TX12000D |
| Number of Channels | 1 (Mono) |
| Output Power | 2000 Watts (Peak/Max) |
| Mounting Type | Surface Mount |
| Item Weight | 12.45 pounds |
| Package Dimensions | 23.2 x 12.7 x 4.5 inches |
| ASIN | B007Z6TRJ2 |
| Date First Available | April 30, 2012 |
9. Warranty and Support
Soundstream products are designed and manufactured to the highest quality standards. For specific warranty terms and conditions, please refer to the warranty card included with your product or visit the official Soundstream website. Keep your purchase receipt as proof of purchase for warranty claims.
For technical support, troubleshooting assistance beyond this manual, or service inquiries, please contact Soundstream customer service through their official website or authorized service centers. Always provide your product model number (TX12000D) and purchase details when seeking support.


