
Claber 87321
Claber Turbine Sprinkler User Manual
Model: 87321
1. Introduction
Thank you for choosing the Claber Turbine Sprinkler. This manual provides essential information for the proper installation, operation, and maintenance of your new sprinkler system. Designed for efficient and uniform irrigation, this turbine sprinkler offers a 30-360° rotation and covers an area of up to 450 m². Please read these instructions carefully before use to ensure optimal performance and longevity of your product.
2. Product Features
- Turbine mechanism for smooth and quiet operation.
- Adjustable spray pattern from 30° to 360° for precise watering.
- Designed for coverage up to 450 m².
- Durable plastic construction for long-lasting use.
- Hydraulic power supply for efficient water distribution.

Image 1: Claber Turbine Sprinkler with its packaging, showing the main unit and included nozzle accessories.
3. Specifications
| Attribute | Value |
|---|---|
| Product Dimensions | 10 x 10 x 10 cm |
| Item Weight | 358.34 g (0.36 Kilograms) |
| Model Number | 87321 |
| Material Type | Plastic |
| Power Source Type | Hydraulic Power Supply |
| Brand | Claber |
| Colour | Nero/Arancione/Grigio |
| Coverage Area | Up to 450 m² (as per product title) |
| Rotation Angle | 30-360° (as per product title) |
4. Setup
Proper setup is crucial for the efficient operation of your Claber Turbine Sprinkler.
4.1 Placement
Choose a location in your garden that requires irrigation and allows the sprinkler to cover the desired area without obstruction. For optimal coverage, consider placing the sprinkler in the center of the area or at strategic points to ensure overlapping coverage if using multiple units.
4.2 Connection to Water Supply
- Ensure your water supply is turned off before connecting the sprinkler.
- Attach a standard garden hose to the inlet connection at the base of the sprinkler. Ensure the connection is tight to prevent leaks.
- If burying the sprinkler, ensure proper plumbing connections are made according to local codes.
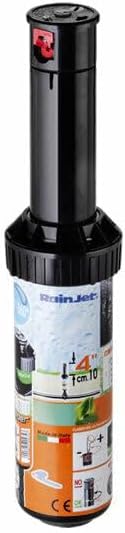
Image 2: Close-up view of the Claber Turbine Sprinkler head, showing the nozzle and adjustment points.
5. Operating Instructions
The Claber Turbine Sprinkler is designed for easy operation and adjustment.
5.1 Adjusting Spray Angle (Arc)
The sprinkler allows for adjustment of the spray arc from 30° to 360°.
- Locate the adjustment mechanism on the top of the sprinkler head. This typically involves a collar or a screw.
- Rotate the collar or use the provided key/screwdriver to set the desired arc. One side of the arc is usually fixed, and you adjust the other side to define the watering sector.
- For full 360° coverage, set the arc to its maximum rotation.
5.2 Adjusting Spray Distance
The spray distance can be adjusted by changing the nozzle or by using the diffuser screw.
- Nozzle Selection: The sprinkler comes with various nozzles. Select a nozzle that provides the desired flow rate and spray distance for your application. Refer to the nozzle chart (if provided with the product) for specific performance data.
- Diffuser Screw: A screw located on the top of the nozzle can be turned to break up the water stream, reducing the spray distance. Turn clockwise to decrease distance, counter-clockwise to increase.

Image 3: The Claber Turbine Sprinkler actively watering a green lawn, demonstrating its spray pattern.
6. Maintenance
Regular maintenance will extend the life of your Claber Turbine Sprinkler and ensure consistent performance.
6.1 Cleaning the Filter
Periodically check and clean the filter located at the base of the sprinkler to prevent clogging from debris in the water supply.
- Turn off the water supply.
- Unscrew the sprinkler from its connection.
- Remove the filter screen from the inlet.
- Rinse the filter under running water to remove any accumulated dirt or debris.
- Reinsert the clean filter and reattach the sprinkler.
6.2 Winterization
In regions with freezing temperatures, it is essential to winterize your sprinkler system to prevent damage.
- Drain all water from the sprinkler and connecting hoses before the first frost.
- If the sprinkler is installed below ground, ensure the system is properly blown out with compressed air (consult a professional if unsure).
- Store portable sprinklers in a dry, frost-free location.
7. Troubleshooting
| Problem | Possible Cause | Solution |
|---|---|---|
| Sprinkler not rotating or rotating slowly. | Low water pressure, clogged filter, debris in turbine mechanism. | Check water supply pressure. Clean the filter (Section 6.1). Flush the system to remove debris. |
| Uneven water distribution. | Incorrect nozzle, improper arc adjustment, low pressure. | Ensure correct nozzle is installed. Re-adjust the spray arc (Section 5.1). Verify adequate water pressure. |
| Water leaking from connections. | Loose connection, damaged washer/gasket. | Tighten connections. Replace worn or damaged washers/gaskets. |
| Sprinkler not popping up fully (for pop-up models). | Low water pressure, debris around riser, damaged spring. | Increase water pressure. Clear debris from around the sprinkler head. Inspect for damage. |
8. Warranty and Support
For information regarding product warranty, returns, or technical support, please refer to the purchase documentation or contact Claber customer service directly.
You can often find support information on the official Claber website or through the retailer where the product was purchased.
- Manufacturer: Claber
- Model: 87321
- ASIN: B007VDIZTW
- Date First Available: 17 April 2012
Related documents87321


Ask a question about this manual
Ask about setup, troubleshooting, compatibility, parts, safety, or missing instructions. Manuals+ will review the question and use this page’s manual context to help answer it.