1. Introduction
This manual provides detailed instructions for the installation, operation, and maintenance of your TYT TH-9000D VHF Mono Band Mobile Transceiver. Please read this manual thoroughly before using the radio to ensure proper function and safety.
Product Overview
The TYT TH-9000D is a powerful VHF mobile transceiver designed for reliable communication. Key features include:
- VHF (220-260MHz) operation
- Up to 50 Watts output power
- 200 programmable memory channels
- CTCSS/DCS, Scan, DTMF functions
- Emergency Alarm feature
- User-programmable P1-P5 front function keys
The radio is supplied with a keypad microphone, power cord, and mounting bracket.
2. Safety Information
Observe the following precautions to prevent fire, personal injury, or damage to the radio:
- Do not operate the radio in explosive atmospheres.
- Do not transmit without an antenna connected.
- Ensure proper ventilation to prevent overheating during prolonged transmission.
- Use only the specified power supply (13.8V DC).
- Keep the radio away from water and moisture.
3. Package Contents
Verify that all items are present in the package:
- TYT TH-9000D Transceiver Unit
- Keypad Microphone
- DC Power Cord
- Mounting Bracket with Hardware
- User Manual (this document)
4. Radio Components
Front Panel
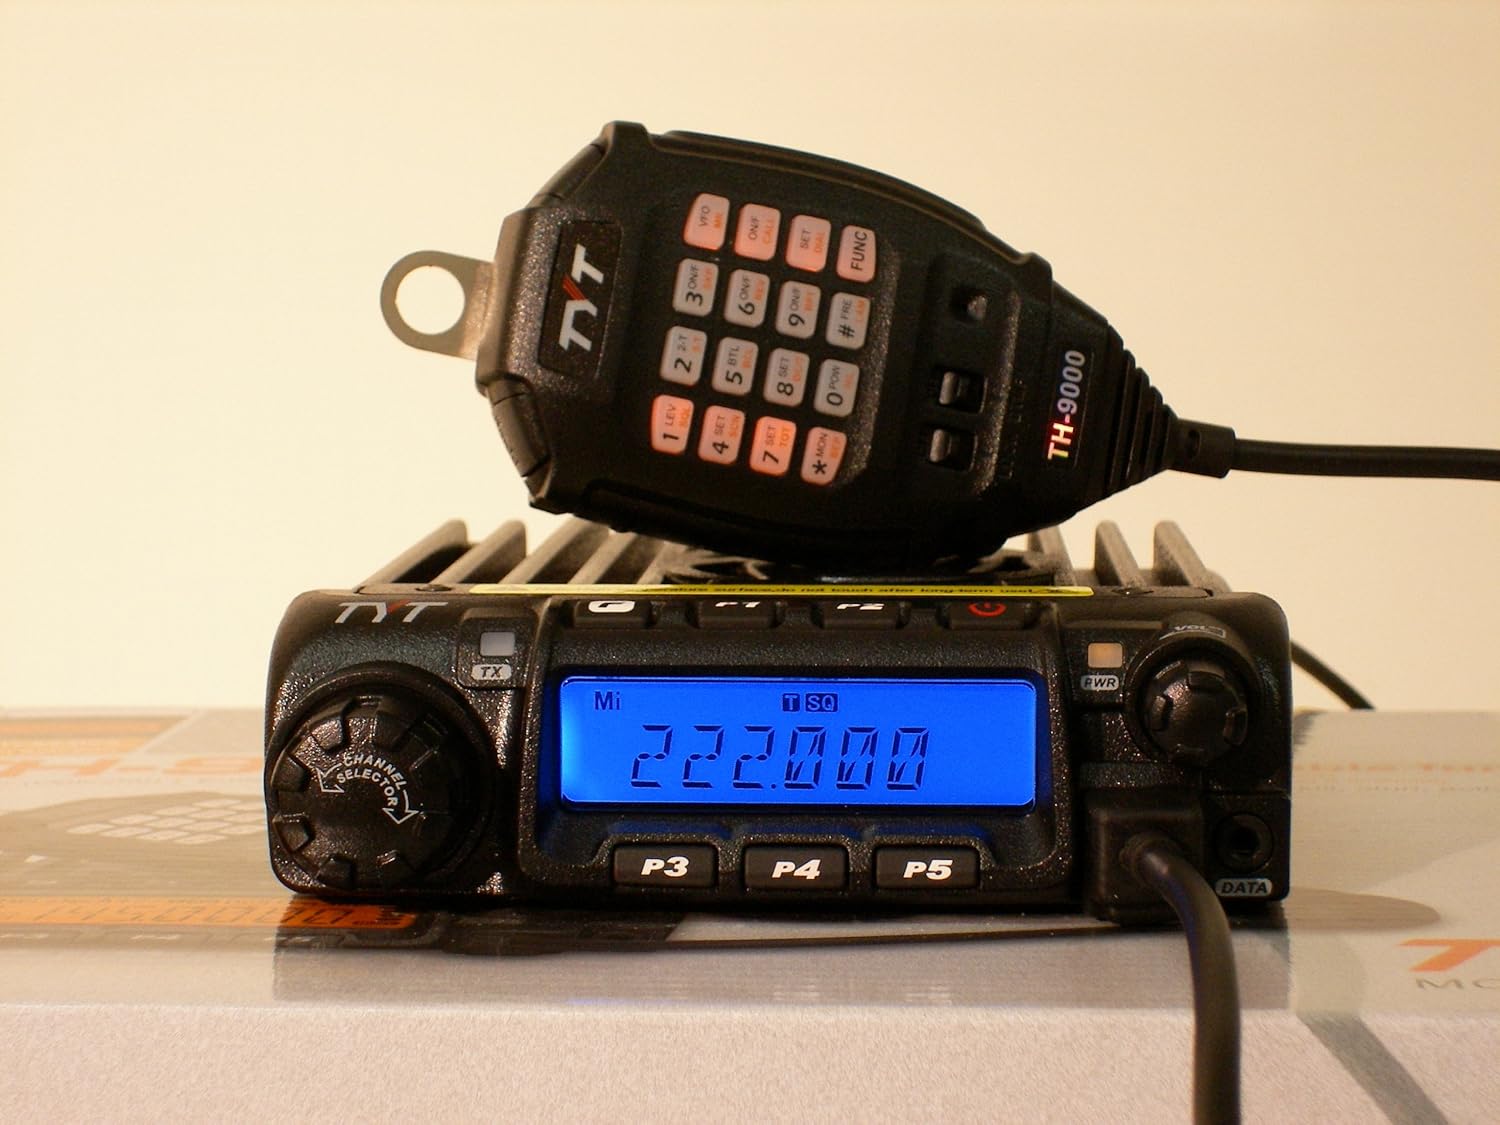
Image Description: A close-up view of the TYT TH-9000D mobile radio and its keypad microphone. The radio unit features a blue backlit LCD display showing "222.000" MHz, a channel selector knob on the left, and power/volume knobs on the right. Below the display are three programmable function buttons labeled P3, P4, P5. The microphone, connected via a coiled cable, rests on top of the radio, displaying its numeric keypad and function buttons, along with the "TH-9000" model designation.
- LCD Display: Shows frequency, channel number, and various status indicators.
- Channel Selector Knob: Used to select channels or adjust frequency.
- VOL/PWR Knob: Controls power on/off and audio volume.
- P1-P5 Buttons: User-programmable function keys.
- TX Indicator: Illuminates when transmitting.
Keypad Microphone
- Numeric Keypad: For direct frequency entry and DTMF tones.
- Function Keys: Dedicated buttons for various radio functions (e.g., VFO, MR, FUNC, SET).
- Up/Down Buttons: For channel or frequency adjustment.
5. Setup and Installation
5.1 Mobile Installation
- Mounting the Transceiver:
Select a secure location in your vehicle that does not obstruct driving or airbag deployment. Use the provided mounting bracket and hardware to firmly attach the radio. Ensure adequate space around the heatsink for ventilation.
- Power Connection:
Connect the supplied DC power cord directly to the vehicle's 12V battery. The red wire connects to the positive (+) terminal, and the black wire connects to the negative (-) terminal. Ensure the connection is fused correctly (refer to specifications for fuse rating). Avoid connecting to the cigarette lighter socket for full power operation.
- Antenna Connection:
Connect a suitable VHF antenna (220-260MHz) with a PL-259 connector to the antenna jack on the rear of the transceiver. Ensure the antenna is properly tuned for the operating frequency range to prevent damage to the radio.
- Microphone Connection:
Plug the keypad microphone into the front panel microphone jack.
5.2 Base Station Installation
- Power Supply:
Use a regulated 13.8V DC power supply capable of providing at least 12 Amperes for full power operation. Connect the red wire of the DC power cord to the positive (+) terminal and the black wire to the negative (-) terminal of the power supply.
- Antenna:
Connect a properly tuned base station antenna for the 220-260MHz band. Ensure the antenna cable is of good quality and the connections are secure.
- Grounding:
For optimal performance and safety, ensure your base station setup is properly grounded.
6. Basic Operation
6.1 Power On/Off and Volume
Rotate the VOL/PWR knob clockwise to turn the radio on. Continue rotating to adjust the audio volume. Rotate counter-clockwise until a click is heard to turn the radio off.
6.2 Frequency/Channel Selection
- VFO Mode (Frequency Mode): Press the VFO button on the microphone to enter VFO mode. Use the Channel Selector knob or the microphone's Up/Down buttons to change the frequency. You can also directly enter the frequency using the numeric keypad.
- Memory Mode (Channel Mode): Press the MR button on the microphone to enter Memory mode. Use the Channel Selector knob or the microphone's Up/Down buttons to select a stored memory channel.
6.3 Transmitting and Receiving
To transmit, press and hold the PTT (Push-To-Talk) button on the side of the microphone. Speak clearly into the microphone. Release the PTT button to receive.
6.4 Squelch Adjustment
The squelch function mutes the speaker when no signal is present. To adjust, press the SQL button (if programmed to a P-key or microphone key) or refer to the advanced settings for squelch level adjustment. Adjust until background noise is suppressed but weak signals can still be heard.
6.5 Power Output Selection
The TH-9000D offers multiple power output levels (e.g., High, Medium, Low). Press the POW button (if programmed) on the microphone to cycle through the available power settings. Use the lowest power necessary for reliable communication to conserve power and reduce interference.
7. Advanced Features
7.1 Memory Channel Programming
The radio can store up to 200 memory channels. Programming typically involves setting the desired frequency, offset, CTCSS/DCS tone, and then saving it to a memory location. Refer to the detailed programming section in the full manual for step-by-step instructions, or consider using programming software for easier management.
7.2 CTCSS/DCS Tones
CTCSS (Continuous Tone-Coded Squelch System) and DCS (Digital Coded Squelch) are used to filter out unwanted signals. To set CTCSS/DCS, access the menu system or use the dedicated function keys. Select the desired tone or code for both transmit and receive.
7.3 Scan Function
The scan function allows the radio to automatically search for active signals across frequencies or memory channels. Press the SCAN button (if programmed) to initiate scanning. The radio will stop on an active channel and resume scanning after a set delay.
7.4 Emergency Alarm
The TH-9000D includes an emergency alarm feature. Activation methods and alarm types can usually be configured via the menu or a programmable function key. Use this feature responsibly.
8. Maintenance
- Cleaning: Use a soft, dry cloth to clean the radio's exterior. Do not use abrasive cleaners or solvents.
- Connections: Periodically check all cable connections (power, antenna, microphone) for security and corrosion.
- Firmware: Check the manufacturer's website for any available firmware updates.
9. Troubleshooting
| Problem | Possible Cause | Solution |
|---|---|---|
| No Power | Loose power connection; Blown fuse; Faulty power supply. | Check power cable connections; Replace fuse; Verify power supply output. |
| No Audio | Volume too low; Squelch set too high; External speaker not connected properly. | Increase volume; Adjust squelch level; Check external speaker connection. |
| Cannot Transmit | Antenna not connected; Incorrect frequency/offset; PTT button faulty. | Connect antenna; Verify frequency and repeater offset settings; Test PTT button. |
| Poor Reception/Transmission | Poor antenna connection/tuning; High SWR; Interference. | Check antenna and cable; Verify antenna SWR; Identify and mitigate interference sources. |
10. Specifications
- Frequency Range: 220-260MHz (VHF)
- Number of Channels: 200
- Output Power: 50W / 25W / 10W (selectable)
- Operating Voltage: 13.8V DC (±15%)
- Dimensions (W x H x D): Approximately 13.1 x 3.4 x 9.8 inches (Package dimensions, actual unit may vary slightly)
- Weight: Approximately 4.25 pounds
- Special Features: Emergency Alarm, CTCSS/DCS, DTMF, Scan
11. Warranty and Support
For warranty information and technical support, please refer to the documentation provided with your purchase or visit the official TYT website. Keep your purchase receipt as proof of purchase.
Manufacturer: TYT
Model: TH-9000
ASIN: B007T4L23E


