Important Safety Instructions
When using electrical appliances, basic safety precautions should always be followed to reduce the risk of fire, electric shock, and/or injury to persons, including the following:
- Read all instructions before operating this product.
- Do not touch hot surfaces. Use handles or knobs.
- To protect against electrical shock, do not immerse cord, plugs, or heating unit in water or other liquid.
- Close supervision is necessary when any appliance is used by or near children.
- Unplug from outlet when not in use and before cleaning. Allow to cool before putting on or taking off parts.
- Do not operate any appliance with a damaged cord or plug or after the appliance malfunctions or has been damaged in any manner. Return appliance to the nearest authorized service facility for examination, repair, or adjustment.
- The use of accessory attachments not recommended by the appliance manufacturer may cause injuries.
- Do not use outdoors.
- Do not let cord hang over edge of table or counter, or touch hot surfaces.
- Do not place on or near a hot gas or electric burner, or in a heated oven.
- Extreme caution must be used when moving an appliance containing hot oil or other hot liquids.
- Always attach plug to appliance first, then plug cord into the wall outlet. To disconnect, turn any control to “OFF,” then remove plug from wall outlet.
- Do not use appliance for other than intended use.
- Avoid sudden temperature changes, such as adding refrigerated foods into a heated pot.
- The ceramic pot is designed for use with this appliance only. It must never be used on a range top.
- Do not place a hot pot on a wet or cold surface.
- Do not use a cracked pot or a loose lid.
- Do not wrap cord around appliance when storing.
SAVE THESE INSTRUCTIONS.
Parts and Features
Familiarize yourself with the components of your Rival 2-Quart Slow Cooker.
- Tempered Glass Lid: Allows you to monitor cooking progress without releasing heat.
- Removable Ceramic Pot: The cooking vessel, which can also be used for serving.
- Heating Base: Contains the heating element and control dial.
- Control Dial: Used to select cooking settings (OFF, LOW, HIGH, WARM).
- Power Indicator Light: Illuminates when the unit is powered on.
- Slide-Proof Feet: Provides stability on countertops.
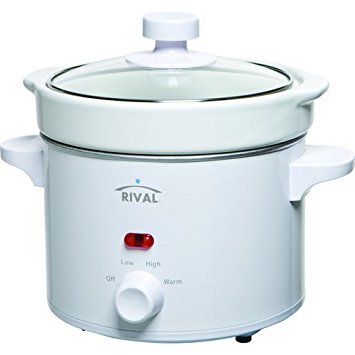
Image: The Rival 2-Quart Slow Cooker, showing the white heating base, removable ceramic pot, and tempered glass lid. The control dial is visible on the front of the base.
Setup and First Use
- Unpack: Carefully remove all packaging materials and labels from the slow cooker.
- Clean: Wash the ceramic pot and glass lid in warm, soapy water. Rinse thoroughly and dry completely. The heating base can be wiped with a damp cloth. Do not immerse the heating base in water.
- Placement: Place the heating base on a dry, level, heat-resistant surface, away from the edge of the counter.
- Insert Pot: Place the clean ceramic pot into the heating base.
- Initial Run (Optional): For first-time use, it is recommended to operate the slow cooker on the LOW setting for 2-4 hours with 1 cup of water in the ceramic pot. This helps to burn off any manufacturing residues. Discard the water and wash the pot again before cooking food.
Operating Instructions
Cooking with Your Slow Cooker
- Prepare Food: Place all ingredients into the ceramic pot. Do not overfill; ensure there is at least 1 inch of space from the top rim of the pot to allow for steam and bubbling.
- Cover: Place the glass lid securely on the ceramic pot.
- Plug In: Plug the slow cooker into a standard electrical outlet. The power indicator light will illuminate.
- Select Setting: Turn the control dial to your desired cooking setting:
- LOW: For slow, gentle cooking over a longer period (typically 6-8 hours).
- HIGH: For faster cooking (typically 3-4 hours). One hour on HIGH is approximately equal to 2 to 2.5 hours on LOW.
- WARM: Use only to keep cooked food at a serving temperature. Do not use the WARM setting for cooking raw food.
- Cooking Time: Follow your recipe's recommended cooking times. Avoid lifting the lid frequently, as this releases heat and can extend cooking time.
- Serve: Once cooking is complete, turn the control dial to the WARM setting if you wish to keep food warm for serving, or to OFF if serving immediately.
- Unplug: Always unplug the slow cooker from the outlet when cooking is finished and before cleaning.
Tips for Best Results
- For best results, ensure the ceramic pot is at least half full but not more than three-quarters full.
- Root vegetables (carrots, potatoes) cook slower than meat. Place them at the bottom of the pot.
- Dairy products and fresh herbs should be added during the last hour of cooking.
- Do not use the ceramic pot on a stovetop burner or in a conventional oven.
Care and Cleaning
Proper care ensures the longevity of your slow cooker.
- Unplug and Cool: Always unplug the slow cooker and allow it to cool completely before cleaning.
- Ceramic Pot and Lid: The removable ceramic pot and tempered glass lid are dishwasher safe. Alternatively, they can be washed by hand with warm, soapy water. Avoid abrasive cleaners or scouring pads that could scratch the surface.
- Heating Base: Wipe the exterior of the heating base with a soft, damp cloth. Do not use abrasive cleaners. Never immerse the heating base in water or any other liquid.
- Storage: Store the slow cooker with the lid inverted on the ceramic pot, inside the heating base, in a dry place.
Troubleshooting
| Problem | Possible Cause | Solution |
|---|---|---|
| Slow cooker does not turn on. | Unit is not plugged in or outlet is not functioning. | Ensure the power cord is securely plugged into a working electrical outlet. Check the circuit breaker. |
| Food is not cooking properly or is undercooked. | Lid was lifted too often; incorrect setting used; pot overfilled. | Avoid lifting the lid during cooking. Ensure the correct setting (LOW or HIGH) is selected. Do not overfill the pot. Adjust cooking time as needed. |
| Food is burning or overcooked. | Incorrect setting used; cooked for too long. | Ensure the correct setting (LOW or HIGH) is selected. Reduce cooking time or switch to the WARM setting earlier. |
| Ceramic pot appears discolored. | Mineral deposits from water or food. | Fill the pot with warm water and add 2 tablespoons of white vinegar. Let it soak for a few hours or overnight, then scrub gently. |
Product Specifications
- Model Number: YHJ20DW
- Capacity: 2 Quarts (approximately 1.89 Liters)
- Color: White
- Material: Tempered Glass (lid), Ceramic (pot)
- Dimensions: Approximately 25.4 x 20.57 x 25.65 cm (10 x 8.1 x 10.1 inches)
- Weight: Approximately 2.99 kg (6.6 lbs)
- Voltage: 220 Volts (Please verify compatibility with your local power supply)
- Settings: OFF, LOW, HIGH, WARM
Warranty and Support
This Rival slow cooker is manufactured to high-quality standards. For specific warranty information, please refer to the warranty card included with your purchase or visit the official Rival website. If you have any questions, require assistance, or need to report a defect, please contact Rival customer service.
Please retain your proof of purchase for any warranty claims.


