1. Introduction
This manual provides essential instructions for the installation, configuration, and operation of your ASRock H77 PRO4/MVP LGA1155 ATX Motherboard. Designed for Intel 2nd and 3rd generation Core i7/i5/i3 processors, this motherboard offers robust performance and expandability for various computing needs. Please read this manual thoroughly before proceeding with installation to ensure proper setup and to maximize the lifespan of your components.
2. What's in the Box
Verify that all items are present in your motherboard package:
- ASRock H77 PRO4/MVP Motherboard
- Quick Installation Guide
- Support CD (for drivers and utilities)
- I/O Shield
- 2 x SATA Data Cables

3. Setup and Installation
Follow these steps for proper installation of your motherboard and components:
- Prepare the Chassis: Install the I/O shield into the rear opening of your computer case.
- Install the Motherboard: Carefully place the motherboard into the chassis, aligning the screw holes. Secure it with screws.
- Install the CPU: Open the CPU socket lever, align the CPU with the socket (matching the golden triangle on the CPU to the triangle on the socket), gently place the CPU, and close the lever.
- Install the CPU Cooler: Attach the CPU cooler according to its manufacturer's instructions.
- Install Memory (RAM): Open the clips on the DDR3 DIMM slots. Align the memory modules with the slots, ensuring the notch on the module matches the notch in the slot. Press firmly until the clips lock into place. This motherboard supports up to 32GB of DDR3-1600/1333/1066 memory.
- Install Expansion Cards: Insert graphics cards into the PCI-Express 3.0 x16 or PCI-Express 2.0 x16 slots. Other expansion cards (e.g., sound cards, network cards) can be installed in the PCI-Express 2.0 x1 or PCI slots.
- Connect Storage Devices: Use the provided SATA cables to connect your SATA3 (6Gb/s) and SATA2 (3Gb/s) storage devices (HDDs, SSDs) to the corresponding ports on the motherboard.
- Connect Power Supply: Connect the 24-pin ATX power connector and the 8-pin 12V power connector from your power supply to the motherboard.
- Connect Front Panel Cables: Connect the power button, reset button, HDD LED, power LED, and front USB/audio headers to their respective pins on the motherboard. Refer to the detailed motherboard diagram in the full manual for exact pin locations.

Driver Installation
After installing your operating system, install the necessary drivers from the provided Support CD or download the latest versions from the ASRock official website. This includes chipset drivers, audio drivers, LAN drivers, and any other utility drivers.
General Motherboard Overview (LGA1155)
This video provides a general overview of an LGA1155 motherboard, demonstrating common components and connections. While not specific to the H77 PRO4/MVP model, it offers helpful visual context for users unfamiliar with LGA1155 motherboard layouts and basic handling.
4. Operating Your Motherboard
BIOS/UEFI Setup
To enter the BIOS/UEFI setup utility, press the Delete key during the Power-On Self-Test (POST) sequence. The BIOS/UEFI allows you to configure system settings such as boot order, CPU parameters, memory timings, and integrated peripherals. Save your changes before exiting.
Operating System Installation
Insert your operating system installation media (USB drive or DVD) and set the boot priority in the BIOS/UEFI to boot from the media. Follow the on-screen instructions to install your preferred operating system.
5. Specifications
| Feature | Description |
|---|---|
| CPU Socket | LGA1155 |
| Supported CPUs | 2nd/3rd generation Intel Core i7/i5/i3 Processors (Supports Intel Turbo Boost 2.0 Technology, Hyper-Threading Technology) |
| Chipset | Intel H77 Chipset |
| Memory | 4x DDR3 DIMM Slots, Non-ECC, Unbuffered, Dual Channel, Max Capacity up to 32GB (DDR3-1600/1333/1066) |
| Expansion Slots | 1x PCI-Express 3.0 x16, 1x PCI-Express 2.0 x16 (runs at x4), 1x PCI-Express 2.0 x1, 3x PCI Slots |
| Storage | 4x SATA3 Ports (6Gb/s), 4x SATA2 Ports (3Gb/s), Supports RAID 0, 1, 5, 10 |
| USB Ports | 10x USB 2.0 Ports (6 rear, 4 via headers), 4x USB 3.0 Ports (2 rear, 2 via headers) |
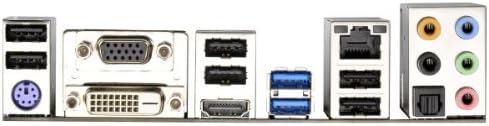
| Rear I/O Ports | 1x PS/2 Keyboard Port, 1x Optical S/PDIF Out, 1x RJ45 LAN Port, 1x HDMI Port, 1x DVI Port, 1x VGA Port, Audio I/O Jacks |
| Power Connector | 1x 24pin ATX Power Connector, 1x 8pin 12V Power Connector |
| Form Factor | ATX |
| Dimensions | 12 x 3 x 7.9 inches |
| Weight | 3 pounds |
6. Troubleshooting
If you encounter issues, consider the following common troubleshooting steps:
- No Power: Ensure all power cables (24-pin ATX, 8-pin 12V, and power supply to wall) are securely connected. Check the power supply unit (PSU) switch.
- No Display: Verify that your monitor is connected to the correct video output on your graphics card or motherboard. Reseat your graphics card and RAM modules. Test with a single RAM stick if multiple are installed.
- System Instability/Crashes: Check CPU and GPU temperatures. Ensure all drivers are up to date. Test memory modules individually.
- Peripheral Not Detected: Ensure USB devices are connected to functional ports. Install necessary drivers for the peripheral.
- BIOS/UEFI Issues: If you cannot enter the BIOS or experience boot loops, try clearing the CMOS. This can usually be done by removing the CMOS battery for a few minutes or using a dedicated jumper on the motherboard (refer to the full manual for location).
For more detailed troubleshooting, consult the comprehensive user manual available on the ASRock support website.
7. Warranty and Support
Your ASRock H77 PRO4/MVP Motherboard is covered by a manufacturer's warranty. For specific warranty terms, conditions, and duration, please refer to the warranty card included with your product or visit the official ASRock website. For technical support, driver downloads, and further assistance, please visit the ASRock support page:


