1. Introduction
Thank you for choosing the BONTEC TV Wall Bracket. This full-motion wall mount is designed to securely hold 37-80 inch LED LCD flat and curved screen televisions, offering exceptional flexibility for optimal viewing angles. Manufactured from reinforced, compressed steel, it ensures durability and safety for your television. This manual provides essential information for safe installation, operation, and maintenance of your TV wall bracket.
2. Safety Information
Please read all instructions carefully before installation and use. Failure to follow these instructions may result in serious personal injury, property damage, or voiding of your warranty.
- Weight Capacity: Do not exceed the maximum load weight of 65 kg (144 lbs).
- Wall Type: This bracket is designed for installation on wood studs, concrete walls, or brick walls. DO NOT MOUNT ON DRYWALL ALONE without securing to a stud or using appropriate heavy-duty anchors for hollow walls.
- Professional Installation: If you are unsure about the installation process or the suitability of your wall, consult a qualified professional.
- Check VESA Pattern: Ensure your TV's VESA pattern is compatible with the bracket before beginning installation.
- Secure Fasteners: Ensure all screws and bolts are securely tightened before mounting the TV. Do not overtighten.
- Cable Management: Route cables carefully to prevent pinching or damage when adjusting the TV.
3. Package Contents
Verify that all components are present and undamaged before installation. If any parts are missing or defective, contact BONTEC customer support.
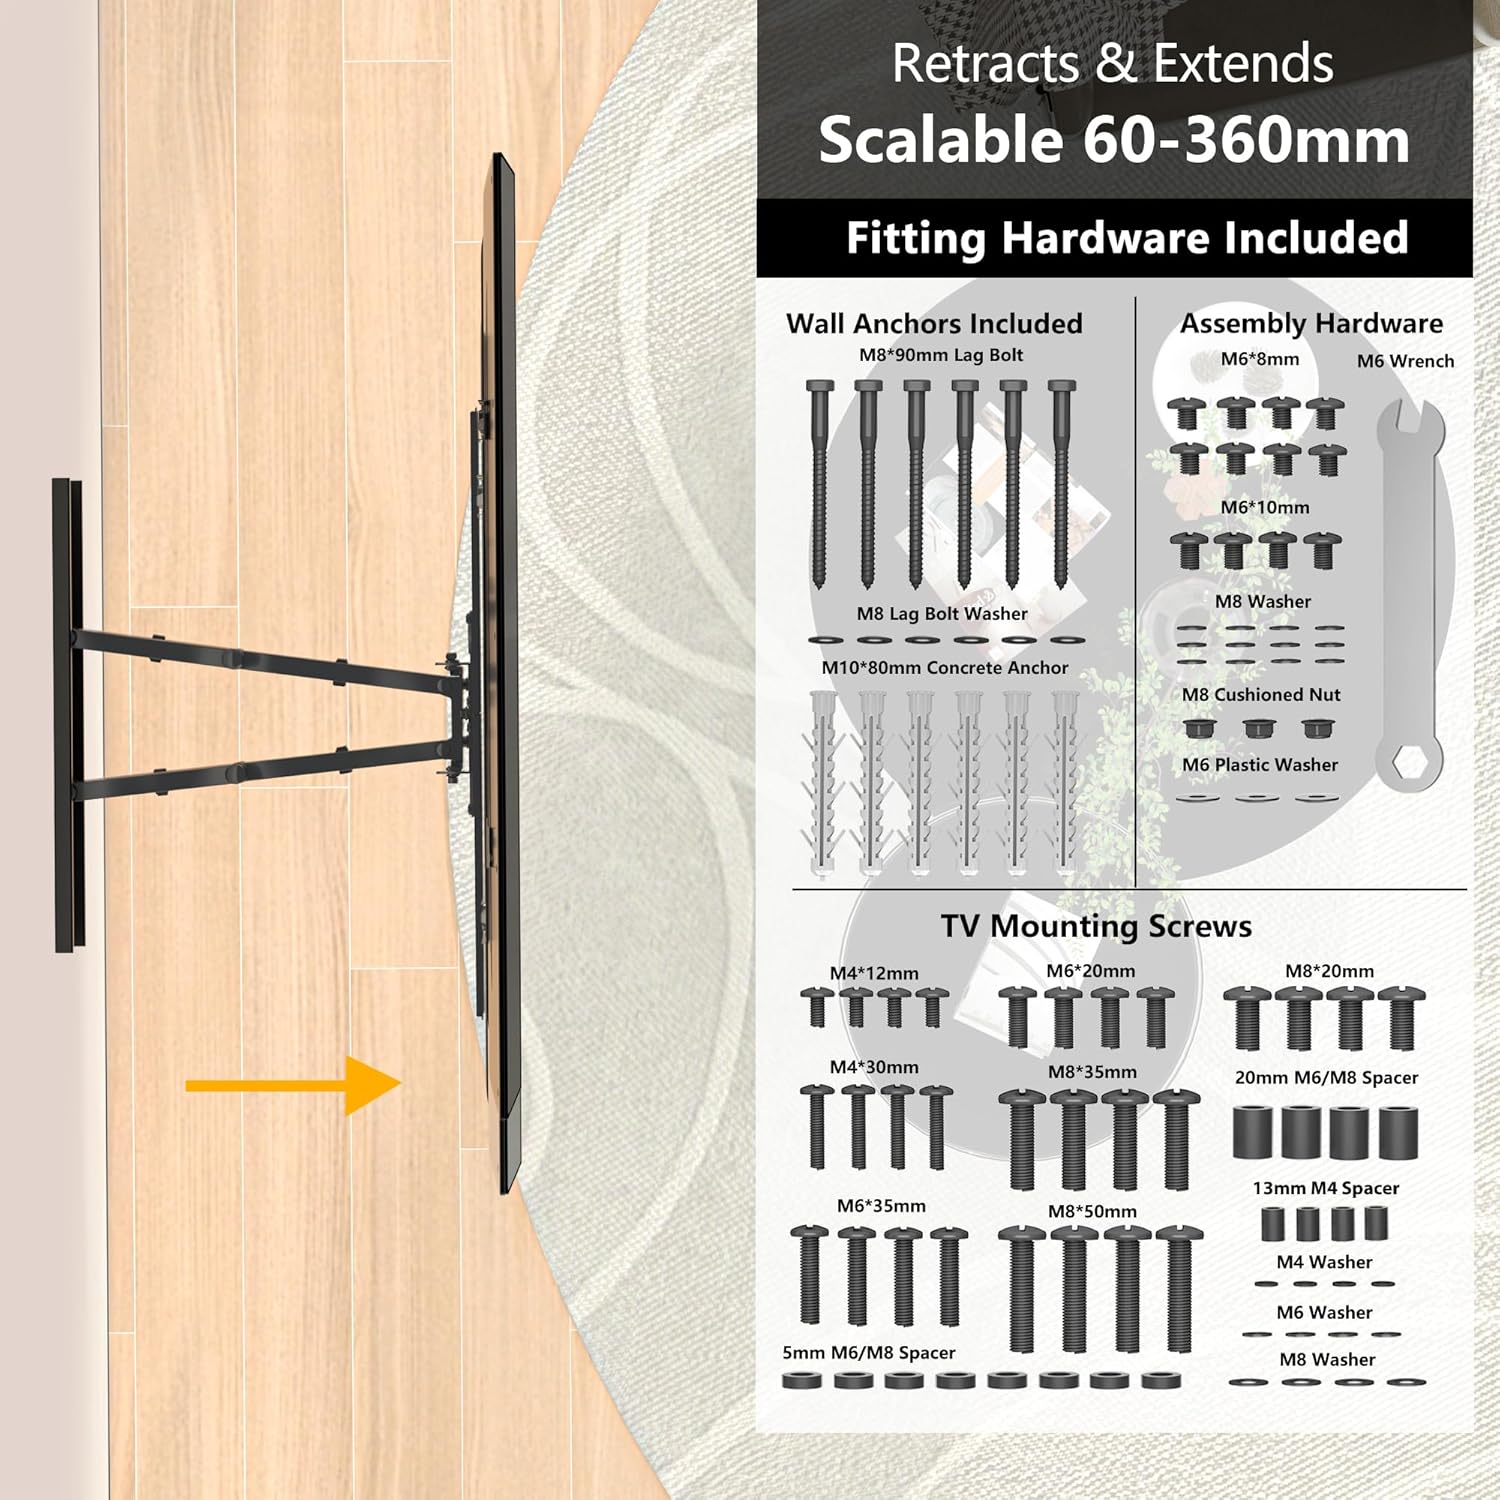
Image: Overview of included fitting hardware and TV mounting screws.
- TV Wall Bracket Assembly
- Wall Anchors (M8*90mm Lag Bolts, M10*80mm Concrete Anchors)
- Assembly Hardware (M6*6mm, M6*10mm screws, M8 Washers, M8 Cushioned Nuts, M6 Plastic Washers, M6 Wrench)
- TV Mounting Screws (Various sizes: M4*12mm, M4*30mm, M6*20mm, M6*35mm, M8*20mm, M8*35mm, M8*50mm)
- Spacers (20mm M6/M8, 13mm M4, 5mm M6/M8)
- Washers (M4, M6, M8)
- 1.8m HDMI Cable
- Spirit Level
- Illustrated Instructions
4. Specifications
| Feature | Description |
|---|---|
| Compatible TV Sizes | 37 - 80 inches |
| VESA Compatibility | 100x100, 200x100, 200x200, 300x200, 300x300, 400x200, 400x400, 600x400mm |
| Maximum Load Capacity | 65 kg (144 lbs) |
| Tilt Angle | +5° (up) to -15° (down) |
| Swivel Angle | ±45° (left to right) |
| Rotation Adjustment | ±3° (level adjustment) |
| Wall Distance (Retracted) | 60mm |
| Wall Distance (Extended) | 360mm |
| Material | Reinforced, Compressed Steel |
| Product Dimensions | 64 x 45 x 43 cm |
| Product Weight | 7.71 kg |

Image: TV size and VESA compatibility overview.
5. Setup and Installation
Follow these steps for a secure and efficient installation. It is recommended to have at least two people for installation, especially when mounting the TV.
5.1. Pre-Installation Checks
- Verify TV Compatibility: Check your TV's VESA pattern and weight against the specifications.
- Identify Wall Type: Determine if your wall is wood stud, concrete, or brick. Use the appropriate anchors and drilling methods.
- Locate Studs (for wood walls): Use a stud finder to accurately locate the center of wood studs.
- Clear Area: Ensure the installation area is clear of obstructions, electrical wires, and plumbing.

Image: Diverse wall compatibility information.
5.2. Mounting the Wall Plate
- Position the Template: Hold the wall plate or use the provided template against the wall at your desired height. Use the spirit level to ensure it is perfectly horizontal.
- Mark Drill Holes: Mark the drilling points through the holes on the wall plate.
- Drill Holes: Drill pilot holes according to the marked points and the type of wall. For concrete/brick, use a masonry drill bit and insert concrete anchors. For wood studs, drill pilot holes directly into the center of the studs.
- Attach Wall Plate: Secure the wall plate to the wall using the appropriate lag bolts and washers. Tighten firmly but do not overtighten.
5.3. Attaching Brackets to TV
- Lay TV Face Down: Carefully place your TV face down on a soft, clean surface to prevent scratches.
- Attach TV Brackets: Align the vertical TV brackets with the VESA mounting holes on the back of your TV. Use the correct size screws and spacers from the provided hardware kit. Ensure the brackets are securely fastened.
5.4. Hanging the TV and Final Adjustments
- Hang TV: With assistance, carefully lift the TV and hook the TV brackets onto the wall plate. Ensure the TV is securely seated on the wall plate.
- Secure TV: Use the safety screws or locking mechanisms on the TV brackets to secure the TV to the wall plate, preventing accidental dislodgement.
- Adjust Level: Use the ±3° rotation adjustment feature to fine-tune the TV's level if needed.

Image: Easy installation steps.
6. Operating and Adjustments
The BONTEC TV Wall Bracket offers full motion capabilities for an optimized viewing experience.
6.1. Swivel Adjustment
Gently push or pull the TV to swivel it up to 45° left or right. This allows you to direct the screen towards different viewing areas in your room.

Image: Swivel adjustment for optimal viewing.
6.2. Tilt Adjustment
To adjust the vertical tilt, gently push the top or bottom of the TV. The bracket allows for a tilt of +5° up and -15° down, helping to reduce glare and improve viewing comfort.

Image: Tilt and level adjustment features.
6.3. Extension and Retraction
The dual arms allow the TV to extend up to 360mm from the wall and retract to a low profile of 60mm, saving space when not in use.
6.4. Cable Management
Utilize the integrated cable management system on the bracket arms to neatly route and conceal unsightly cables, maintaining a clean and tidy appearance.
7. Maintenance
Regular maintenance ensures the longevity and safe operation of your TV wall bracket.
- Cleaning: Wipe the bracket with a soft, dry cloth. Avoid using abrasive cleaners or solvents that could damage the finish.
- Periodic Checks: Periodically check all mounting screws and bolts to ensure they remain tight and secure. Over time, vibrations or adjustments may cause them to loosen slightly.
- Lubrication: The moving parts are designed for smooth operation and generally do not require lubrication. If movement becomes stiff, consult BONTEC customer support.
8. Troubleshooting
If you encounter any issues with your BONTEC TV Wall Bracket, refer to the following common problems and solutions.
- TV is not level: Use the ±3° rotation adjustment feature to fine-tune the level. Ensure the wall plate was installed horizontally using the spirit level.
- Bracket feels unstable or sags:
- Verify that the TV weight does not exceed the 65 kg (144 lbs) maximum capacity.
- Ensure all wall mounting bolts and TV attachment screws are securely tightened.
- Confirm that the bracket is mounted to appropriate wall studs or solid concrete/brick, not just drywall.
- Difficulty adjusting the TV (swivel/tilt/extension):
- Check for any obstructions preventing movement.
- Ensure no cables are caught in the moving parts.
- The joints are designed to be firm to hold the TV's position. Apply gentle, steady pressure.
If the problem persists after attempting these solutions, please contact BONTEC customer support for further assistance.
9. Warranty and Support
For information regarding warranty coverage, returns, or technical support, please refer to the documentation provided at the time of purchase or visit the official BONTEC website. Keep your purchase receipt as proof of purchase.
BONTEC Customer Service: Please refer to the contact information provided on the product packaging or the official BONTEC website for the most up-to-date support channels.


