1. Introduction
This manual provides detailed instructions for the safe and effective operation of the KAISE SK-7720 Clamp Meter. The SK-7720 is a versatile instrument designed for accurate electrical measurements in automotive and mechanical maintenance applications. It features a current and voltage double display, True RMS measurement for distorted waveforms, and functions such as Peak Hold, Max/Min recording, and deviation measurement. The main case is designed with dustproof and splash-proof characteristics for enhanced durability.
2. Safety Information
Always observe the following safety precautions to prevent electric shock or personal injury, and to avoid damage to the meter or the equipment under test.
- Read and understand all instructions in this manual before using the meter.
- Do not use the meter if it appears damaged or if the insulation is compromised.
- Ensure the rotary switch is in the correct position for the measurement being performed.
- Do not exceed the maximum input limits for any function.
- Use caution when working with voltages above 30V AC RMS, 42V peak, or 60V DC. These voltages pose a shock hazard.
- Replace the battery immediately when the low battery indicator appears to ensure accurate readings.
- Do not operate the meter in explosive gas, vapor, or dust environments.
3. Product Components and Features
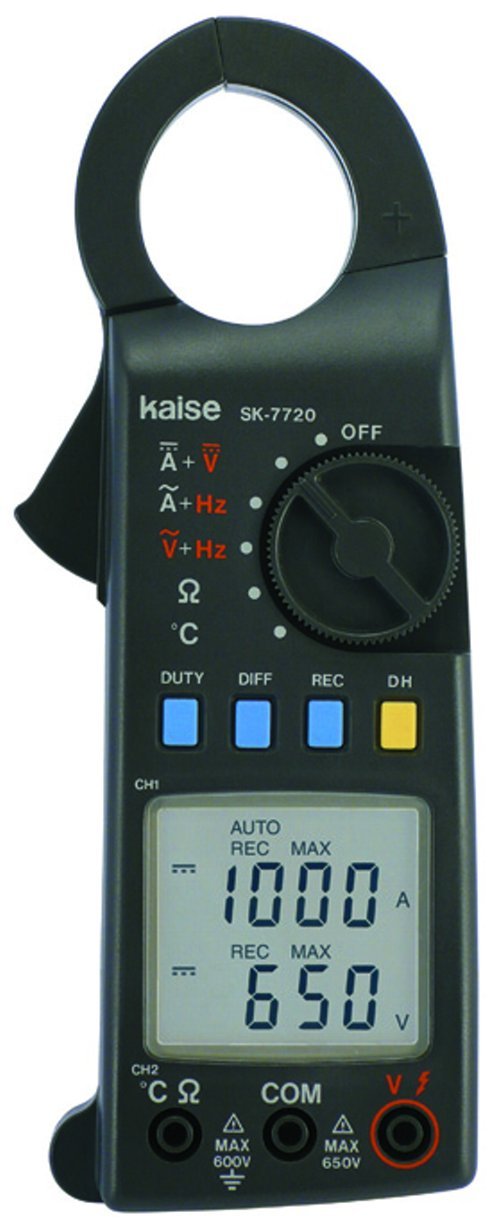
Figure 1: KAISE SK-7720 Clamp Meter Overview
This image displays the KAISE SK-7720 Clamp Meter. It features a black body with a large clamp jaw at the top for non-contact current measurement. The front panel includes a rotary switch for function selection (OFF, DC Current + DC Voltage, AC Current + Frequency, AC Voltage + Frequency, Resistance, Temperature), four blue buttons (DUTY, DIFF, REC), and one yellow button (DH for Data Hold). A clear LCD screen shows measurement values, such as '1000 A' and '650 V'. Below the screen are input terminals labeled CH2 (°C Ω), COM (Common), and VΩ, with maximum voltage ratings indicated (MAX 600V, MAX 650V).
Key Features:
- Clamp Jaw: For non-contact measurement of AC/DC current.
- Rotary Switch: Selects measurement functions (OFF, A+V, A+Hz, V+Hz, Ω, °C).
- LCD Display: Digital readout of measurements, including dual display for current/voltage.
- Function Buttons:
- DUTY: Duty Cycle measurement.
- DIFF: Differential measurement.
- REC: Record function (Max/Min).
- DH: Data Hold.
- Input Terminals: For voltage, resistance, and temperature probe connections.
4. Setup and Battery Installation
4.1 Battery Installation
- Ensure the meter is turned OFF.
- Locate the battery compartment cover on the rear of the meter.
- Use a screwdriver to remove the screw securing the battery cover.
- Insert one 9V 6F22 battery, observing the correct polarity (+/-).
- Replace the battery cover and secure it with the screw.
4.2 Initial Power-On
Turn the rotary switch from the "OFF" position to any measurement function. The LCD display will illuminate, indicating the meter is ready for use. If the display does not light up, check the battery installation or replace the battery.
5. Operating Instructions
The KAISE SK-7720 offers various measurement modes. Always select the appropriate function before connecting the meter to a circuit.
5.1 Current Measurement (A)
To measure AC or DC current:
- Turn the rotary switch to the A+V (DC Current) or A+Hz (AC Current) position.
- Open the clamp jaw by pressing the lever.
- Enclose only one conductor of the circuit within the clamp jaw. Ensure the jaw is fully closed. The maximum measurement conductor diameter is 36 mm (1.4 inches).
- Read the current value on the LCD display.
5.2 Voltage Measurement (V)
To measure AC or DC voltage:
- Connect the black test lead to the COM terminal and the red test lead to the VΩ terminal.
- Turn the rotary switch to the A+V (DC Voltage) or V+Hz (AC Voltage) position.
- Connect the test leads in parallel to the circuit or component you wish to measure.
- Read the voltage value on the LCD display.
5.3 Resistance Measurement (Ω)
To measure resistance:
- Connect the black test lead to the COM terminal and the red test lead to the CH2 (°C Ω) terminal.
- Turn the rotary switch to the Ω position.
- Ensure the circuit or component under test is de-energized before connecting the test leads.
- Connect the test leads across the component.
- Read the resistance value on the LCD display.
5.4 Frequency Measurement (Hz)
Frequency can be measured in conjunction with AC Current or AC Voltage:
- For AC Current frequency, select A+Hz.
- For AC Voltage frequency, select V+Hz.
- The frequency value will be displayed on the secondary display or indicated by a specific symbol.
5.5 Temperature Measurement (°C)
To measure temperature:
- Connect a compatible temperature probe (not included) to the CH2 (°C Ω) and COM terminals.
- Turn the rotary switch to the °C position.
- Place the temperature probe at the desired measurement point.
- Read the temperature value on the LCD display.
5.6 Function Buttons
- DUTY: Press to measure the duty cycle of a signal.
- DIFF: Activates differential measurement mode. Refer to the full manual for detailed usage.
- REC: Press to activate the recording function, allowing the meter to capture maximum and minimum readings. Press again to cycle through MAX, MIN, and current readings.
- DH (Data Hold): Press to freeze the current reading on the display. Press again to release.
6. Maintenance
6.1 Cleaning
Wipe the case with a damp cloth and mild detergent. Do not use abrasives or solvents. Ensure the meter is completely dry before use.
6.2 Battery Replacement
Replace the 9V battery when the low battery indicator appears on the display. Refer to Section 4.1 for battery installation instructions.
6.3 Storage
If the meter is not used for an extended period, remove the battery to prevent leakage and damage. Store the meter in a cool, dry place away from direct sunlight.
7. Troubleshooting
| Problem | Possible Cause | Solution |
|---|---|---|
| Meter does not power on. | Dead or incorrectly installed battery. | Check battery polarity or replace the 9V battery. |
| Inaccurate readings. | Low battery, incorrect function selected, or external interference. | Replace battery, verify function setting, move away from strong electromagnetic fields. |
| "OL" or "OVER" displayed. | Measurement exceeds the meter's range. | Select a higher range if available, or ensure the input is within specifications. |
8. Technical Specifications
- Model: SK-7720
- Measurement Type: Clamp Meter (Ammeter, Voltmeter, Ohmmeter, Frequency, Temperature)
- Current Frequency Response (ACA): 40Hz - 400Hz
- Voltage Frequency Response (ACV): 40Hz - 400Hz
- Battery: 1 x 9V 6F22 (included)
- Dimensions: 200 x 64 x 33 mm (7.9 x 2.5 inches)
- Weight: 310 Grams
- Measurement Conductor Diameter: 36 mm (1.4 inches)
- Features: True RMS, Peak Hold, Max/Min, Deviation Measurement, Dustproof and Splash-proof (main case).
9. Warranty Information
This KAISE SK-7720 Clamp Meter is covered by a standard manufacturer's warranty against defects in materials and workmanship. The warranty period typically begins from the date of purchase. Please retain your proof of purchase for warranty claims. This warranty does not cover damage caused by misuse, accident, unauthorized repair, or normal wear and tear. For specific warranty terms and conditions, please refer to the documentation provided with your purchase or contact Kaise customer support.
10. Customer Support
For technical assistance, troubleshooting, or service inquiries regarding your KAISE SK-7720 Clamp Meter, please contact your local distributor or the manufacturer's customer support. You may find contact information on the product packaging or the official Kaise website.
Manufacturer: Kaise


