
1. Introduction and Overview
The Elna 3210 Jeans Sewing Machine is a robust mechanical sewing machine designed to meet a wide range of sewing needs, from everyday projects to more demanding tasks like sewing denim. It combines practical features with an intuitive design, making it suitable for various skill levels. This manual provides comprehensive instructions for setting up, operating, maintaining, and troubleshooting your Elna 3210 to ensure optimal performance and longevity.

Figure 1: Front view of the Elna 3210 Jeans Sewing Machine, showing the stitch selection panel open and the main body.
2. Key Features
The Elna 3210 is equipped with a variety of features to enhance your sewing experience:
Technical Features:
- Stitch Selection Display: Clearly indicates the selected stitch pattern.
- Reverse Key: For reinforcing stitches at the beginning and end of seams.
- Built-in Needle Threader: Simplifies the needle threading process.
- Strong Needle Penetration: Ensures effective sewing through various fabric types, including thick materials like denim.
- Rotary Horizontal Hook with Transparent Bobbin Cover: Allows for easy monitoring of bobbin thread supply.
- Automatic Declutch Bobbin Winder: Automatically stops winding when the bobbin is full.
- Built-in Thread Cutter: Conveniently cuts threads after sewing.
- Drop Feed Dog: Enables free-motion sewing and darning.
- Adjustable Foot Pressure: Allows adjustment of presser foot pressure for different fabric thicknesses.
- Extra Presser Foot Lift: Provides additional clearance for bulky fabrics.
- Clip-on Presser Feet: For quick and easy changing of presser feet.
- Metric/Inch Measurement: Markings on needle plate and bobbin cover plate for precise measurements.
- Free Arm: Facilitates sewing cylindrical items like sleeves and pant hems.
- Carrying Handle: For easy portability.
- Vinyl Dust Cover: Protects the machine when not in use.
- 2 Accessory Storage Areas: Conveniently stores presser feet, bobbins, needles, quilt guide, and other accessories.
Sewing Features:
- 19 Stitches: Includes a variety of utility and decorative stitches.
- One-step Buttonhole: Simplifies the creation of perfectly sized buttonholes.
- Maximum Stitch Width 6.5mm: Allows for wider decorative stitches.
3. Setup Guide
3.1 Unpacking and Placement
Carefully remove the sewing machine from its packaging. Place the machine on a stable, flat surface with adequate lighting. Ensure there is enough space around the machine for fabric movement.
3.2 Power Connection
Connect the power cord to the machine and then to a suitable electrical outlet. Ensure the foot controller is also connected.
3.3 Winding the Bobbin
To wind the bobbin, place a spool of thread on the spool pin. Guide the thread through the bobbin winding tension disc and then around the bobbin. Place the bobbin onto the bobbin winder spindle and push it to the right. Press the foot controller to start winding. The automatic declutch feature will stop winding when the bobbin is full.

Figure 2: Illustrates the process of inserting a wound bobbin into the bobbin case area.
3.4 Threading the Machine
Follow the numbered threading path indicated on the machine. Ensure the presser foot is raised before threading the upper thread. Use the built-in needle threader for convenience. For the bobbin thread, place the wound bobbin into the bobbin case and pull the thread through the tension spring. Replace the bobbin cover.

Figure 3: Detailed view of the needle, presser foot, and needle plate, showing the area where threading occurs.
4. Operating Instructions
4.1 Stitch Selection
Turn the stitch selection dial to choose from the 19 available stitches, including utility stitches, decorative stitches, and the one-step buttonhole. The selected stitch will be indicated on the display.
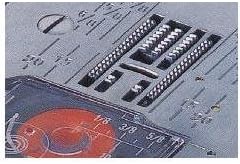
Figure 4: View of the needle plate area, showing stitch patterns and measurement markings.
4.2 Sewing Basics
Place your fabric under the presser foot. Lower the presser foot using the presser foot lifter. Gently press the foot controller to begin sewing. Use the reverse key to secure stitches at the beginning and end of seams. The machine's strong needle penetration allows for smooth sewing through multiple layers of fabric.

Figure 5: The Elna 3210 sewing machine in operation, demonstrating its capability to sew through denim.
4.3 Using the One-Step Buttonhole
Attach the one-step buttonhole foot. Place a button in the buttonhole foot's holder. Select the buttonhole stitch. The machine will automatically sew a buttonhole to the size of the inserted button.

Figure 6: The one-step buttonhole foot ready for use, simplifying buttonhole creation.
4.4 Free Arm Sewing
Remove the accessory storage compartment to reveal the free arm. This feature is ideal for sewing cuffs, sleeves, pant hems, and other small, circular items.

Figure 7: The accessory storage area, which can be removed to convert the machine to free arm mode.

Figure 8: A selection of accessories that come with the Elna 3210, including different presser feet and a bobbin.
5. Maintenance
5.1 Cleaning the Machine
Regularly clean the bobbin area and feed dogs using the lint brush provided. Remove the needle plate and clean any lint or thread buildup. Do not use harsh chemicals for cleaning.
5.2 Storage
When not in use, cover the machine with the provided vinyl dust cover to protect it from dust and debris. Store in a dry, stable environment.

Figure 9: The vinyl dust cover, designed to protect the sewing machine from dust and damage.
6. Troubleshooting
This section addresses common issues you might encounter with your Elna 3210 sewing machine. For more complex problems, consult an authorized service center.
6.1 Thread Breaking
- Check Threading: Ensure both upper and bobbin threads are correctly threaded according to the manual.
- Needle Condition: Replace bent, dull, or incorrect size needles.
- Tension Settings: Adjust upper and bobbin thread tension.
- Thread Quality: Use good quality thread suitable for your fabric.
6.2 Skipped Stitches
- Needle Type/Size: Ensure the correct needle type and size for your fabric.
- Needle Insertion: Re-insert the needle correctly, ensuring it is fully seated and facing the right direction.
- Threading: Re-thread the machine completely.
6.3 Machine Not Starting
- Power Connection: Verify the power cord and foot controller are securely plugged in.
- Bobbin Winder: Ensure the bobbin winder spindle is pushed to the left (sewing position).
- Main Power Switch: Check if the machine's main power switch is on.
7. Specifications
| Attribute | Detail |
|---|---|
| Brand | Elna |
| Model Number | 3210 |
| Product Dimensions | 7.5"D x 16.5"W x 12"H (19.05 x 41.91 x 30.48 cm) |
| Item Weight | 23.1 pounds (10.48 kg) |
| Color | Dark Gray or Black (main body is white with blue accents) |
| Number of Stitches | 19 (including buttonhole) |
| Buttonhole Type | One-step |
| Maximum Stitch Width | 6.5mm |
| Hook Type | Rotary Horizontal |
| Date First Available | July 10, 2014 |

Figure 10: Dimensions of the Elna 3210 Jeans Sewing Machine, shown with the dust cover.
8. Warranty and Support
The Elna 3210 Jeans Sewing Machine is covered by a manufacturer's warranty. For specific warranty terms, duration, and conditions, please refer to the warranty card included with your product or visit the official Elna website. In case of technical issues or for service inquiries, it is recommended to contact an authorized Elna dealer or service center. Keep your proof of purchase for warranty claims.


