1. Introduction
This manual provides essential instructions for the installation, operation, and maintenance of your Intel Server Board S1200BTLR. This server board is designed to support Intel Xeon Processor E3-1200 series based on the Next-Generation Intel Microarchitecture (Sandy Bridge).
Key features include:
- 4 DDR3 (1066/1333MHz) ECC UDIMM sockets (Unbuffered)
- Multiple PCI Express slots for expansion: 1x PCIe 2.0 x8 (x16 mechanical), 1x PCIe 2.0 x8 (x8 mechanical), 1x PCIe 2.0 x4 (x8 mechanical), 1x PCIe x4 (x8 mechanical), and 1x PCI 32/33 (5V) slot
- 6 SATA ports (2x 6Gbps, 4x 3Gbps) via Intel C204 chipset with Intel Embedded Server RAID Technology and Intel RST
- Embedded Intel Dual Gigabit Controller 82574L and 82578DM
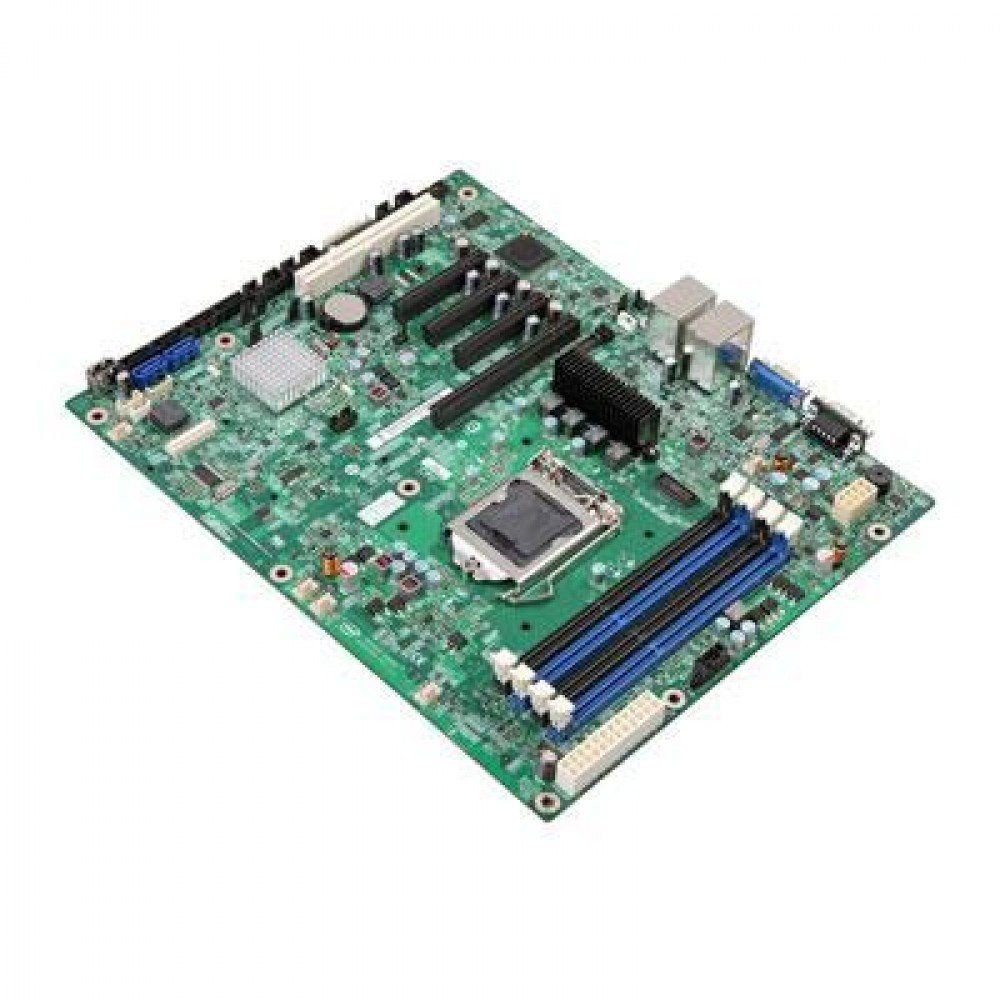
Figure 1: Intel Server Board S1200BTLR. This image displays the full layout of the server motherboard, highlighting the CPU socket, RAM slots, PCI Express slots, and various connectors.
2. Setup and Installation
Before beginning installation, ensure your workspace is clean, well-lit, and static-free. Use an anti-static wrist strap to prevent damage to components.
2.1. Required Components
- Intel Xeon Processor E3-1200 series (LGA 1155 socket compatible)
- DDR3 ECC UDIMM memory modules (1066/1333MHz)
- Compatible power supply unit (PSU)
- Storage devices (SATA hard drives or SSDs)
- Server chassis
- Operating system installation media
2.2. Processor Installation
- Locate the LGA 1155 CPU socket on the motherboard.
- Gently lift the load plate lever and open the load plate.
- Align the processor's triangular mark with the corresponding mark on the socket. Carefully place the processor into the socket without forcing it.
- Close the load plate and secure it with the lever.
- Apply thermal paste and install the CPU cooler according to its manufacturer's instructions.
2.3. Memory Installation
- Identify the four DDR3 UDIMM sockets.
- Open the retention clips at both ends of the memory slot.
- Align the memory module's notch with the key in the slot.
- Insert the module firmly into the slot until the retention clips snap into place.
- Repeat for additional memory modules, ensuring proper channel configuration as per your system requirements.
2.4. Storage Device Connection
- Connect SATA data cables from your storage devices to the SATA ports on the motherboard. The board features 2x 6Gbps ports and 4x 3Gbps ports.
- Connect power cables from the PSU to your storage devices.
2.5. Power Supply Connection
- Connect the 24-pin ATX main power connector from the PSU to the corresponding socket on the motherboard.
- Connect the 8-pin (or 4-pin) ATX 12V CPU power connector to the motherboard.
2.6. Expansion Card Installation
The server board includes various PCI Express and PCI slots:
- 1x PCI Express 2.0 x8 slot (x16 mechanical)
- 1x PCI Express 2.0 x8 slot (x8 mechanical)
- 1x PCI Express 2.0 x4 slot (x8 mechanical)
- 1x PCI Express x4 slot (x8 mechanical)
- 1x PCI 32/33 (5V) slot
Insert expansion cards firmly into the appropriate slots and secure them with the chassis retention mechanism.
3. Operating Instructions
3.1. Initial Power On
- After all components are installed and connected, ensure the power supply is switched on.
- Press the power button on your server chassis.
- Monitor the POST (Power-On Self-Test) sequence.
3.2. BIOS/UEFI Configuration
During POST, press the designated key (usually DEL or F2) to enter the BIOS/UEFI setup utility. Here you can configure:
- Boot order
- SATA controller mode (AHCI, RAID)
- Memory settings
- Integrated peripherals
- System time and date
Refer to the Intel documentation for detailed BIOS/UEFI settings specific to the S1200BTLR.
3.3. Operating System Installation
Insert your operating system installation media (USB drive or DVD) and configure the BIOS/UEFI to boot from it. Follow the on-screen instructions to install your preferred server operating system (e.g., Linux, Windows Server).
3.4. Driver Installation
After OS installation, install all necessary drivers for the motherboard components, including chipset, network controllers (Intel Dual Gigabit Controller 82574L and 82578DM), and any integrated graphics or RAID controllers. Drivers are typically available on the Intel support website.
4. Maintenance
Regular maintenance ensures optimal performance and longevity of your Intel Server Board S1200BTLR.
4.1. Dust Removal
Periodically clean the interior of the server chassis to prevent dust buildup, which can lead to overheating. Use compressed air to gently remove dust from heatsinks, fans, and other components. Ensure the system is powered off and unplugged before cleaning.
4.2. Firmware and Driver Updates
Regularly check the Intel support website for updated BIOS/UEFI firmware and device drivers. Keeping these components up-to-date can improve stability, performance, and security.
4.3. Component Inspection
Occasionally inspect the motherboard for any signs of damage, loose connections, or bulging capacitors. Address any issues promptly.
5. Troubleshooting
This section provides solutions to common issues you might encounter.
5.1. No Power
- Verify that the power supply unit (PSU) is connected correctly to the motherboard (24-pin ATX and 8-pin/4-pin CPU power).
- Ensure the PSU is switched on and connected to a working power outlet.
- Check the power button connection from the chassis to the motherboard.
- Test the PSU with another system or a PSU tester if available.
5.2. No Display Output
- Ensure the monitor is connected to the correct video output port and is powered on.
- Reseat the memory modules. Incorrectly seated RAM is a common cause of no display.
- If using a dedicated graphics card, ensure it is properly seated in its PCIe slot and has auxiliary power connected (if required).
- Try booting with only one memory module installed.
5.3. System Instability or Crashes
- Check CPU and system temperatures. Overheating can cause instability. Ensure CPU cooler is properly installed.
- Run memory diagnostic tools to check for faulty RAM modules.
- Verify that all drivers are correctly installed and up-to-date.
- Check for BIOS/UEFI updates.
- Ensure the power supply is sufficient for all installed components.
5.4. Storage Device Not Detected
- Verify SATA data and power cables are securely connected to both the drive and the motherboard.
- Check BIOS/UEFI settings to ensure SATA ports are enabled and configured correctly (e.g., AHCI mode).
- Test the drive on another system or with a different SATA cable.
6. Specifications
| Feature | Detail |
|---|---|
| Model Name | S1200BTLR |
| Brand | Intel |
| CPU Socket | LGA 1155 |
| Compatible Processors | Intel Xeon E3-1200 series |
| Chipset Type | Intel C204 |
| RAM Memory Technology | DDR3 ECC UDIMM |
| Memory Clock Speed | 1066 MHz, 1333 MHz |
| Memory Slots | 4 |
| Max Memory Storage Capacity | 16 GB (per input) |
| PCI Express Slots | 1x PCIe 2.0 x8 (x16 mechanical), 1x PCIe 2.0 x8 (x8 mechanical), 1x PCIe 2.0 x4 (x8 mechanical), 1x PCIe x4 (x8 mechanical) |
| PCI Slots | 1x PCI 32/33 (5V) |
| SATA Ports | 6 (2x 6Gbps, 4x 3Gbps) with Intel Embedded Server RAID Technology and Intel RST |
| Network Controller | Embedded Intel Dual Gigabit Controller 82574L and 82578DM |
| Compatible Devices | Personal Computer (Server) |
| Platform | Linux (and other server OS) |
| Item Weight | 3.75 pounds |
| Date First Available | May 24, 2012 |
7. Support and Warranty
7.1. Technical Support
For technical assistance, driver downloads, and additional documentation, please visit the official Intel support website. You can find product-specific information by searching for "Intel Server Board S1200BTLR" or "S1200BTLR".
Intel's support resources typically include:
- Knowledge base articles
- Driver and software downloads
- Community forums
- Contact information for direct support
7.2. Warranty Information
Warranty terms and conditions for the Intel Server Board S1200BTLR are provided by Intel. Please refer to the warranty documentation included with your product or visit the Intel website for the most current warranty policy. Keep your proof of purchase for warranty claims.


