
Introduction
This manual provides essential instructions for the safe and effective use, setup, operation, and maintenance of your Grey Pneumatic 3050D 1-9/16" Deep Socket. Please read this manual thoroughly before using the product and retain it for future reference.
Product Overview
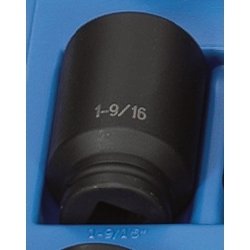
Image Description: A close-up view of the Grey Pneumatic 3050D 1-9/16" deep impact socket. The socket is black with the size "1-9/16" clearly marked in white lettering on its side. It features a robust, industrial design, indicating its use with impact wrenches. The socket is shown resting in a blue molded case or tray, highlighting its deep well design.
The Grey Pneumatic 3050D is a 1-9/16 inch deep impact socket designed for heavy-duty applications. It features a 3/4" drive and is constructed from durable Chrome Molybdenum Steel, ensuring strength and longevity for demanding tasks. This socket is engineered to withstand the high torque and impact forces generated by impact wrenches, making it suitable for professional and industrial use.
Setup
- Inspect the Socket: Before each use, visually inspect the socket for any signs of wear, cracks, or damage. Do not use a damaged socket.
- Select Compatible Drive Tool: Ensure you are using a 3/4" drive impact wrench or ratchet that is in good working condition.
- Attach to Drive Tool: Firmly push the square drive end of the socket onto the drive anvil of your impact wrench or ratchet until it clicks into place or is securely seated.
- Verify Fit: Gently pull on the socket to ensure it is securely attached to the drive tool before applying torque.
Operating Instructions
- Select Correct Fastener: Match the 1-9/16" deep socket to the corresponding 1-9/16" fastener (nut or bolt head). Ensure the socket fits snugly over the fastener.
- Position the Socket: Place the socket squarely onto the fastener, ensuring full engagement to prevent rounding of the fastener or slippage.
- Apply Torque: Operate your impact wrench or ratchet according to its manufacturer's instructions to loosen or tighten the fastener. Apply steady, controlled force.
- Remove Socket: Once the task is complete, remove the socket from the fastener and then from the drive tool.
Safety Note: Always wear appropriate personal protective equipment, including eye protection, when using impact tools and sockets. Do not use damaged sockets or drive tools. Ensure the workpiece is stable and secure before applying torque.
Maintenance
- Cleaning: After each use, wipe the socket clean of any dirt, grease, or debris using a clean cloth. For stubborn grime, a mild solvent can be used, followed by thorough drying.
- Inspection: Regularly inspect the socket for signs of wear, such as rounded corners, cracks, or deformation. Replace any damaged sockets immediately.
- Storage: Store the socket in a dry environment, away from moisture and corrosive materials, to prevent rust. A socket rail or tray is recommended for organized storage.
Troubleshooting
- Socket Not Fitting Fastener: Ensure the fastener size is exactly 1-9/16". If the fastener is worn or damaged, the socket may not fit correctly. Do not force the socket.
- Socket Slipping on Fastener: This indicates either an incorrect socket size, a worn socket, or a damaged fastener. Replace worn components.
- Socket Stuck on Drive Tool: Apply a small amount of penetrating oil to the drive end and gently wiggle the socket while pulling. If it remains stuck, inspect for damage to either the socket or the drive tool.
- Socket Cracking or Breaking: This usually indicates excessive force, improper use (e.g., using a standard socket with an impact wrench), or a defective product. Discontinue use immediately and replace the socket.
Specifications
| Model Number: | 3050D |
| Drive Size: | 3/4 inch |
| Socket Size: | 1-9/16 inch |
| Socket Type: | Deep Impact Socket |
| Material: | Chrome Molybdenum Steel |
| Finish Type: | Polished |
| Number of Pieces: | 1 |
| Item Weight: | 1.7 pounds |
| Product Dimensions: | 3.7 x 2.2 x 2.2 inches |
Warranty and Support
For information regarding warranty coverage, product support, or to inquire about replacement parts, please contact Grey Pneumatic directly through their official website or customer service channels. Retain your proof of purchase for warranty claims.