1. Introduction
This instruction manual provides detailed guidance for the safe and efficient operation of your Sanyo PLC-XT16 XGA Large Venue Projector. Please read this manual thoroughly before using the projector and retain it for future reference. Understanding the information contained herein will ensure optimal performance and longevity of your device.
2. Safety Information
Observe the following safety precautions to prevent fire, electric shock, or injury.
- Do not block ventilation openings. Ensure adequate space around the projector for proper airflow.
- Do not expose the projector to rain or moisture to prevent fire or electric shock.
- Refer all servicing to qualified service personnel. Do not attempt to open or repair the projector yourself.
- Avoid looking directly into the projector lens when the lamp is on, as it can cause eye damage.
- Use only the power cord supplied with the projector or a suitable replacement.
- Disconnect the power plug from the wall outlet if the projector is not to be used for an extended period.
3. Package Contents
Verify that all items listed below are included in your package. If any items are missing or damaged, contact your dealer.
- Sanyo PLC-XT16 Projector Unit
- Power Cord
- Remote Control
- VGA Cable (D-sub 15-pin)
- User Manual (this document)

Figure 3.1: Included Accessories. This image displays the remote control, a VGA cable, and a power cable, which are typically included with the Sanyo PLC-XT16 projector.
4. Product Overview
4.1 Front View

Figure 4.1: Front View. This image shows the front of the Sanyo PLC-XT16 projector, highlighting the central projection lens and the front ventilation grille.
4.2 Rear View and Connection Panel
The rear panel of the projector features various input and output ports for connecting external devices.
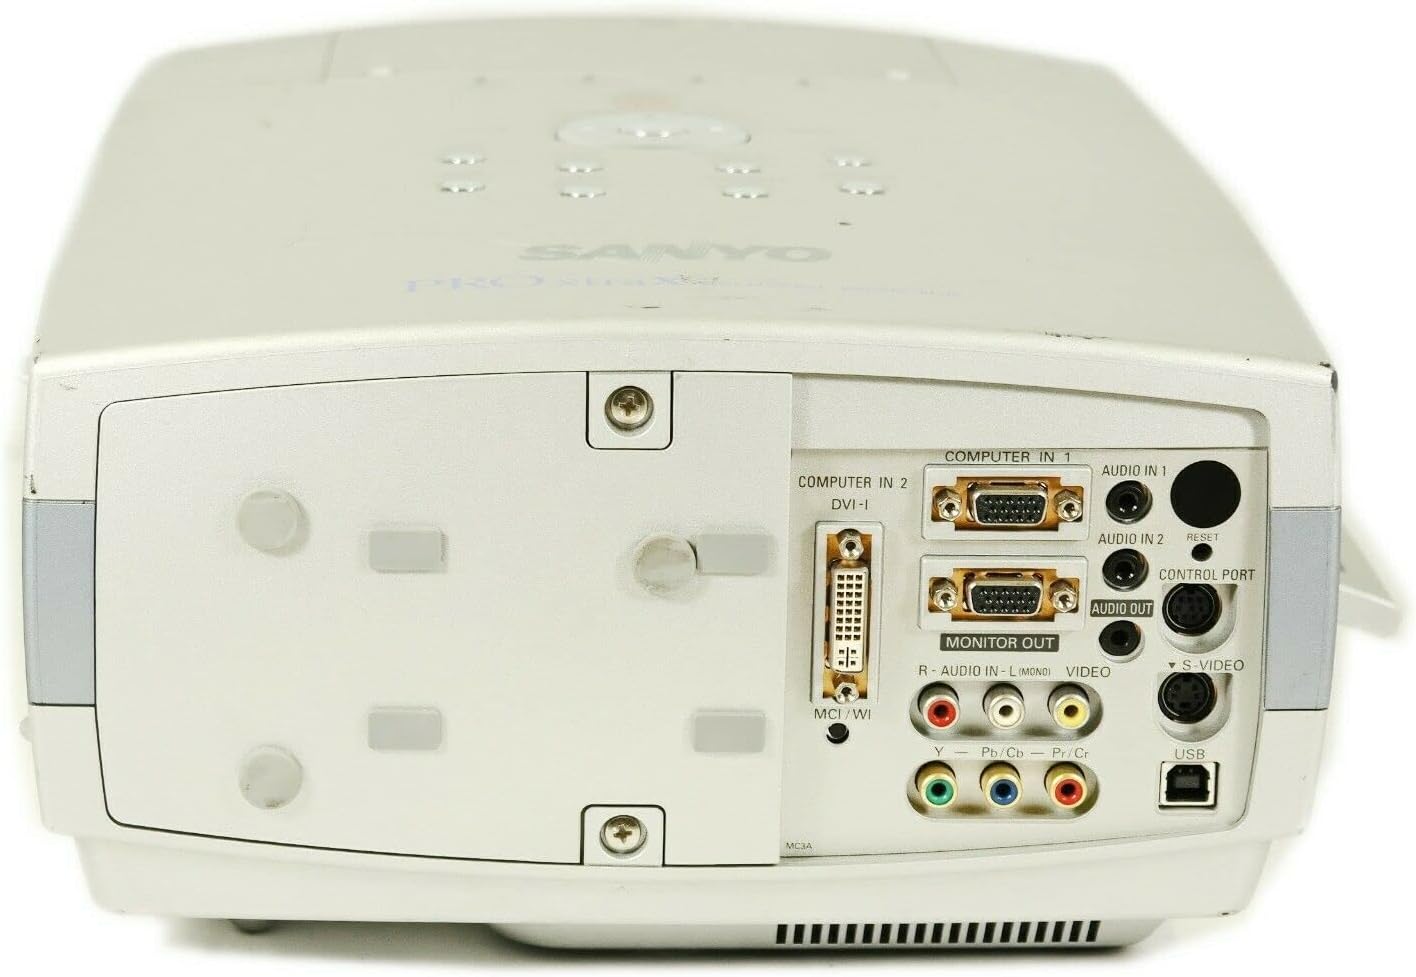
Figure 4.2: Rear Connection Panel. This image provides a clear view of the projector's rear panel, detailing the various input and output ports including Computer In (VGA), DVI-I, Audio In/Out, Monitor Out, S-Video, Video, and USB ports.

Figure 4.3: Angled Rear View. This image offers an angled perspective of the rear panel, further illustrating the arrangement of the input and output connections on the Sanyo PLC-XT16 projector.
4.3 Top View and Control Panel
The top panel houses the main control buttons for operating the projector.

Figure 4.4: Top Control Panel. This image displays the top surface of the projector, featuring the integrated control panel with buttons for power, menu navigation, volume, keystone correction, lens shift, image adjustments, focus, and zoom.
4.4 Bottom View
The bottom of the projector includes adjustable feet and product information labels.

Figure 4.5: Bottom View. This image shows the underside of the Sanyo PLC-XT16 projector, including the adjustable feet for leveling and the product information label detailing model number and electrical ratings.
5. Setup
5.1 Projector Placement
Position the projector on a stable, level surface or mount it securely. Ensure the projector is within the optimal projection distance for your screen size. Avoid placing it in direct sunlight or near heat sources.
5.2 Connecting Devices
Use appropriate cables to connect your video source (e.g., computer, DVD player) to the projector's input ports. The PLC-XT16 supports various connections:
- Computer In 1 (VGA): Connects to a computer's VGA output.
- Computer In 2 (DVI-I): Connects to a computer's DVI output.
- Video (RCA): Connects to standard composite video sources.
- S-Video: Connects to S-Video sources for improved picture quality.
- Audio In 1/2 (RCA/Mini-jack): Connects audio from your source device.
- Monitor Out (VGA): Allows connection to an external monitor for simultaneous display.
- USB: For service or control purposes.
After connecting, ensure all cables are securely fastened.
5.3 Powering On/Off
- Connect the power cord to the projector and a wall outlet.
- Press the ON/OFF button on the projector's control panel or the remote control. The power indicator light will illuminate.
- To power off, press the ON/OFF button again. The projector will enter a cooling cycle before fully shutting down. Do not unplug the projector during the cooling cycle.
6. Operating the Projector
6.1 Basic Controls
Use the control panel on the projector or the remote control to navigate menus and adjust settings.
- MENU: Accesses the on-screen display (OSD) menu.
- SELECT: Confirms selections within the OSD menu.
- ARROW Buttons: Navigate through menu options and adjust values.
- VOLUME +/-: Adjusts the audio output level.
- KEYSTONE: Corrects trapezoidal distortion of the image.
- LENS SHIFT: Adjusts the vertical and horizontal position of the image without moving the projector.
- FOCUS: Sharpens the projected image.
- ZOOM: Adjusts the image size.
6.2 Input Selection
Press the INPUT button on the remote or the projector's control panel to cycle through available input sources (Computer 1, Computer 2, Video, S-Video).
6.3 Image Adjustment
Access the OSD menu to fine-tune image settings such as brightness, contrast, color, tint, and sharpness. The IMAGE button on the control panel may provide quick access to common image presets.
7. Maintenance
7.1 Lamp Replacement
The projector lamp has a limited lifespan. When the lamp indicator lights up or the image becomes dim, the lamp needs replacement. Refer to the specific instructions in the full service manual for safe lamp replacement procedures. Always allow the projector to cool down completely before attempting lamp replacement.
7.2 Air Filter Cleaning
Regularly clean the air filter to maintain optimal cooling and prevent overheating. A clogged filter can reduce lamp life and projector performance.
- Turn off the projector and unplug the power cord.
- Locate the air filter cover (refer to the projector diagram for exact location).
- Remove the filter and gently clean it with a soft brush or vacuum cleaner. Do not wash the filter with water.
- Reinsert the clean filter and replace the cover.
7.3 General Cleaning
Wipe the projector casing with a soft, dry cloth. For stubborn stains, use a slightly damp cloth with a mild, non-abrasive cleaner. Do not use harsh chemicals or solvents. Clean the lens gently with a lens cleaning cloth and solution designed for optical surfaces.
8. Troubleshooting
If you encounter issues with your projector, refer to the following common problems and solutions:
| Problem | Possible Cause | Solution |
|---|---|---|
| No image projected | Power cord disconnected, incorrect input source, lamp failure. | Check power connection, select correct input, replace lamp if necessary. |
| Image is blurry | Out of focus, incorrect projection distance. | Adjust the focus ring/button, reposition the projector. |
| Image is trapezoidal | Projector not perpendicular to screen. | Use the Keystone correction function. |
| No audio | Volume too low, audio cable disconnected, incorrect audio input. | Increase volume, check audio cable connections, select correct audio input. |
| Projector overheats and shuts down | Blocked ventilation, dirty air filter. | Ensure clear ventilation, clean the air filter. |
If the problem persists after attempting these solutions, contact qualified service personnel.
9. Specifications
The following are key technical specifications for the Sanyo PLC-XT16 Projector:
- Brand: Sanyo
- Model: PLC-XT16
- Display Technology: 3LCD
- Native Resolution: 1024 x 768 (XGA)
- Maximum Display Resolution: 1280 x 1024
- Brightness: 3500 ANSI Lumens
- Connectivity Technology: USB (for control/service), VGA, DVI-I, Composite Video, S-Video
- Special Features: Built-In Speaker, Digital Keystone, Portable, Lens Shift
- Speaker Type: Built-In
- First Available: October 18, 2010
10. Warranty and Support
For warranty information and technical support, please refer to the warranty card included with your product or visit the official Sanyo support website. Keep your purchase receipt as proof of purchase for warranty claims.
For further assistance, you may contact Sanyo customer service through their official channels.


