1. Introduction
The American DJ RGBW4C is a compact 32-channel DMX controller specifically designed for RGB, RGBW, or RGBA LED fixtures. It provides intuitive control over standard 3-channel (Red, Green, Blue) or 4-channel (Red, Green, Blue, White/Amber) LED lighting units. This controller allows users to manage up to 8 individual fixtures or fixture groups, offering a range of color mixing, preset colors, chases, and special effects for various lighting applications.
2. Safety Instructions
- Electrical Safety: Always connect the unit to a grounded power outlet. Ensure the power supply voltage matches the unit's requirements. Disconnect power before cleaning or servicing.
- Moisture: Do not expose the unit to rain or moisture. Avoid using it in damp or wet environments.
- Ventilation: Ensure adequate ventilation around the unit to prevent overheating. Do not block ventilation openings.
- Handling: Handle the unit with care. Avoid dropping or subjecting it to severe impact.
- Servicing: Refer all servicing to qualified service personnel. Do not attempt to repair the unit yourself.
3. Product Overview
The RGBW4C controller features a user-friendly interface with dedicated buttons and faders for precise control. Below is an image illustrating the main control panel layout and its various components.
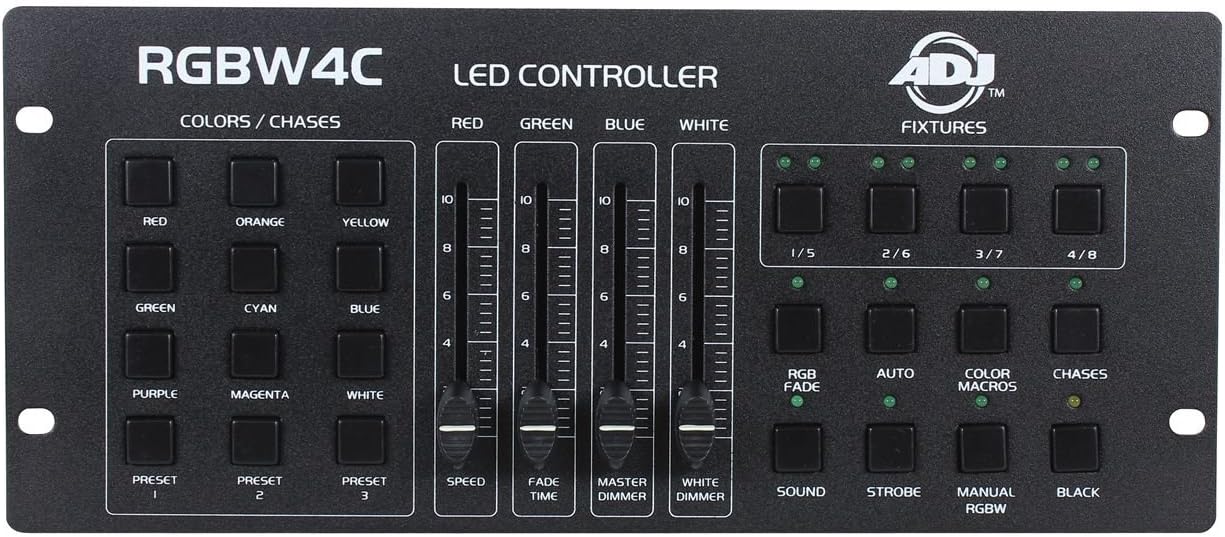
Figure 1: Front panel of the American DJ RGBW4C LED DMX Lighting Controller, showing color/chase buttons, RGBW faders, fixture selection buttons, and function buttons.
Control Panel Components:
- COLORS / CHASES Section: Dedicated buttons for direct access to preset colors (Red, Orange, Yellow, Green, Cyan, Blue, Purple, Magenta, White) and three user-programmable color presets (Preset 1, 2, 3).
- LED CONTROLLER Faders: Individual faders for Red, Green, Blue, and White intensity control. Additional faders for Speed, Fade Time, Master Dimmer, and White Dimmer.
- FIXTURES Section: Buttons labeled 1/5, 2/6, 3/7, 4/8 for selecting individual fixtures or groups of fixtures. Each button has an indicator LED.
- Function Buttons: Buttons for RGB Fade, Auto, Color Macros, Chases, Sound Active mode, Strobe, Manual RGBW mode, and Blackout. Each has an indicator LED.
4. Setup
4.1 Power Connection
Connect the provided power adapter to the DC input jack on the rear of the RGBW4C controller and then plug it into a suitable power outlet. Ensure the power source is stable and matches the controller's voltage requirements.
4.2 DMX Connection
Use a standard 3-pin DMX cable to connect the DMX output of the RGBW4C controller to the DMX input of your first LED fixture. If you are using multiple fixtures, connect them in a daisy-chain configuration: DMX output of the first fixture to the DMX input of the second, and so on. Ensure the last fixture in the chain has a DMX terminator connected to its DMX output to prevent signal reflection.
4.3 DMX Addressing
Each LED fixture connected to the RGBW4C must be assigned a unique DMX start address. The RGBW4C is designed to control fixtures that use a 3-channel (Red, Green, Blue) or 4-channel (Red, Green, Blue, White/Amber) DMX profile. For optimal control, set your fixtures' DMX addresses according to the fixture groups you intend to control with the RGBW4C's 1/5, 2/6, 3/7, 4/8 buttons. For example, if controlling 4-channel fixtures:
- Fixture 1 (controlled by 1/5 button): DMX Address 1
- Fixture 2 (controlled by 2/6 button): DMX Address 5
- Fixture 3 (controlled by 3/7 button): DMX Address 9
- Fixture 4 (controlled by 4/8 button): DMX Address 13
Refer to your LED fixture's instruction manual for details on setting its DMX address and channel mode.
5. Operating Instructions
5.1 Fixture Selection
To control a specific fixture or group of fixtures, press one of the FIXTURES buttons (1/5, 2/6, 3/7, 4/8). The corresponding LED above the button will illuminate, indicating that the fixture(s) are selected for control. You can select multiple fixtures simultaneously by pressing their respective buttons.
5.2 Color Control
- Manual Color Mixing: Use the RED, GREEN, BLUE, and WHITE faders to manually adjust the intensity of each color component for the selected fixtures. Moving a fader up increases the intensity, and moving it down decreases it.
- Preset Colors: Press any of the COLORS / CHASES buttons (Red, Orange, Yellow, Green, Cyan, Blue, Purple, Magenta, White) for instant access to pre-programmed static colors.
- User Presets: The PRESET 1, PRESET 2, and PRESET 3 buttons allow you to store and recall your own custom color mixes. To save a preset, set your desired color using the faders, then press and hold a PRESET button until its LED flashes. To recall, simply press the desired PRESET button.
5.3 Programmed Functions
- RGB FADE: Activates a smooth, automatic fade through various RGB color combinations.
- AUTO: Initiates an automatic program mode, cycling through various built-in shows and effects.
- COLOR MACROS: Accesses a library of pre-programmed color sequences and effects.
- CHASES: Activates dynamic lighting sequences or patterns. Use the SPEED fader to adjust the speed of chases and the FADE TIME fader to control the transition smoothness between steps.
- SOUND: Engages sound-active mode, where the lighting effects react to ambient sound picked up by the controller's internal microphone.
- STROBE: Activates a strobe effect. The speed of the strobe can often be adjusted via the Speed fader or a dedicated control if available.
- MANUAL RGBW: Allows for direct manual control over Red, Green, Blue, and White channels using their respective faders, overriding other programmed modes.
- BLACK: Instantly blacks out all selected fixtures. Press again to restore previous lighting state.
5.4 Master Dimmer
The MASTER DIMMER fader controls the overall intensity of all selected fixtures, regardless of their individual color settings. Move the fader up to increase brightness and down to decrease it.
5.5 White Dimmer
The WHITE DIMMER fader specifically controls the intensity of the white channel for selected fixtures, useful for fine-tuning white balance or adding a pure white component to colors.
6. Maintenance
- Cleaning: Use a soft, lint-free cloth to wipe the exterior of the controller. Do not use abrasive cleaners or solvents.
- Storage: Store the unit in a cool, dry place away from extreme temperatures and humidity when not in use.
- Inspection: Periodically check DMX cables and power connections for any signs of wear or damage.
7. Troubleshooting
| Problem | Possible Cause | Solution |
|---|---|---|
| Controller does not power on. | No power, faulty power adapter, or faulty outlet. | Check power connection, test power adapter, try a different outlet. |
| Fixtures not responding to controller. | Incorrect DMX addressing, faulty DMX cable, fixtures not in DMX mode, or DMX chain issue. | Verify DMX addresses, check DMX cables, ensure fixtures are in DMX mode, check DMX chain for proper termination. |
| Colors are incorrect or flickering. | Incorrect DMX channel assignment on fixture, DMX signal interference. | Confirm fixture DMX channel mode (3-channel or 4-channel RGBW/RGBA), ensure DMX cables are not near power cables. |
| Sound active mode not working. | Low ambient sound, microphone obstruction, or mode not properly activated. | Increase sound level, ensure microphone is clear, press the SOUND button to activate. |
8. Specifications
| Feature | Detail |
|---|---|
| Product Dimensions | 18 x 7 x 3.5 inches |
| Item Weight | 4 pounds |
| Model Number | 1322000041 |
| ASIN | B00765A9U8 |
| Manufacturer | American DJ |
| First Available | April 4, 2012 |
9. Warranty and Support
For warranty information, technical support, or service inquiries, please refer to the official American DJ website or contact their customer service department directly. Keep your purchase receipt as proof of purchase for any warranty claims.


