
Product Overview
The Lepai LP-168HA 2.1 Mini Amplifier is a versatile audio solution designed for various applications, from desktop setups to mobile audio systems. It delivers clear stereo sound and powerful bass through its dedicated subwoofer output. Its compact size and comprehensive controls make it an excellent choice for enhancing your audio experience.
Key Features:
- Stereo speaker and dedicated subwoofer amplifier
- Bass, treble, and subwoofer crossover controls
- Rear-mounted USB charging port
- Stereo RCA and stereo 3.5 mm inputs
- Perfect amplifier for computer desks
Package Contents
Verify that all items are present in your package:
- Lepai LP-168HA 2.1 Mini Amplifier Unit
- Power Adapter
- Power Cord

Image: Lepai LP-168HA amplifier, power adapter, and power cord.
Controls and Connections
Front Panel
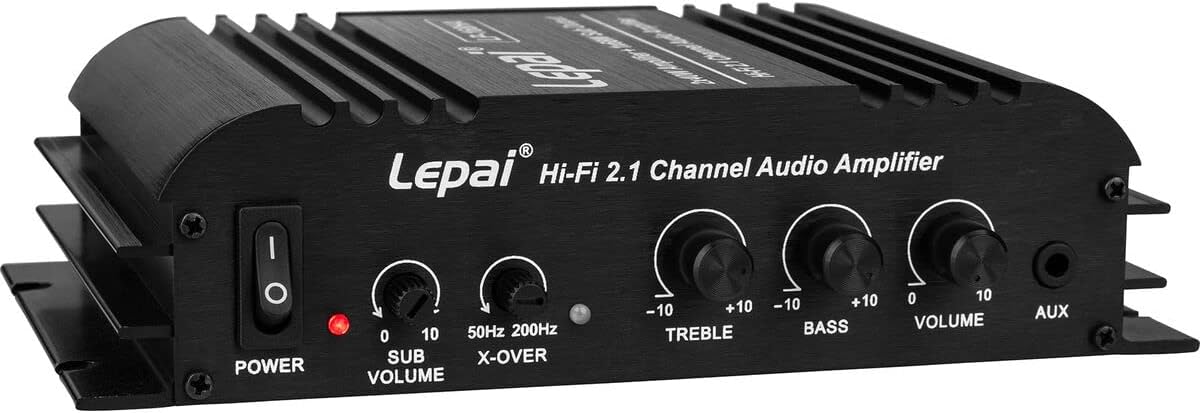
Image: Front panel of the amplifier with various control knobs.
- 1. POWER Switch: Rocker-style switch to turn the unit ON or OFF. A red LED indicator will glow when the unit is ON.
- 2. SUB VOLUME: Controls the output level of the subwoofer relative to the overall volume. Turn clockwise to increase, counter-clockwise to decrease.
- 3. X-OVER: Adjusts the crossover point where bass frequencies are sent to the subwoofer (50Hz-200Hz). Turn clockwise to increase, counter-clockwise to decrease.
- 4. TREBLE: Controls the level of high-frequency audio signals. Turn clockwise to increase, counter-clockwise to decrease.
- 5. BASS: Controls the level of low-frequency audio signals. Turn clockwise to increase, counter-clockwise to decrease.
- 6. VOLUME: Controls the overall output level from the amplifier. Turn clockwise to increase, counter-clockwise to decrease.
- 7. AUX Input: 3.5mm headphone/line-level input for personal audio devices.
Rear Panel

Image: Rear panel of the amplifier with input/output terminals.
- 1. AUDIO INPUT (RCA): Dual RCA input for use with any audio device with line-level stereo output.
- 2. RIGHT and LEFT SPEAKER OUTPUT: Connect 2-8 Ohm speakers. Ensure to observe polarity: red for positive (+) and black for negative (-).
- 3. SUBWOOFER OUTPUT: Connect a passive subwoofer. Ensure to observe polarity: red for positive (+) and black for negative (-).
- 4. POWER INPUT: Connect the included power adapter here (DC 9-14.4V, 5A).
- 5. USB POWER OUT: Provides 5VDC output for charging portable electronic devices.
Setup
- Connect Speakers: Connect your stereo speakers to the 'R' (Right) and 'L' (Left) speaker output terminals on the rear panel. Ensure correct polarity: red to positive (+), black to negative (-).
- Connect Subwoofer (Optional): If using a passive subwoofer, connect it to the 'SUB' output terminals on the rear panel, observing correct polarity.
- Connect Audio Source: Connect your audio source (e.g., computer, smartphone, MP3 player) to either the 'AUDIO INPUT' RCA jacks or the 'AUX' 3.5mm input on the front panel.
- Connect Power: Plug the power adapter into the 'POWER INPUT' jack on the rear panel, then plug the power cord into a wall outlet.
- Power On: Flip the 'POWER' switch on the front panel to the ON position. The red LED indicator will illuminate.
Operating
- Adjust Volume: Use the 'VOLUME' knob on the front panel to control the overall sound output.
- Adjust Tone: Use the 'BASS' and 'TREBLE' knobs to fine-tune the low and high frequencies to your preference.
- Subwoofer Control: Adjust the 'SUB VOLUME' knob to set the subwoofer's output level relative to the main speakers. Use the 'X-OVER' knob to set the desired crossover frequency for the subwoofer, typically between 50Hz and 200Hz.
- USB Charging: Connect your compatible device to the 'USB POWER OUT' port on the rear panel for charging.
Maintenance
- Cleaning: Use a soft, dry cloth to clean the amplifier's exterior. Avoid using harsh chemicals or abrasive cleaners.
- Ventilation: Ensure the amplifier has adequate ventilation to prevent overheating. Do not block the heat sinks or place the unit in an enclosed space without airflow.
- Storage: When not in use for extended periods, store the amplifier in a cool, dry place away from direct sunlight and extreme temperatures.
Troubleshooting
- No Sound:
- Ensure the power switch is ON and the LED indicator is lit.
- Check all audio input and speaker connections for secure fit and correct polarity.
- Verify the volume knob is turned up and not at minimum.
- Test with a different audio source or cable to rule out source/cable issues.
- Distorted Sound:
- Reduce the volume level on both the amplifier and the audio source.
- Adjust the 'BASS' and 'TREBLE' controls. Excessive bass can sometimes lead to distortion, especially if turned all the way up.
- Ensure speaker impedance is within the supported range (2-8 Ohms).
- Check for loose speaker wire strands touching each other or the amplifier chassis.
- Subwoofer Not Working:
- Verify the subwoofer is correctly connected to the 'SUB' output terminals with correct polarity.
- Adjust the 'SUB VOLUME' and 'X-OVER' knobs.
- Ensure the subwoofer is passive; this amplifier does not power active subwoofers.
Specifications
| Feature | Specification |
|---|---|
| Model | LP-168HA |
| Input Voltage | DC 9-14.4V, 5A |
| Stereo Power Output | 2 x 40W max |
| Subwoofer Power Output | 1 x 68W max |
| Load Impedance | 2-8 Ohms |
| Total Harmonic Distortion (THD) | <1% |
| Signal-to-Noise Ratio (SNR) | >80 dB |
| Frequency Response | 20-20,000 Hz |
| Adjustable Subwoofer Crossover | 50-200 Hz |
| Dimensions (L x W x H) | 4 x 7 x 1.8 inches |
| Item Weight | 1.48 pounds |
| Certifications | CE, FCC |
Warranty and Support
Specific warranty details are not provided in this manual. For information regarding warranty coverage, technical support, or service, please contact Lepai customer service directly or visit their official website. Keep your purchase receipt as proof of purchase for any warranty claims.