
Introduction
Thank you for choosing the Vitapur VWD1006BLP Bottom Load Water Dispenser. This manual provides important information regarding the safe operation, installation, maintenance, and troubleshooting of your new appliance. Please read it thoroughly before use and retain it for future reference.
The Vitapur VWD1006BLP is designed to provide convenient access to hot, cold, and room temperature water. It features a bottom-loading design for easy bottle replacement, an energy-saving Kettle feature for hot water, and a childproof safety lock for the hot water dispenser.

Image: Front view of the Vitapur VWD1006BLP Bottom Load Water Dispenser, showcasing its sleek black and platinum design with dispensing area and control panel.
Important Safety Information
To reduce the risk of injury or property damage, please adhere to the following safety precautions:
- Always place the dispenser on a level, stable surface.
- Do not operate the dispenser if the power cord is damaged.
- Keep the dispenser away from direct sunlight and heat sources.
- Ensure proper ventilation around the unit. Maintain at least 4 inches (10 cm) clearance from walls.
- This appliance is not intended for use by persons (including children) with reduced physical, sensory or mental capabilities, or lack of experience and knowledge, unless they have been given supervision or instruction concerning use of the appliance by a person responsible for their safety.
- Supervise children to ensure they do not play with the appliance.
- Always use the childproof safety lock when dispensing hot water.
- Unplug the dispenser before cleaning or performing any maintenance.
- Do not immerse the dispenser, cord, or plug in water or other liquids.
Setup
Unpacking
Carefully remove the dispenser from its packaging. Inspect the unit for any signs of damage. Remove all packing materials, including any protective films or tapes.
Placement
Place the dispenser upright on a hard, level surface. Ensure it is not exposed to direct sunlight or placed near heat-generating appliances. Allow at least 4 inches (10 cm) of clearance from the back and sides of the dispenser to a wall for proper ventilation. Do not place the dispenser in an enclosed cabinet.

Image: The Vitapur VWD1006BLP Water Dispenser positioned in a kitchen, demonstrating suitable placement next to a counter.
Water Bottle Installation (Bottom Load)
- Open the lower cabinet door of the dispenser.
- Place a fresh 3 or 5-gallon water bottle onto the sliding tray inside the cabinet.
- Insert the probe assembly into the neck of the water bottle. Ensure the probe is fully inserted and the cap is securely seated.
- Slide the bottle and tray into the cabinet until it is fully seated.
- Close the cabinet door.
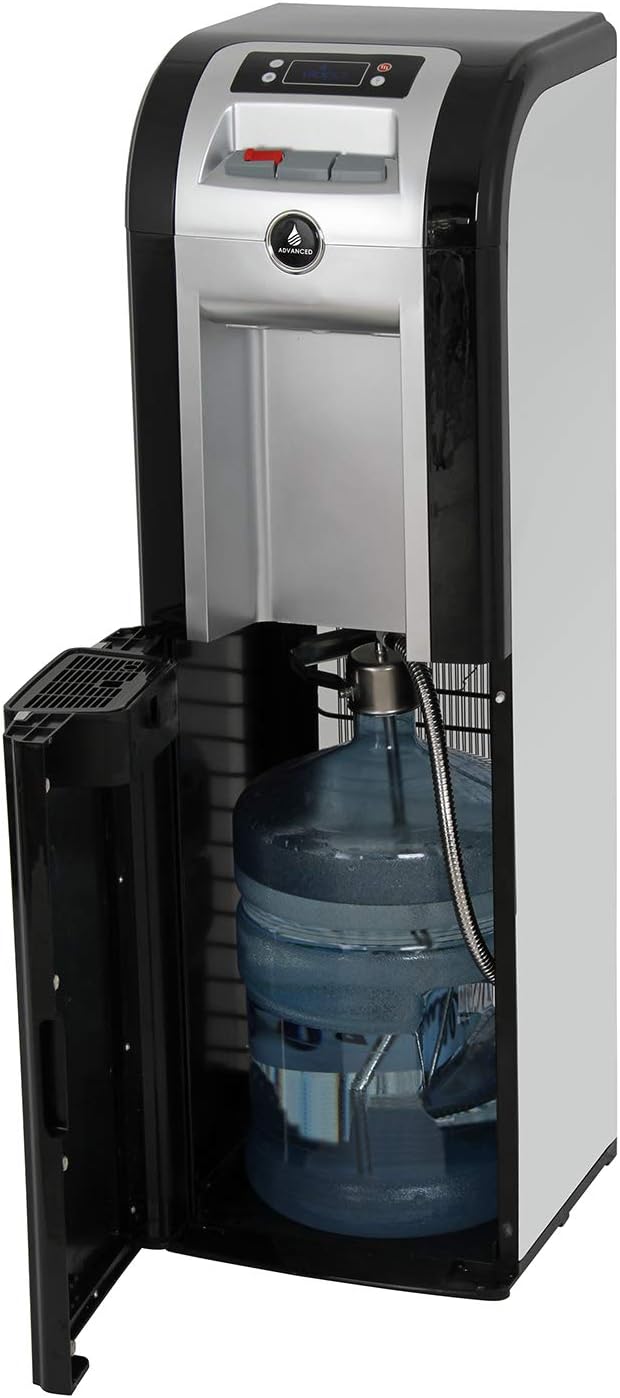
Image: The bottom load compartment of the Vitapur VWD1006BLP open, showing a 5-gallon water bottle being inserted with the probe.
Initial Startup and Flushing
- Once the water bottle is installed, plug the dispenser into a grounded electrical outlet.
- Allow approximately 15-20 minutes for the reservoirs to fill and the water to cool/heat.
- Before initial use, dispense and discard at least two cups of hot water and two cups of cold water to flush the system.
Operating Instructions
Control Panel Overview

Image: Close-up of the Vitapur VWD1006BLP control panel, showing the indicator lights, dispensing buttons, and the red child safety lock for hot water.
The control panel features indicator lights for power, heating, cooling, and a low water alert. Dispensing is controlled by easy-to-use push buttons.
Dispensing Water
- Cold Water: Place your cup under the cold water spigot and press the blue button.
- Room Temperature Water: Place your cup under the room temperature spigot and press the gray button.
- Hot Water: This dispenser is equipped with a childproof safety lock for hot water. To dispense hot water, simultaneously slide the red safety lock to the side and press the red hot water button.
Kettle Feature
The Vitapur VWD1006BLP includes an energy-saving Kettle feature that rapidly provides hot water without the cost of constantly re-heating water. This feature uses 70% less energy than standard 24/7 heating dispensers and can provide hot water in under 3 minutes.

Image: A graphic illustrating the Vitapur Kettle Feature, highlighting 70% energy savings and rapid hot water delivery in under 3 minutes.
Indicator Lights
- Power Indicator: Illuminates when the unit is powered on.
- Heating Indicator: Illuminates when the hot water is heating and turns off when the desired temperature is reached.
- Cooling Indicator: Illuminates when the cold water is cooling and turns off when the desired temperature is reached.
- Low Water Indicator: Illuminates when the water bottle is empty or needs replacement.
Maintenance
Regular maintenance ensures optimal performance and longevity of your water dispenser.
Cleaning the Exterior
Wipe the exterior surfaces with a soft, damp cloth. Do not use abrasive cleaners or solvents.
Drip Tray Cleaning
The drip tray should be emptied and cleaned regularly to prevent overflow and bacterial growth. Simply slide out the tray, empty any collected water, wash with mild soap and water, rinse thoroughly, and replace.
Reservoir Cleaning (Recommended Annually)
For thorough cleaning of the internal reservoirs, it is recommended to consult the manufacturer's guidelines or a qualified service technician. This typically involves draining the unit and flushing with a sanitizing solution.
Water Bottle Replacement
When the low water indicator illuminates, it's time to replace the water bottle. Follow the steps outlined in the 'Water Bottle Installation' section under Setup.
Troubleshooting
If you experience issues with your water dispenser, please refer to the following common problems and solutions:
| Problem | Possible Cause | Solution |
|---|---|---|
| No water dispenses | Water bottle is empty or not properly installed. | Replace the water bottle or ensure the probe is fully inserted. |
| Water is not cold enough | Cooling switch is off; unit recently plugged in; poor ventilation. | Ensure cooling switch is on. Allow 15-20 minutes for cooling. Check for adequate clearance around the unit. |
| Water is not hot enough | Heating switch is off; unit recently plugged in. | Ensure heating switch is on. Allow 15-20 minutes for heating. |
| Water leaking from unit | Water bottle cracked; drain plug loose; auto shut-off float switch system activated. | Check water bottle for cracks and replace if necessary. Ensure drain plug is tight. The auto shut-off float switch system prevents overflows/leaking; if activated, check bottle and connections. |
| Unusual noise | Compressor cycling; unit not level. | This is normal operation. Ensure the unit is on a level surface. |
Specifications
| Feature | Specification |
|---|---|
| Model | VWD1006BLP |
| Brand | Vitapur |
| Color | Black and Platinum |
| Material | Plastic/Steel |
| Capacity | Fits 3 or 5-Gallon Bottles |
| Product Dimensions (D x W x H) | 12.5"D x 13.5"W x 40.7"H |
| Item Weight | 41.8 pounds |
| Installation Type | Freestanding |
| Access Location | Bottom |
| Upper Temperature Rating (Hot) | Up to 194 Degrees Fahrenheit |
| Power Source | Corded Electric |
| Special Features | LED Night Light, High Efficiency Compressor, Childproof Safety Lock, Auto Shut-off Float Switch System, Energy Saving Kettle Feature |
Warranty Information
This Vitapur water dispenser comes with a limited manufacturer's warranty. Please refer to the warranty card included with your product or visit the official Vitapur website for detailed terms and conditions, including coverage period and claim procedures. Keep your proof of purchase for warranty service.
Customer Support
For technical assistance, parts, or service inquiries, please contact Vitapur customer support. Refer to the contact information provided in your product packaging or on the official Vitapur website. When contacting support, please have your model number (VWD1006BLP) and purchase date available.


