1. Introduction
The Central Pneumatic Air File is a compact and efficient pneumatic tool designed for material removal and filing in tight or hard-to-reach spots. This versatile tool utilizes compressed air to provide rapid filing action, making it suitable for various applications where precision and speed are required.
Key Features:
- Air Consumption: Approximately 8.5 CFM (Cubic Feet per Minute)
- Working Pressure: Requires 90 PSI (Pounds per Square Inch) for optimal performance
- Low Noise Operation: Designed for reduced operational noise
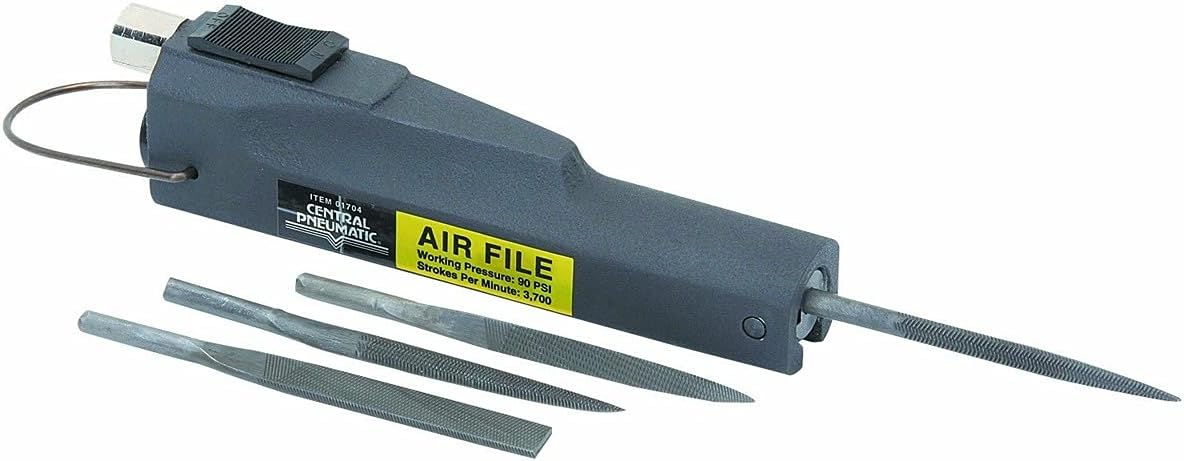
Figure 1: The Central Pneumatic Air File shown with its four interchangeable files: flat cut, half round, round, and triangular. This image displays the main body of the air file, the air inlet, and the file attachment mechanism.
2. Safety Information
Always observe basic safety precautions when using this product to reduce the risk of personal injury and damage to the tool. Read and understand all instructions before operation.
- Wear appropriate personal protective equipment (PPE), including safety glasses, hearing protection, and gloves.
- Ensure the work area is clean, well-lit, and free from obstructions.
- Do not operate the air file if you are tired or under the influence of drugs, alcohol, or medication.
- Disconnect the air supply before making any adjustments, changing accessories, or performing maintenance.
- Do not exceed the maximum recommended air pressure of 90 PSI.
- Keep hands and body parts clear of the moving file during operation.
- Use only accessories and replacement parts recommended by the manufacturer.
- Store the tool in a dry, secure place out of reach of children.
3. Package Contents
Upon opening the package, verify that all components are present and undamaged:
- Central Pneumatic Air File Unit
- Flat Cut File
- Half Round File
- Round File
- Triangular File
- Instruction Manual (this document)
If any items are missing or damaged, please contact Central Pneumatic customer service immediately.
4. Setup
Proper setup is crucial for the safe and efficient operation of your air file.
4.1 Air Supply Connection:
- Ensure your air compressor is turned off and the air tank is drained.
- Connect a standard 1/4 inch NPT air hose (not included) to the air inlet on the rear of the air file. Use thread sealant tape for a secure, leak-free connection.
- Connect the other end of the air hose to your air compressor's regulated output.
- Set your air compressor's regulator to 90 PSI. Do not exceed this pressure.
4.2 Compressor Requirements:
The performance of your air file is directly related to the capacity of your air compressor. Refer to the chart below for recommended compressor tank sizes based on usage:

Figure 2: This chart illustrates the recommended air compressor tank sizes for optimal performance of the air file. For continuous use, a 29+ gallon compressor is recommended. For intermittent use, 7-28 gallon compressors are suitable. 1-6 gallon compressors are not recommended.
4.3 Initial Lubrication:
Before first use, and regularly thereafter, add 3-5 drops of pneumatic tool oil (not included) into the air inlet of the tool. This lubricates the internal components and ensures smooth operation and longevity.
4.4 Attaching a File:
- Ensure the air file is disconnected from the air supply.
- Identify the desired file type (flat cut, half round, round, or triangular) for your task.
- Insert the shank of the file into the chuck opening at the front of the air file.
- Secure the file by tightening the chuck collar or mechanism (refer to tool specific design for exact method, typically a set screw or quick-release). Ensure the file is firmly seated and cannot wobble.
5. Operating Instructions
Once the air file is properly set up and connected to the air supply, you can begin operation.
- Prepare Workpiece: Secure the material you intend to file in a vise or clamp to prevent movement during operation.
- Grip the Tool: Hold the air file firmly with both hands if possible, or with one hand providing stable control.
- Activate Tool: Depress the trigger or lever located on the top of the tool to start the filing action. The file will begin to reciprocate rapidly.
- Apply to Workpiece: Gently bring the moving file into contact with the workpiece. Apply light, consistent pressure. Avoid excessive force, as this can bog down the tool and reduce its effectiveness, potentially causing premature wear or damage.
- Control Movement: Guide the file along the desired path, allowing the tool to do the work. The different file shapes allow for various applications, such as flat surfaces, curves, or internal angles.
- Deactivate Tool: Release the trigger to stop the filing action.
- Inspect Work: Periodically stop and inspect your work to ensure you are achieving the desired result.
Note: The tool operates at a stroke rate of approximately 3,700 strokes per minute, providing fast material removal. Always maintain a firm grip and control.
6. Maintenance
Regular maintenance will extend the life of your Central Pneumatic Air File and ensure its continued performance.
6.1 Lubrication:
- Add 3-5 drops of pneumatic tool oil into the air inlet before each use, or at least once daily if used frequently.
- Run the tool for a few seconds after oiling to distribute the lubricant.
6.2 Cleaning:
- After each use, disconnect the air supply and wipe down the tool with a clean, dry cloth.
- Remove any debris or filings from the chuck area and the file itself. A stiff brush can be used for the files.
6.3 Storage:
- Store the air file in a clean, dry environment, away from excessive moisture or extreme temperatures.
- Ensure the tool is disconnected from the air supply before storage.
7. Troubleshooting
If you encounter issues with your Central Pneumatic Air File, refer to the following common problems and solutions:
| Problem | Possible Cause | Solution |
|---|---|---|
| Tool barely works or binds up with light pressure. |
|
|
| Air blows out exhaust, but file does not move or moves very slowly. |
|
|
| Excessive noise or vibration. |
|
|
8. Specifications
| Attribute | Detail |
|---|---|
| Brand | Central Pneumatic |
| Model Number | B006ZB8ZMS (ASIN) |
| Material | Aluminum (Body), Alloy Steel (Files) |
| Color | Black |
| Item Weight | 2.75 Pounds |
| Package Dimensions | 9.2 x 2.8 x 2.7 inches |
| Air Consumption | 8.5 CFM |
| Working Pressure | 90 PSI |
| Stroke Per Minute | 3,700 BPM |
| Stroke Length | 3/8" |
| Handle Material | Aluminum |
| Included Components | Handle, Flat Cut File, Half Round File, Round File, Triangular File |
9. Warranty and Support
For information regarding warranty coverage, technical support, or replacement parts for your Central Pneumatic Air File, please refer to the warranty card included with your purchase or visit the official Central Pneumatic website. You may also contact their customer service directly for assistance.
It is recommended to keep your purchase receipt as proof of purchase for any warranty claims.


