1. Introduction
This manual provides comprehensive instructions for the installation, operation, and maintenance of your Yale Value Safe YSV/250/DB1. Please read this manual carefully before using the safe to ensure proper function and security. Retain this manual for future reference.
2. Safety Information
- Emergency Key: Never store the emergency override keys inside the safe. Keep them in a secure, separate location known only to trusted individuals.
- Battery Safety: Keep batteries out of reach of children. Do not mix old and new batteries or different types of batteries. Dispose of used batteries according to local regulations.
- Placement: Ensure the safe is placed on a stable, level surface. For enhanced security, consider securing the safe to a wall or floor using appropriate fasteners (not included).
- Environmental Conditions: Do not expose the safe to extreme temperatures, humidity, or direct sunlight. This safe is not water-resistant.
3. Package Contents
Verify that all items are present in the package:
- 1 x Yale Value Safe (Model YSV/250/DB1)
- 2 x Emergency Override Keys
- 4 x AA Batteries (pre-installed or included separately)
- 1 x User Manual (this document)

Figure 1: Interior view of the safe, illustrating storage capacity.
4. Setup
4.1. Battery Installation
The safe requires 4 AA batteries for operation. These may be pre-installed or included separately.
- Locate the battery compartment on the inside of the safe door.
- Open the battery compartment cover.
- Insert 4 AA batteries, ensuring correct polarity (+/-).
- Close the battery compartment cover.
4.2. Initial Code Setting
Upon first use, or after battery replacement, you will need to set your personal identification number (PIN).
- With the safe door open, press the red reset button located on the inside of the door, near the hinge. You will hear a beep.
- Within 5 seconds, enter a new 3 to 8 digit PIN on the keypad.
- Press the 'ENTER' button to confirm. The safe will beep twice, indicating the new code is set.
- Test the new code with the door open to ensure it functions correctly before closing the safe.

Figure 2: Keypad and locking mechanism detail.
5. Operating Instructions
5.1. Opening the Safe with PIN
- Enter your 3 to 8 digit PIN on the keypad.
- Press the 'ENTER' button. The green LED will illuminate.
- Within 5 seconds, turn the handle clockwise to open the safe door.
5.2. Closing and Locking the Safe
- Close the safe door.
- Turn the handle counter-clockwise to engage the locking bolts. The safe is now locked.
5.3. Emergency Key Override
In case of forgotten PIN or dead batteries, the emergency key can be used.
- Locate the keyhole cover on the front panel, usually near the handle.
- Remove the cover.
- Insert one of the emergency keys into the keyhole and turn it clockwise.
- While holding the key turned, rotate the handle clockwise to open the safe.
- Once open, remove the key. Remember to replace the keyhole cover.
5.4. LED Indicators
- Green LED: Indicates successful code entry and safe is ready to open.
- Red LED: Indicates an error (e.g., incorrect code) or low battery warning (flashes red).
5.5. Auto Lockdown Feature
For security, the safe will temporarily lock the keypad:
- After 3 incorrect PIN entries, the keypad will lock for 20 seconds.
- After 6 incorrect PIN entries, the keypad will lock for 5 minutes.
6. Maintenance
6.1. Battery Replacement
When the red LED flashes during operation, it indicates low battery power. Replace all 4 AA batteries promptly to ensure continued functionality. Follow the battery installation steps in Section 4.1.
6.2. Cleaning
Clean the safe's exterior with a soft, damp cloth. Do not use abrasive cleaners or solvents, as these can damage the finish or electronic components.
7. Troubleshooting
- Safe does not open with PIN:
- Ensure you are entering the correct 3-8 digit PIN.
- Check if the red LED is flashing, indicating low batteries. Replace batteries if necessary.
- If the keypad is locked due to multiple incorrect entries, wait for the lockout period to expire.
- Use the emergency key to open the safe and then reset the PIN.
- Red LED flashes:
- If it flashes during code entry, the code is incorrect.
- If it flashes intermittently or upon pressing any key, batteries are low and need replacement.
- Safe cannot be closed:
- Ensure no obstructions are preventing the door from closing completely.
- Verify that the locking bolts are retracted before attempting to close.
8. Specifications
| Model | YSV/250/DB1 |
| Brand | Yale |
| Lock Type | Electronic Keypad, Emergency Key |
| External Dimensions (H x W x D) | 250mm x 350mm x 250mm (approx. 9.8" x 13.8" x 9.8") |
| Internal Dimensions (H x W x D) | 242mm x 340mm x 190mm (approx. 9.5" x 13.4" x 7.5") |
| Capacity | 16.3 Liters |
| Weight | 7.5 kg (16.5 lbs) |
| Material | Alloy Steel |
| Power Source | 4 x AA Batteries (included) |
| PIN Code Length | 3 to 8 digits |
| Special Feature | Visual Alarm (low battery) |
| Water Resistance Level | Not Water Resistant |
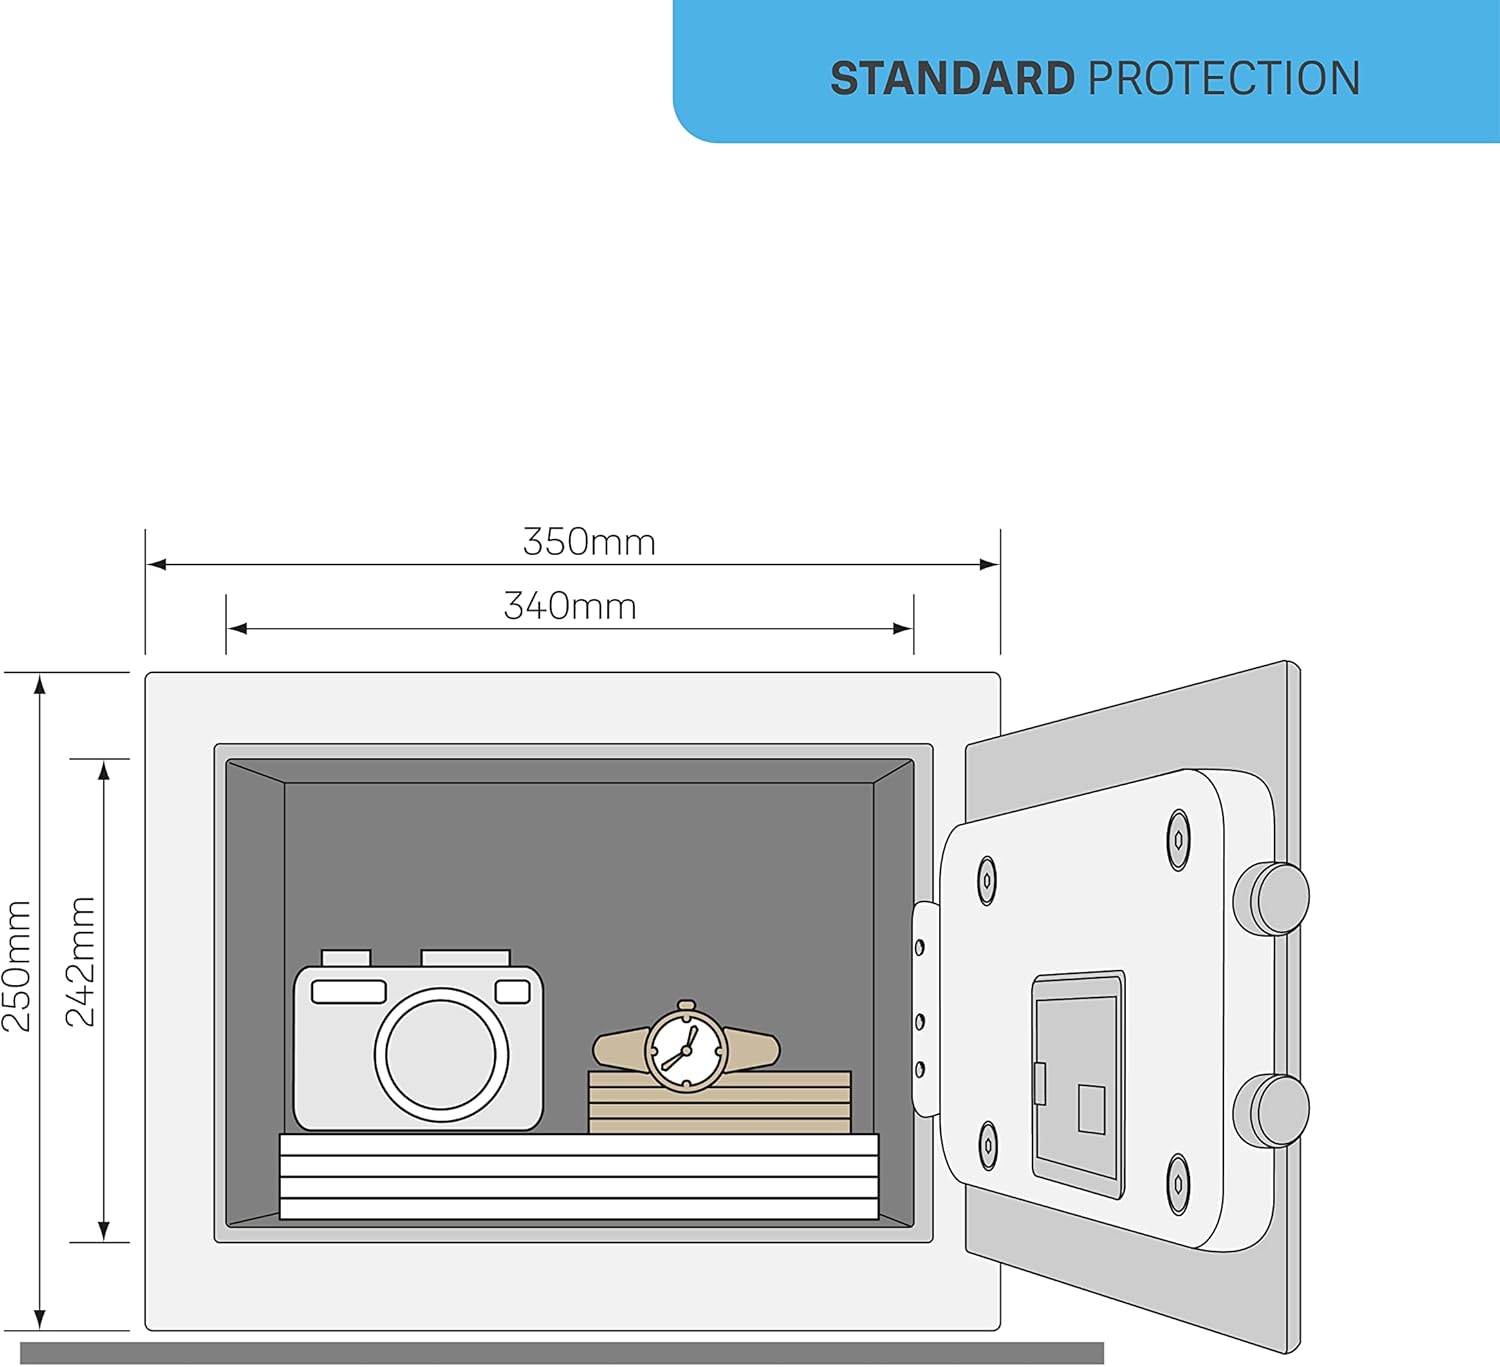
Figure 3: Safe dimensions diagram.
9. Warranty and Support
9.1. Manufacturer's Warranty
This Yale Value Safe YSV/250/DB1 comes with a 2-year manufacturer's warranty from the date of purchase. This warranty covers defects in materials and workmanship under normal use. It does not cover damage resulting from misuse, unauthorized modification, accident, or improper installation.
9.2. Customer Support
For technical assistance, warranty claims, or further inquiries, please contact Yale customer support. Refer to the official Yale website or product packaging for the most current contact information.


