Introduction
The AKG PZM11 is a professional boundary layer microphone specifically designed for security and surveillance applications. It is characterized by a consistent pickup pattern, ensuring clear audio capture from any direction around the microphone. The microphone's design incorporates features to enhance speech clarity and effectively reduce environmental noise.
Key Features:
- Hemispherical Polar Pattern: Provides clear, intelligible pickup of speech from a wide area.
- Low-Frequency Rolloff: Effectively reduces the pickup of heating, ventilation, or air-conditioning (HVAC) rumble and other low-frequency environmental noise.
- Screw Terminal Connection: Offers secure and reliable wiring without the need for additional connectors.
- High-Frequency Response Boost: Slightly enhances the high-frequency range to aid in overall clarity and articulation of sound.
Setup Instructions
Unpacking
Carefully remove the microphone from its packaging. Verify that all components, including the microphone unit, are present and undamaged.
Mounting
The PZM11 is a flush-mount microphone, designed for installation into a flat surface such as a table, wall, or ceiling. For proper installation, ensure the cutout dimensions match the microphone's specifications.

Image: AKG PZM11 microphone, illustrating its flush-mount design.
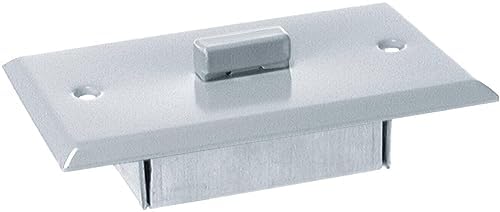
Image: AKG PZM11 dimensions for installation planning.
Wiring and Connection
The PZM11 utilizes screw terminals for audio signal connection. It requires 12-48V phantom power from the connected audio device.
- Identify the positive, negative, and ground terminals on the microphone's connection plate.
- Carefully strip a small amount of insulation (approximately 5mm) from the audio cable wires.
- Securely connect the stripped wires to their corresponding screw terminals. Ensure a firm connection to prevent signal loss or interference.
- Before connecting the microphone, ensure the audio input device (e.g., mixer, amplifier) is powered off.
- Once connected, power on the audio input device and activate the phantom power supply.
Operating Instructions
Powering On
The PZM11 microphone does not have an independent power switch. It is powered by 12-48V phantom power supplied by your connected audio device (mixer, preamplifier, or audio interface). Ensure phantom power is enabled on the input channel to which the microphone is connected.
Placement Considerations
Given its hemispherical polar pattern, the PZM11 captures sound consistently from all directions above its mounting surface. Optimal placement is crucial for effective audio capture and depends on the specific application:
- Conference Rooms: For capturing speech from multiple participants, mount the microphone centrally on a conference table.
- Security and Surveillance: Install in a ceiling or wall location where discreet, wide-area audio monitoring is required.
- Stage Applications: Can be positioned on a stage floor to pick up instruments or vocals from a broad performance area.
Audio Level Adjustment
Adjust the input gain on your mixer or audio interface to achieve the desired audio level. It is important to monitor the audio signal to prevent clipping or distortion, which can degrade sound quality.
Maintenance and Care
Cleaning
To clean the microphone, gently wipe the surface with a soft, dry, lint-free cloth. Avoid using liquid cleaners, solvents, or abrasive materials, as these can damage the microphone's finish or internal electronic components.
Storage
When not in use, store the microphone in a clean, dry environment, away from direct sunlight, extreme temperatures, and high humidity. Protect it from physical impact or excessive vibration.
Inspection
Periodically inspect the screw terminals and wiring for any signs of wear, corrosion, or damage. Ensure all connections remain secure and tight to maintain optimal performance.
Troubleshooting Guide
| Problem | Possible Cause | Solution |
|---|---|---|
| No Sound Output | No phantom power supplied. | Ensure your mixer or preamplifier is providing 12-48V phantom power and that it is activated for the connected channel. |
| No Sound Output | Incorrect or loose wiring. | Check the screw terminal connections for proper polarity and secure contact. Re-wire if necessary. |
| Low Volume / Weak Signal | Insufficient input gain. | Increase the input gain on your mixer or preamplifier. |
| Distorted Sound | Input gain set too high. | Reduce the input gain on your mixer or preamplifier to prevent clipping. |
| Excessive Background Noise (e.g., HVAC rumble) | Microphone picking up unwanted low-frequency noise. | The PZM11 has a built-in low-frequency rolloff. Ensure proper placement away from direct noise sources. If available, activate additional low-cut filters on your mixer or audio interface. |
Technical Specifications
| Feature | Detail |
|---|---|
| Model Name | PZM11 |
| Item Model Number | 3326H00010 |
| Brand | AKG |
| Microphone Form Factor | Boundary |
| Polar Pattern | Hemispherical |
| Power Source | Corded Electric (12-48V Phantom Power) |
| Connectivity Technology | Screw Terminal |
| Connector Type | Screw |
| Signal-to-Noise Ratio | 78 dB |
| Item Weight | 71 Grams (2.5 ounces) |
| Product Dimensions (L x W x H) | 9.6 x 4.8 x 2.8 inches |
| Included Components | Microphone |
| Recommended Uses | Security, Surveillance, Conference, Live Performance |
Warranty and Support
Warranty Information
For specific warranty details regarding your AKG PZM11 microphone, please refer to the documentation included with your purchase. Standard warranties typically cover manufacturing defects for a specified period from the date of purchase. Retain your proof of purchase for warranty claims.
Customer Support
If you encounter issues not covered in this manual or require further technical assistance, please contact AKG customer support. Contact information can usually be found on the official AKG website or within your product packaging.
Online resources, FAQs, and additional product information may also be available on the AKG Store on Amazon or the official AKG website.


