Important Safety Information
Read and understand all instructions and safety warnings before operating this equipment. Failure to follow these instructions may result in serious injury or property damage.
- Always wear appropriate personal protective equipment (PPE), including safety glasses and gloves.
- Do not exceed the maximum load capacity of 150 lbs.
- Ensure the hoist is on a stable, level surface before loading or lifting.
- Verify all locking mechanisms and outriggers are securely engaged before operation.
- Keep hands and clothing clear of moving parts, especially the crank and lifting mechanism.
- Inspect the hoist for damage or wear before each use. Do not operate if damaged.
- Do not modify the hoist in any way. Use only manufacturer-approved replacement parts.
- Keep children and bystanders away from the work area.
Product Overview
The Ironton Drywall and Panel Hoist, Model DPH11, is designed to assist in the lifting and positioning of drywall panels and other sheet materials. It features a rugged steel frame with a powder-coat finish, a manual crank for lifting, and a tilting action for precise panel placement. The hoist has a maximum lift height of 11 feet and can accommodate panels up to 4 feet by 16 feet. It includes three casters for mobility and locking outriggers for stability.
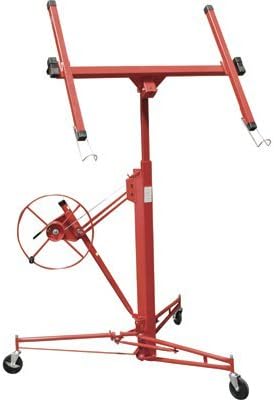
Figure 1: The Ironton Drywall and Panel Hoist, fully assembled, showcasing its red steel frame and manual crank system.
Assembly
The Ironton Drywall and Panel Hoist is designed for easy assembly without the need for special tools. Follow these steps to assemble your hoist:
- Unpack all components and verify against the parts list (refer to included packaging for detailed parts list).
- Attach the three casters to the base frame. Ensure they are securely fastened.
- Assemble the main vertical mast sections. Secure them according to the provided hardware.
- Mount the panel support arms to the top of the mast. These arms should be able to tilt.
- Connect the manual crank assembly to the mast, ensuring the lifting cable or chain is correctly routed and secured.
- Extend and lock the outriggers for initial stability during setup.
After assembly, perform a functional check by slowly raising and lowering the support arms without a load to ensure smooth operation of the crank and lifting mechanism.
Operating Instructions
Follow these steps for safe and effective operation of the drywall hoist:
- Positioning the Hoist: Move the hoist to the desired location. Engage the locking mechanisms on the casters to prevent movement. Extend and lock the outriggers for maximum stability.
- Lowering the Support Arms: Use the manual crank to lower the panel support arms to a comfortable height for loading.
- Loading the Panel: Carefully place the drywall or panel onto the support arms. Ensure the panel is centered and balanced. The hoist can accommodate panels up to 4ft x 16ft.

Figure 2: A worker carefully places a drywall panel onto the hoist's support arms, ensuring it is centered and stable before lifting.
- Lifting the Panel: Slowly turn the manual crank to raise the panel to the desired height. Maintain a firm grip on the crank.

Figure 3: The hoist with a drywall panel partially elevated, demonstrating the manual crank operation for controlled lifting.
- Tilting and Positioning: Once near the ceiling or wall, use the tilting action of the support arms to precisely position the panel against the surface.

Figure 4: The drywall hoist with a panel fully elevated, illustrating its maximum lift capability and readiness for installation.

Figure 5: The hoist positions a drywall panel against a ceiling, demonstrating its utility for overhead installation.
- Securing the Panel: Secure the panel to the ceiling or wall using appropriate fasteners.
- Lowering the Hoist: Once the panel is secured, slowly lower the support arms using the manual crank.
- Removing the Hoist: Disengage caster locks and outriggers, then carefully move the hoist away from the work area.
Maintenance
Regular maintenance ensures the longevity and safe operation of your Ironton Drywall and Panel Hoist.
- Cleaning: After each use, wipe down the hoist to remove dust and debris.
- Inspection: Periodically inspect all bolts, nuts, and fasteners to ensure they are tight. Check the lifting cable/chain for fraying, kinks, or damage. Inspect the casters and outriggers for proper function.
- Lubrication: Apply a light lubricant to moving parts, such as the crank mechanism and mast sections, as needed to ensure smooth operation.
- Storage: Store the hoist in a clean, dry area. For long-term storage, it can be disassembled for compact storage.

Figure 6: A close-up of the hoist's base, highlighting the robust construction of the locking outriggers and casters, essential for stability and mobility.
Troubleshooting
| Problem | Possible Cause | Solution |
|---|---|---|
| Hoist does not lift smoothly or is difficult to crank. | Lack of lubrication, damaged cable/chain, excessive load. | Lubricate moving parts. Inspect and replace damaged cable/chain. Reduce load to within capacity. |
| Hoist is unstable during operation. | Outriggers not fully extended/locked, casters not locked, uneven surface. | Ensure outriggers are fully extended and locked. Lock all casters. Move hoist to a level surface. |
| Panel support arms do not tilt correctly. | Obstruction, damaged pivot point. | Check for and remove any obstructions. Inspect pivot points for damage and lubricate. |
Specifications
- Model Number: DPH11
- Load Capacity: 150 lbs
- Maximum Lift Height: 11 feet (up to 15 feet with optional extension bar, sold separately)
- Panel Size Compatibility: Up to 4 ft x 16 ft
- Power Source: Manual
- Frame Material: Steel with powder-coat finish
- Casters: 3 (with locking mechanism)
- Features: Tilting action, locking outriggers
Warranty Information
For detailed warranty information regarding your Ironton Drywall & Panel Hoist, please refer to the warranty card included with your product or contact Ironton customer service directly. Warranty terms and conditions may vary.
Customer Support
If you have any questions, require assistance with assembly or operation, or need to order replacement parts, please contact Ironton customer service. Refer to your product packaging or the official Ironton website for current contact information.


