
1. Introduction
The ECS Elitegroup A55F-M2 motherboard is designed to integrate AMD FM1 APU processors with the AMD A55 chipset, offering a balanced performance solution. This motherboard supports excellent graphics capabilities, including DirectX 11, and can utilize AMD Dual Graphics technology to combine APU and select Radeon discrete graphics cards for enhanced visual output. Key features include Dual-Channel DDR3 memory support up to 16GB, UVD3.0, SATA 3Gb/s, and USB 2.0 connectivity. This manual provides essential information for the proper installation, configuration, and maintenance of your A55F-M2 motherboard.
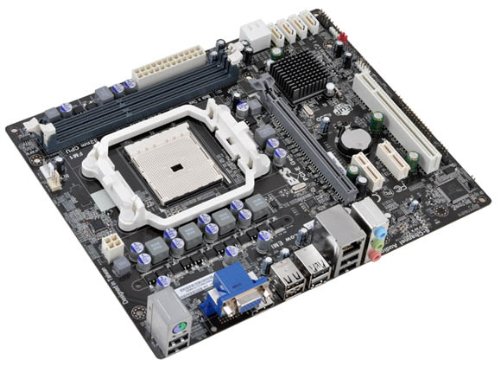
Figure 1: ECS Elitegroup A55F-M2 Motherboard. This image displays the overall layout of the motherboard, including the CPU socket, RAM slots, PCIe slots, and various connectors.
2. Key Features
- Supports AMD FM1 socket for AMD A series, E Series, Athlon Quad-core, Athlon Dual-core, and Sempron Dual-core processors.
- Features ESD protection design to prevent damage and extend product lifespan.
- Includes ECS Intelligent EZ Utility suite: eBLU, eDLU, eOC, eSF for system management.
- Supports AMD Dual Graphics technology for enhanced visual performance.
- Equipped with solid capacitors for improved VRM stability and longevity.
- Expansion slots include 1 x PCIe x16 and 1 x PCIe x1.
- Compatible with Microsoft Windows 8, Windows 7, Windows Vista, and Windows XP (32-bit and 64-bit versions).
3. Setup and Installation
Follow these steps for proper installation of the motherboard and its components:
- Prepare the Case: Ensure your computer case is compatible with Micro ATX motherboards. Install the I/O shield into the case's rear opening.
- Install the CPU:
- Open the CPU socket lever.
- Carefully align the CPU with the socket, ensuring the triangular mark on the CPU matches the mark on the socket.
- Gently place the CPU into the socket without forcing it.
- Close the socket lever to secure the CPU.
- Apply a thin layer of thermal paste to the CPU's surface.
- Install the CPU cooler according to its manufacturer's instructions.
- Install RAM Modules:
- Open the clips on both ends of the DIMM slots.
- Align the RAM module with the slot, ensuring the notch on the module matches the key in the slot.
- Press down firmly on both ends of the RAM module until the clips snap into place.
- Mount the Motherboard:
- Place the motherboard into the case, aligning the screw holes with the standoffs.
- Secure the motherboard with screws. Do not overtighten.
- Connect Power Supply:
- Connect the 24-pin ATX power connector from the power supply to the motherboard.
- Connect the 4-pin or 8-pin ATX 12V power connector (CPU power) to the motherboard.
- Connect Storage Devices: Connect SATA data cables from your storage drives (HDD/SSD) to the SATA ports on the motherboard. Connect power cables from the power supply to the drives.
- Connect Front Panel Cables: Connect the power button, reset button, HDD LED, power LED, and USB/audio headers from the case to the corresponding pins on the motherboard. Refer to the motherboard's silkscreen labels for correct orientation.
- Install Expansion Cards (Optional): If using a discrete graphics card or other PCIe cards, insert them into the appropriate PCIe slots and secure them with the case's retention mechanism.
4. Operating System Support
The ECS Elitegroup A55F-M2 motherboard supports a range of Microsoft Windows operating systems:
- Windows XP (32-bit and 64-bit)
- Windows Vista (32-bit and 64-bit)
- Windows 7 (32-bit and 64-bit)
- Windows 8 (32-bit and 64-bit)
Ensure you install the correct drivers for your operating system after installation for optimal performance and functionality.
5. Technical Specifications
| Feature | Detail |
|---|---|
| CPU Socket | Socket FM1 |
| Compatible Processors | AMD A-Series, AMD Athlon, AMD Sempron (FM1) |
| Chipset | AMD A55 (Hudson D2) |
| Memory Type | DDR3 SDRAM |
| Memory Speed | Up to 1800 MHz |
| Maximum RAM Capacity | 32 GB |
| Graphics Coprocessor | Integrated AMD Graphics (APU dependent) |
| Expansion Slots | 1 x PCIe x16, 1 x PCIe x1 |
| USB 2.0 Ports | 8 (via headers and rear panel) |
| Storage Interface | SATA 3Gb/s |
| Form Factor | Micro ATX |
| Dimensions (LxWxH) | 10.5 x 9 x 2 inches |
| Item Weight | 1.7 pounds |
6. Troubleshooting
This section provides solutions to common issues you might encounter.
- No Power:
- Ensure the power supply is connected correctly to the motherboard (24-pin ATX and 4/8-pin CPU power).
- Verify the power supply switch is in the 'ON' position.
- Check front panel power button connection to the motherboard.
- Test with a different power supply if possible.
- No Display:
- Ensure the monitor is connected to the correct video output (onboard or discrete graphics card).
- Reseat the RAM modules. Try booting with only one RAM module.
- Reseat the graphics card (if applicable).
- Clear CMOS by removing the CMOS battery for 5-10 minutes or using the clear CMOS jumper.
- System Instability/Crashes:
- Check CPU and GPU temperatures. Overheating can cause instability.
- Ensure all drivers are up to date.
- Run memory diagnostic tools to check for faulty RAM.
- Verify power supply is sufficient for all components.
- Peripheral Devices Not Detected:
- Ensure devices are properly connected to the correct ports (USB, SATA).
- Check device manager in your operating system for driver issues.
- Try connecting the device to a different port.
7. Maintenance
Proper maintenance can extend the lifespan and ensure optimal performance of your motherboard.
- Dust Removal: Regularly clean dust from inside your computer case, especially from CPU heatsinks, GPU fans, and case fans. Use compressed air for this purpose. Ensure the system is powered off and unplugged before cleaning.
- Cable Management: Ensure cables are neatly routed to improve airflow and prevent obstruction of components.
- Driver Updates: Keep your motherboard drivers (chipset, audio, network) and graphics drivers updated to ensure compatibility and performance. Visit the ECS Elitegroup website for the latest drivers.
- BIOS/UEFI Updates: Periodically check for BIOS/UEFI updates from the manufacturer's website. Updates can improve stability, add support for new hardware, or fix bugs. Follow the update instructions carefully.
- Environmental Control: Operate the computer in a well-ventilated area, away from direct sunlight, excessive heat, or humidity.
8. Warranty and Support
For specific warranty terms and conditions, please refer to the warranty card included with your product or visit the official ECS Elitegroup website. Warranty coverage typically includes defects in materials and workmanship under normal use.
For technical support, driver downloads, and further assistance, please visit the ECS Elitegroup support page. Have your product model number (A55F-M2) and serial number ready when contacting support.
Official Website: https://www.ecs.com.tw/

