Introduction
The TC Helicon VoiceTone Single H1 Intelligent Harmony pedal is designed to add realistic vocal harmonies to your performance. This compact stompbox provides essential harmony effects, allowing you to enrich your vocal sound with ease. This manual provides detailed instructions for setup, operation, maintenance, and troubleshooting to ensure optimal performance of your device.
Safety Instructions
Please read these safety instructions carefully before operating the device. Keep this manual for future reference.
- Power Source: Use only the specified power adapter or batteries. Ensure the voltage matches the device requirements.
- Water and Moisture: Do not expose the device to rain, moisture, or any liquids. Do not operate with wet hands.
- Ventilation: Ensure adequate ventilation around the unit. Do not block ventilation openings.
- Heat: Keep the device away from heat sources such as radiators, heat registers, stoves, or other apparatus that produce heat.
- Servicing: Do not attempt to service this product yourself. Refer all servicing to qualified service personnel.
- Cleaning: Clean only with a dry cloth.
Package Contents
Upon unpacking your TC Helicon VoiceTone Single H1, please verify that all items are present:
- TC Helicon VoiceTone Single H1 Intelligent Harmony Pedal
- Footswitch (integrated)
- Power Adapter (typically included, check packaging)
- User Manual (this document)
Product Overview
The VoiceTone Single H1 features a robust metal and plastic construction, designed for durability on stage or in the studio. Its intuitive layout allows for quick adjustments to your vocal harmony effects.

Image 1: Front View. This image displays the top panel of the VoiceTone Single H1, highlighting the 'MIC', 'OUT', and 'POWER' labels at the top. Three main rotary knobs are visible: one for harmony key (C, F, G), one for voice selection (BELOW, ABOVE, VOICES), and one for dry/wet mix. The central footswitch is prominent at the bottom.

Image 2: Angled Left View. This angled view shows the left side of the pedal, revealing additional controls such as 'MIC GAIN', 'GRND LIFT' (Ground Lift switch), and 'INST THRU' (Instrument Thru jack). The main top panel controls are also visible from this perspective.
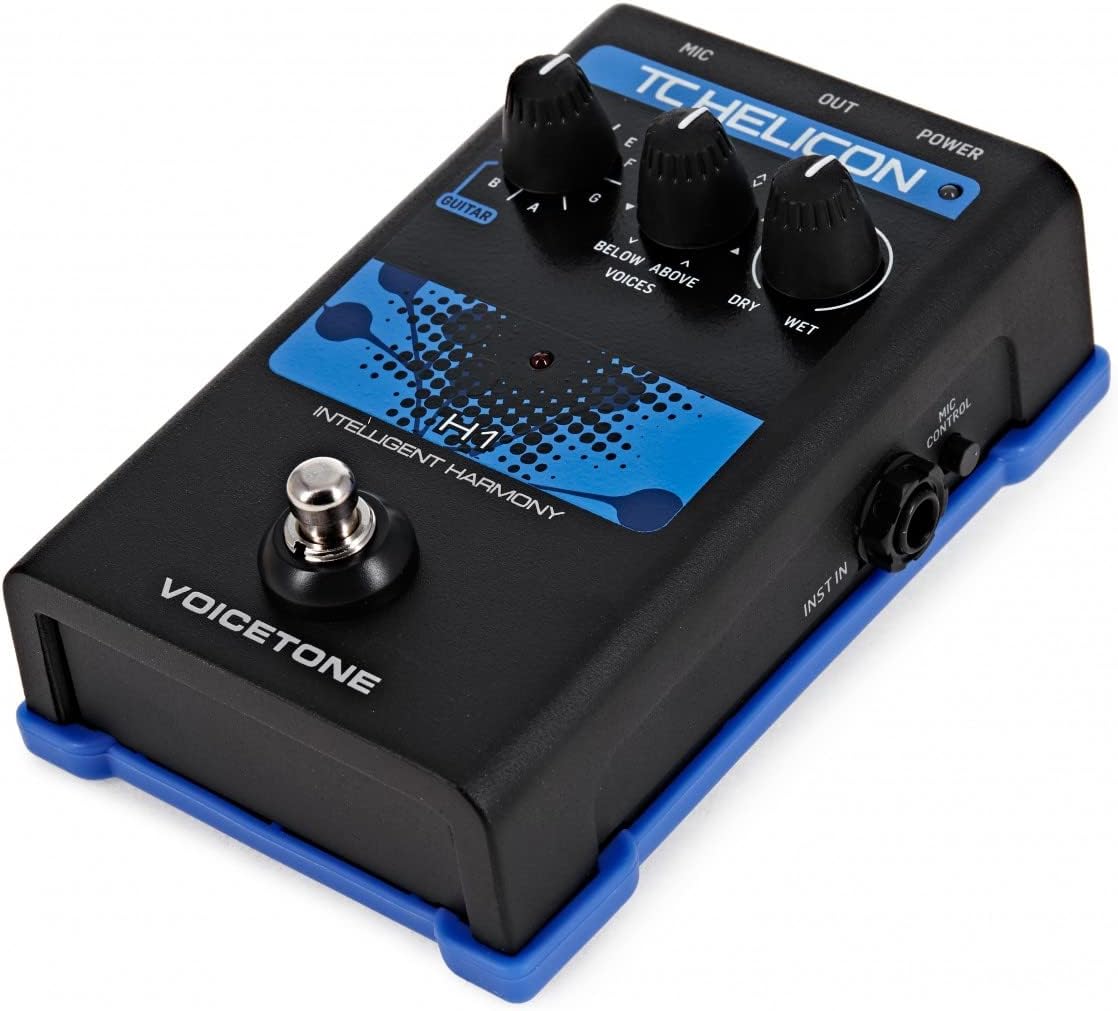
Image 3: Angled Right View. This angled view presents the right side of the pedal, showing the 'MIC CONTROL' input and 'INST IN' (Instrument Input jack). The top panel controls are also visible, providing a comprehensive view of the unit's interface.

Image 4: Rear View. This image focuses on the rear panel of the VoiceTone Single H1. It clearly shows the USB port, the DC power input jack, the 'OUT' (XLR output) port, and the 'MIC' (XLR input) port. These are the primary connectivity points for the device.
Controls and Connectors:
- MIC Input (XLR): Connect your microphone here.
- OUT Output (XLR): Connect to your mixer or PA system.
- POWER Input (DC Jack): Connect the provided power adapter.
- USB Port: For firmware updates and connection to VoiceSupport software.
- INST IN (1/4" Jack): Connect your guitar or other instrument for harmony key detection.
- INST THRU (1/4" Jack): Passes the instrument signal directly through to an amplifier or other device.
- MIC GAIN Knob: Adjusts the input level of your microphone.
- GRND LIFT Switch: Helps eliminate hum caused by ground loops.
- MIC CONTROL Input: For connecting an optional TC Helicon MP-75 or MP-76 microphone for remote control.
- Harmony Key Knob (C, F, G): Selects the musical key for the harmony voices.
- Voices Knob (BELOW, ABOVE, VOICES): Selects the harmony interval (e.g., third below, fifth above) and the number of voices.
- DRY/WET Mix Knob: Balances the level of your original (dry) vocal with the harmony (wet) effect.
- Footswitch: Engages or bypasses the harmony effect.
Setup
Follow these steps to set up your VoiceTone Single H1 pedal:
- Power Connection: Connect the provided power adapter to the POWER input jack on the rear of the pedal and then to a suitable power outlet.
- Microphone Connection: Connect your microphone to the MIC input (XLR) on the rear panel using a balanced XLR cable.
- Output Connection: Connect the OUT output (XLR) on the rear panel to an input on your mixer, audio interface, or PA system using a balanced XLR cable.
- Instrument Connection (Optional): If you are using a guitar or other instrument to guide the harmony, connect your instrument to the INST IN (1/4" jack) on the right side of the pedal. If you need to pass the instrument signal to an amplifier, connect the INST THRU (1/4" jack) on the left side to your amplifier's input.
- Ground Lift: If you experience hum or noise, try flipping the GRND LIFT switch on the left side of the pedal.
- Mic Control (Optional): If using a TC Helicon MP-75 or MP-76 microphone, connect it to the MIC CONTROL input on the right side for remote control functionality.
Operating
Once set up, you can begin using your VoiceTone Single H1:
- Power On: Ensure all connections are secure. The pedal will power on automatically when connected to power.
- Adjust MIC GAIN: Sing into your microphone and adjust the MIC GAIN knob on the left side until the signal is strong but not clipping. The LED indicator on the pedal will help you monitor the input level.
- Select Harmony Key: Use the Harmony Key knob to select the musical key of your song (C, F, G are common starting points, but the pedal can detect other keys via instrument input).
- Choose Voices: Turn the Voices knob to select the desired harmony interval and number of voices. Options typically include harmonies below your voice, above your voice, or a combination.
- Mix Dry/Wet: Adjust the DRY/WET Mix knob to blend your original vocal with the generated harmony voices. Turn towards DRY for less harmony, towards WET for more prominent harmony.
- Engage/Bypass: Press the footswitch to toggle the harmony effect on or off. The LED will indicate the effect status.
- Instrument-Guided Harmony: If an instrument is connected to INST IN, the H1 will use its pitch to determine the harmony key, providing more accurate and dynamic harmonies. Ensure your instrument is in tune.
Maintenance
Proper maintenance ensures the longevity and reliable performance of your VoiceTone Single H1.
- Cleaning: Use a soft, dry cloth to clean the exterior of the pedal. Do not use abrasive cleaners, solvents, or waxes.
- Storage: When not in use, store the pedal in a cool, dry place, away from direct sunlight and extreme temperatures.
- Cable Care: Regularly check all cables for signs of wear or damage. Replace faulty cables immediately.
- Firmware Updates: Periodically check the TC Helicon website for firmware updates. Connect the pedal via USB to a computer and use the VoiceSupport software to perform updates.
Troubleshooting
If you encounter issues with your VoiceTone Single H1, refer to the following common problems and solutions:
- No Sound Output:
- Check all cable connections (microphone, output, instrument).
- Ensure the power adapter is securely connected and receiving power.
- Verify the MIC GAIN knob is adjusted appropriately.
- Check the DRY/WET Mix knob; if set fully to DRY, you will only hear your unprocessed vocal.
- Ensure the footswitch LED indicates the effect is engaged.
- Hum or Noise:
- Engage the GRND LIFT switch on the left side of the pedal.
- Try using different power outlets or a power conditioner.
- Ensure all cables are in good condition and properly shielded.
- Harmony Not Tracking Correctly:
- Ensure your microphone input level (MIC GAIN) is optimal, not too low or too high.
- If using instrument-guided harmony, ensure your instrument is in tune and playing clearly.
- Double-check the Harmony Key knob setting to match the song's key.
- Ensure your vocal pitch is clear and consistent.
- Pedal Not Responding:
- Disconnect and reconnect the power adapter.
- If issues persist, contact TC Helicon support.
Specifications
| Feature | Description |
|---|---|
| Model Number | 996012011 |
| Item Weight | 1.59 pounds |
| Body Material | Metal, Plastic |
| Color | Black |
| Signal Format | Analog |
| Audio Output Effects | Pitch-Shifting |
| Controls Type | Footswitch, Rotary Knobs |
| Power Source | DC Power Adapter (external) |
| Connectivity | XLR Mic In, XLR Out, 1/4" Inst In, 1/4" Inst Thru, USB, Mic Control |
Warranty and Support
TC Helicon products are designed for reliability and performance. For specific warranty information, please refer to the warranty card included with your product or visit the official TC Helicon website. For technical support, firmware updates, or additional resources, please visit www.tchelicon.com.