1. Introduction
This manual provides detailed instructions for the safe and effective installation, operation, and maintenance of your HeatTech 120V Electric Radiant Floor Heating Mat. This system is designed to provide comfortable radiant heat for various floor types in residential and commercial settings.
Product Overview
- Application: Suitable for new construction and retrofits in residential homes and apartment buildings, including bathrooms, kitchens, and saunas. Compatible with tile, stone, granite, marble, laminate, engineered wood, and vinyl floors.
- Included Components: Electric radiant heating mat (10 sq.ft.) and this detailed installation manual.
Key Features
- Safety Certified: UL listed for USA (complies with electrical safety standards).
- Low Profile: Heating cable is approximately 1/8 inch thick, minimizing floor height increase.
- Easy Installation: Exclusive HeatTech adhesive mat backing ensures the mat lays flat and stays flat, simplifying the installation process.
- Zero Electromagnetic Field (EMF): Designed for minimal EMF emissions.
- Optimal Heat Distribution: Heating cable spaced at 3 inches apart.
- Cold Lead: Comes with a single armored 10-foot long cold lead wire for easy connection to the thermostat.

Image 1.1: HeatTech Electric Radiant Floor Heating Mat. The mat features a blue heating cable woven into a red adhesive mesh backing, designed for easy installation.
2. Safety Information
Read all instructions carefully before installation and operation. Failure to follow these safety guidelines may result in electric shock, fire, property damage, or personal injury.
- Qualified Personnel: Installation and electrical connections must be performed by a qualified electrician in accordance with local electrical codes and regulations.
- Dedicated Circuit: Always connect the heating mat to a dedicated circuit breaker.
- Series Connection: DO NOT connect multiple heating mats in series. Mats must be connected in parallel to a suitable thermostat. Up to three 120V mats can be connected to a single thermostat, provided the total amperage does not exceed the thermostat's rating.
- Cable Protection: Exercise extreme caution during installation to prevent damage to the heating cable. Damage to the cable can lead to system failure or electrical hazards.
- Thermostat and Sensor: A floor sensing thermostat and floor sensor (not included) are required for proper operation and temperature control.
- Testing: Test the heating mat for continuity and resistance before, during, and after installation to ensure proper function and detect any damage.
- Flammable Materials: Do not install the heating mat under or near flammable materials.
3. Setup and Installation
Proper installation is critical for the performance and longevity of your HeatTech radiant floor heating system. Follow these steps carefully.
3.1 Planning the Layout
- Measure the area to be heated. The 10 sq.ft. mat is 20 inches wide and 6.1 feet long.
- Plan the mat placement, avoiding areas under permanent fixtures like cabinets, bathtubs, or toilets.
- Determine the location for the thermostat and ensure the 10-foot cold lead can reach it without splicing.
- Draw a detailed layout plan, noting any obstacles or areas where the mat needs to be cut and turned.
3.2 Subfloor Preparation
- Ensure the subfloor is clean, dry, level, and structurally sound.
- For maximum energy efficiency and faster heat-up times, consider installing insulation beneath the subfloor.
- Refer to the diagrams below for typical framed and slab floor constructions.

Image 3.1: Framed Floor Construction and Applications. Illustrates various layering methods for installing heating mats on framed floors, including thin-set and thick-set mortar applications.
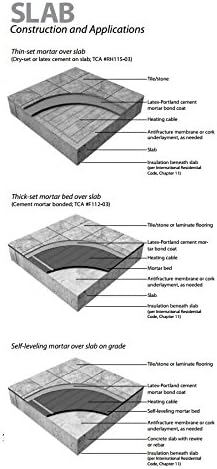
Image 3.2: Slab Floor Construction and Applications. Illustrates various layering methods for installing heating mats on slab floors, including thin-set, thick-set, and self-leveling mortar applications.
3.3 Laying the Heating Mat
- Begin laying the mat from the thermostat location, unrolling it across the planned area.
- The adhesive backing will help the mat stay in place. Press firmly to secure.
- To change direction or navigate obstacles, cut only the mesh backing, never the heating cable.
- The red mesh can be cut to adjust cable spacing if needed, but the standard 3-inch spacing is recommended for optimal heat distribution.

Image 3.3: Mat Cutting and Turning Guide. This diagram shows techniques for making 180-degree turns, open corner turns, navigating obstacles, and full corner turns by cutting only the mesh backing.
3.4 Electrical Connections
- Route the 10-foot cold lead to the electrical box where the thermostat will be installed.
- Install a floor sensor (not included) between two heating cables, equidistant from them, and route its lead to the thermostat box. Ensure the sensor is not directly touching the heating cable.
- Connect the cold lead and sensor lead to the thermostat according to the thermostat manufacturer's instructions.
- Ensure all electrical connections are secure and comply with local codes.
3.5 Testing the Mat
Before applying mortar or flooring, perform the following tests:
- Continuity Test: Use a multimeter to check for continuity across the heating cable.
- Resistance Test: Measure the resistance (ohms) of the heating cable and compare it to the specified value in the product documentation.
- Insulation Resistance Test: Check for any shorts between the heating cable and ground.
Repeat these tests after applying mortar and before installing the final flooring to ensure no damage occurred during these stages.
3.6 Applying Mortar and Flooring
- Apply a thin-set mortar or self-leveling compound over the mat, ensuring full coverage of the heating cable without creating air pockets.
- Use a plastic trowel or exercise caution with metal trowels to avoid damaging the heating cable.
- Allow the mortar to cure completely according to the manufacturer's instructions before installing the final flooring material.
4. Operating Instructions
The HeatTech radiant floor heating mat operates in conjunction with a floor sensing thermostat.
- Thermostat Control: Use the thermostat to set your desired floor temperature. The floor sensor will monitor the actual floor temperature and regulate the heating mat accordingly.
- Programmable Thermostats: For maximum energy savings and optimal system response, it is recommended to use a 120V programmable floor sensing thermostat. Recommended models include Honeywell/Aube TH115-AF-120S and TH115-AF-GA.
- Initial Heat-Up: Allow several hours for the floor to reach the desired temperature, especially during initial use or after prolonged periods of being off.
5. Maintenance
Once properly installed, the HeatTech Electric Radiant Floor Heating Mat requires minimal maintenance.
- Thermostat Care: Keep the thermostat clean and free from dust. Refer to your thermostat's manual for specific cleaning instructions.
- System Checks: If you experience any issues, refer to the troubleshooting section or contact a qualified electrician.
- No Internal Maintenance: The heating mat itself is sealed and requires no internal maintenance. Do not attempt to open or repair the mat.
6. Troubleshooting
If your HeatTech radiant floor heating system is not functioning as expected, consider the following:
- No Heat:
- Check the circuit breaker for the heating system.
- Verify the thermostat settings and ensure it is turned on and set to a temperature above the current floor temperature.
- Ensure the floor sensor is properly connected and functioning.
- Uneven Heating:
- This can sometimes indicate an issue with the mat installation or mortar coverage. If this occurs, consult a professional.
- Thermostat Error:
- Refer to your thermostat's instruction manual for specific error codes and troubleshooting steps.
- Damaged Cable: If the heating cable was damaged during installation (e.g., cut or scraped), the system may not function. This typically requires professional assessment and repair or replacement.
- Sensor Failure: In some cases, a floor sensor may fail over time. Installing a backup sensor during initial installation can provide redundancy.
For persistent issues, contact a qualified electrician or the HeatTech support team.
7. Specifications
| Model Number | CECOMINOD097031 |
| Part Number | HTMAT-120-10 |
| Size | 10 sq.ft. (20 inches wide x 6.1 feet long) |
| Heating Cable Length | 40 feet |
| Heating Cable Spacing | 3 inches |
| Heating Cable Thickness | ~1/8 inch |
| Voltage | 120 Volts |
| Wattage | 120 Watts |
| Amperage Capacity | 1 Amps |
| Output | 12 Watts/sq.ft. (41 BTU/sq.ft.) |
| Cold Lead Length | 10 feet |
| Color | Blue Floor Heating Cable, Red Adhesive Backing |
| Material | Mesh, Adhesive |
| Power Source | Hardwire |
| Certifications | UL listed for USA, ETL listed for USA and Canada |
8. Warranty
HeatTech provides a 25-year Manufacturer's Warranty on electric floor heating mats. This warranty covers manufacturing defects under normal use and service. Please retain your proof of purchase for warranty claims. For full warranty terms and conditions, please refer to the official HeatTech website or contact customer support.
9. Support
For technical assistance, installation questions, or warranty inquiries, please contact HeatTech customer support. Visit the official HeatTech website for contact information and additional resources.
Online Resources: HeatTech Store on Amazon

