1. Introduction
This manual provides detailed instructions for the installation, operation, and maintenance of your ASUS SABERTOOTH X79 motherboard. The SABERTOOTH X79 is designed for Intel LGA2011 2nd Generation Intel Core i7 Processors, featuring an Intel X79 chipset. It supports quad-channel DDR3 memory with an 8-DIMM design for maximum performance and versatility.
Key features include:
- Thermal Armor Technology: Improves airflow with an innovative vent design and integrated turbo fans.
- TUF Capacitors, Chokes, and MOSFETs: Military-standard certified components for enhanced durability.
- ASUS SSD Caching: Provides performance benefits of SSDs and HDDs without capacity limitations.
- DIGI+ Power Control: Offers precise adjustments for system stability, power efficiency, and performance scaling.
- Thermal Radar: Real-time thermal detection for optimized cooling solutions.
- PCIe 3.0 Support: Includes multiple PCIe 3.0 x16 slots for NVIDIA Quad-GPU SLI and Quad-GPU CrossFireX.
2. Package Contents
Verify that all components are present in your motherboard package. If any items are missing or damaged, contact your retailer.
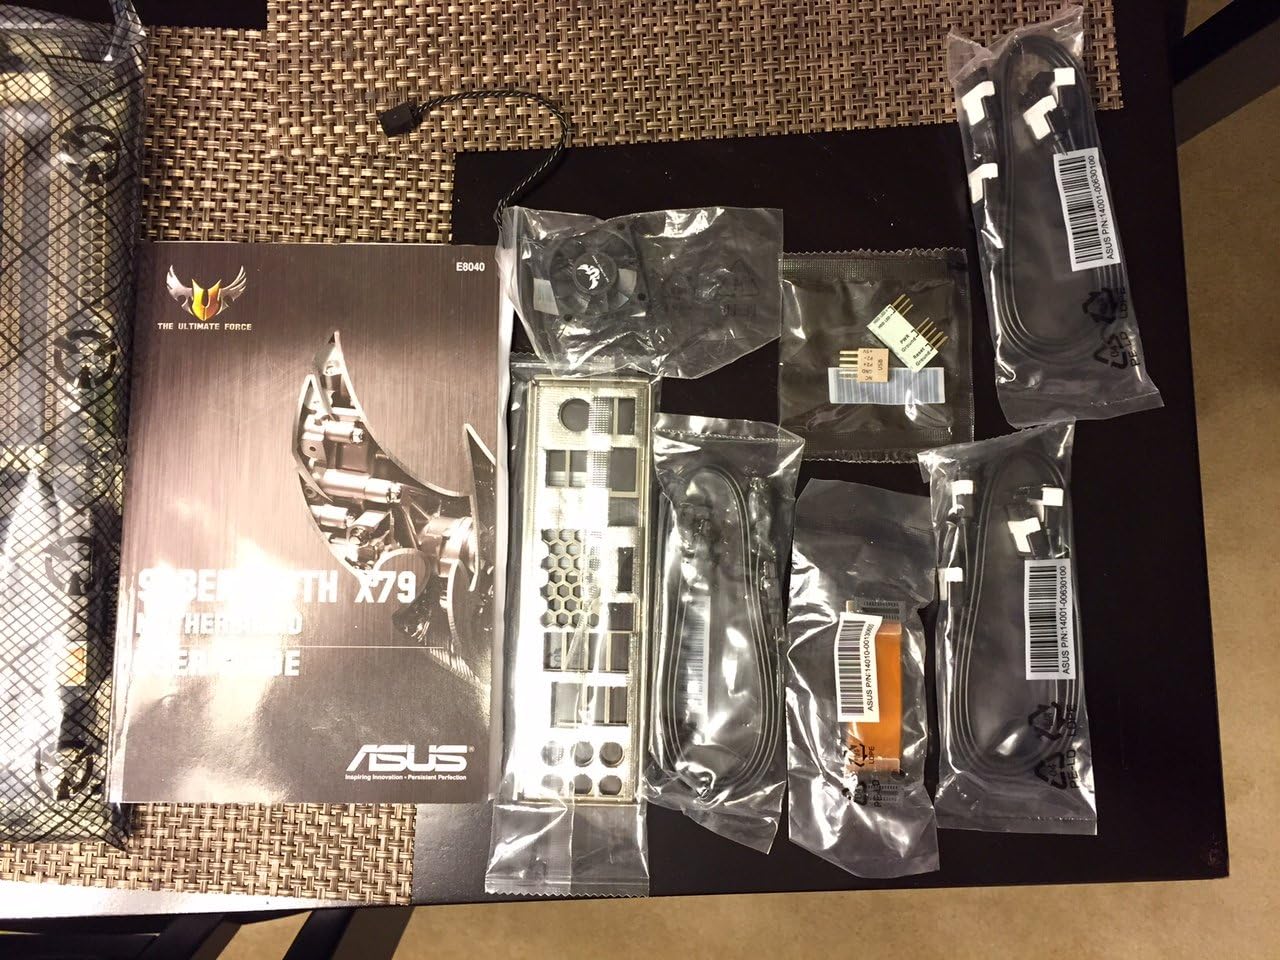
Image 2.1: Overview of the ASUS SABERTOOTH X79 motherboard and its included accessories. This image displays the motherboard, user guide, I/O shield, SATA cables, Q-Connectors, and other small accessories, all neatly packaged.
Typical package contents include:
- ASUS SABERTOOTH X79 Motherboard
- User Guide / Manual
- I/O Shield
- SATA Data Cables
- ASUS Q-Connectors (for front panel headers)
- SLI Bridge Connector
- TUF Certification Card
- Support DVD (drivers and utilities)
3. Setup and Installation
Before beginning installation, ensure your system is powered off and unplugged from the wall outlet. Wear an anti-static wrist strap or frequently touch a grounded metal object to prevent electrostatic discharge (ESD) damage.

Image 3.1: The ASUS SABERTOOTH X79 motherboard still sealed in its anti-static bag, emphasizing the importance of ESD protection during handling.
3.1. CPU Installation (LGA2011)
- Prepare the Socket: Gently push down the load lever and move it sideways to unclip it from the retention tab. Repeat for the second load lever. Open the load plate.
- Insert the CPU: Carefully align the triangular mark on the CPU with the corresponding mark on the socket. Place the CPU into the socket without forcing it. The CPU should sit flat.
- Secure the CPU: Close the load plate. Push down the load levers and clip them back into the retention tabs. Ensure both levers are securely locked.
- Apply Thermal Paste and Cooler: Apply a thin, even layer of thermal paste to the CPU's integrated heat spreader (IHS). Install your CPU cooler according to its manufacturer's instructions.
3.2. Memory (RAM) Installation
The SABERTOOTH X79 supports quad-channel DDR3 memory across 8 DIMM slots. For optimal performance, install memory modules in matched pairs or quads.
- Open DIMM Clips: Push open the retention clips at both ends of the DIMM slots.
- Align Memory Module: Align the notch on the memory module with the key in the DIMM slot.
- Insert Module: Insert the module firmly into the slot until the clips snap into place. Ensure both clips are closed and the module is seated correctly.
- Quad-Channel Configuration: Refer to your motherboard's manual for specific slot recommendations for quad-channel operation (typically slots A1, B1, C1, D1 for four modules).
3.3. Expansion Card Installation (PCIe)
The motherboard features multiple PCIe 3.0 x16 slots. For graphics cards, use the primary PCIe x16 slots for best performance.
- Select Slot: Choose an appropriate PCIe slot for your expansion card (e.g., graphics card, sound card).
- Remove Slot Cover: Remove the corresponding metal slot cover from your PC case.
- Insert Card: Align the card with the slot and press down firmly until it is fully seated. The retention clip at the end of the slot should snap into place.
- Secure Card: Secure the card to the case with a screw.
3.4. Storage Device Connection (SATA)
Connect your SATA hard drives, SSDs, and optical drives to the SATA ports on the motherboard.
- Connect Data Cable: Connect one end of a SATA data cable to a SATA port on the motherboard and the other end to your storage device.
- Connect Power Cable: Connect a SATA power cable from your power supply unit (PSU) to the storage device.
- ASUS SSD Caching: For SSD caching functionality, ensure your SSD and HDD are connected to the designated SATA ports and configure the feature via the ASUS utility software.
4. Operating the Motherboard
4.1. BIOS/UEFI Setup
The UEFI (Unified Extensible Firmware Interface) BIOS provides a user-friendly interface for configuring system settings. To enter BIOS Setup, press the DEL key during the Power-On Self-Test (POST) sequence.
- Navigation: Use the mouse or keyboard (arrow keys, Enter, Esc) to navigate through the BIOS menus.
- Boot Order: Configure your preferred boot device order (e.g., SSD, HDD, USB drive).
- Overclocking: Adjust CPU and memory frequencies and voltages for enhanced performance (use with caution).
- Fan Control: Monitor and adjust fan speeds for optimal cooling and noise levels.
4.2. ASUS Software Utilities
Install the drivers and utilities from the provided support DVD or download the latest versions from the ASUS website for full functionality.
- AI Suite II: A comprehensive software package for system monitoring, overclocking, and power management.
- ASUS SSD Caching Utility: Enables and manages the SSD caching feature to accelerate HDD performance.
- Thermal Radar Utility: Provides real-time temperature monitoring for various components and allows for fan curve adjustments.
- DIGI+ Power Control: Fine-tune digital power delivery for CPU and DRAM.
5. Maintenance
Proper maintenance ensures the longevity and stable operation of your motherboard.
- Dust Removal: Regularly clean dust from the motherboard, CPU cooler, and case fans using compressed air. Dust accumulation can lead to overheating.
- Thermal Armor: The Thermal Armor design helps direct airflow. Ensure case fans are properly configured to work with the motherboard's cooling system.
- BIOS Updates: Periodically check the ASUS support website for BIOS updates. Updates can improve stability, compatibility, and performance. Follow the instructions carefully when updating the BIOS.
- Component Checks: Occasionally inspect cables and connections to ensure they are secure.
6. Troubleshooting
This section addresses common issues you might encounter.
6.1. No Power / System Fails to Boot
- Power Connections: Ensure the 24-pin ATX power connector and the 8-pin CPU power connector are securely plugged into the motherboard. Verify the power supply unit (PSU) is switched on and connected to a working outlet.
- Front Panel Headers: Check that the power button cable from your case is correctly connected to the motherboard's front panel header. Use the ASUS Q-Connectors for easier installation.
- CPU/RAM: Reseat the CPU and RAM modules. Incorrectly seated components can prevent booting. Try booting with only one RAM module installed.
- Clear CMOS: If the system fails to boot after making changes in BIOS, clear the CMOS by either removing the CMOS battery for a few minutes or using the Clear CMOS jumper on the motherboard (refer to the full manual for location).
6.2. CPU Light / CPU Fan Error
If the CPU LED indicator on the motherboard remains lit or you receive a "CPU Fan Error" message:
- CPU Seating: Re-verify that the CPU is correctly seated in the LGA2011 socket and the load levers are securely locked.
- CPU Cooler: Ensure the CPU cooler is properly installed and making good contact with the CPU. Check that the CPU fan is connected to the correct CPU_FAN header on the motherboard.
- Fan Speed: In BIOS, check the CPU fan speed settings. If using a low-RPM or passive cooler, you may need to disable the "CPU Fan Speed Low Limit" warning.
6.3. System Instability / Crashes
- Drivers: Ensure all motherboard drivers (chipset, LAN, audio, etc.) are installed and up to date.
- Memory: Run a memory diagnostic tool to check for faulty RAM modules. Ensure memory is running at supported speeds and timings.
- Temperatures: Monitor CPU and GPU temperatures using software utilities. Overheating can cause instability. Ensure adequate case airflow.
- Power Supply: Verify your PSU provides sufficient wattage for all components, especially if using multiple high-power graphics cards.
7. Specifications
| Feature | Specification |
|---|---|
| CPU Socket | LGA 2011 |
| Compatible Processors | 2nd Generation Intel Core i7 |
| Chipset | Intel X79 |
| Memory Slots | 8 x DIMM, Quad-channel DDR3 |
| Max. Memory Capacity | Up to 64GB DDR3 |
| Supported Memory Speeds | 1866/1600/1333/1066 MHz |
| PCIe 3.0 x16 Slots | 2 x PCIe 3.0 x16 (dual x16/x16), 1 x PCIe 3.0 x16 (x8) |
| PCIe 2.0 x1 Slots | 2 |
| PCI Slots | 1 |
| USB 2.0 Ports | 4 (rear panel) |
| Audio | 8-Channel HD Audio CODEC |
| Dimensions (LxWxH) | 14.4 x 12 x 1.3 inches |
| Item Weight | 4.2 pounds |
| Platform | Windows 10 (Compatible) |
8. Warranty and Support
ASUS products are manufactured to the highest quality standards. For warranty information, please refer to the warranty card included with your product or visit the official ASUS support website. The warranty period and terms may vary by region and product.
For technical assistance, driver downloads, or further support, please visit the official ASUS support website:
- ASUS Support Website: www.asus.com/support/
When contacting support, please have your motherboard model (SABERTOOTH X79) and serial number ready.