1. Introduction
Thank you for purchasing the Hello Kitty KT2064 AM/FM Projection Alarm Clock Radio. This device combines a digital alarm clock with an AM/FM radio and a unique projection feature, allowing you to display the time on your ceiling or wall. Please read this manual carefully to ensure proper operation and to fully utilize all features of your new alarm clock radio.

Image 1.1: Front view of the Hello Kitty KT2064 Projection Alarm Clock Radio, showing the digital display and the Hello Kitty design.
2. Features
- Projection Feature: Projects the time onto your ceiling or wall with adjustable focus and up to 120-degree pivot angle.
- Dual Alarm Options: Wake up to either a buzzer alarm or your favorite radio station.
- AM/FM Radio: Integrated radio tuner for listening to broadcast stations.
- Snooze Function: Allows for an additional 9 minutes of sleep before the alarm sounds again.
- Sleep to Radio: Set a timer (up to 2 hours) for the radio to play before automatically turning off.
- Battery Backup: Maintains time and alarm settings during power outages (requires 3 CR2025 button cell batteries, not included).
- LED Time Display: Clear red LED display for current time.
3. Package Contents
Please check the package for the following items:
- Hello Kitty KT2064 Projection Alarm Clock Radio Unit
- AC Power Adapter
- User Manual (this document)
Note: 3 CR2025 button cell batteries for backup are not included and must be purchased separately.
4. Setup
4.1 Power Connection
- Unpack the alarm clock radio and its accessories.
- Connect the AC power adapter to the DC input jack located on the back of the unit.
- Plug the other end of the AC power adapter into a standard wall outlet. The unit will power on, and the LED display will light up.
4.2 Installing Backup Batteries
Installing backup batteries ensures that your time and alarm settings are retained during a power outage.
- Locate the battery compartment on the bottom or back of the unit.
- Open the battery compartment cover.
- Insert 3 CR2025 button cell batteries, observing the correct polarity (+ and - markings).
- Close the battery compartment cover securely.

Image 4.2: Rear view of the alarm clock radio, showing control buttons and potential location for battery compartment.
5. Operating Instructions
5.1 Setting the Time
- Press and hold the TIME SET button (or similar button, refer to unit markings) for approximately 3 seconds until the hour digits begin to flash.
- Use the HOUR or + / - buttons to adjust the hour. Pay attention to the AM/PM indicator.
- Press the TIME SET button again. The minute digits will flash.
- Use the MINUTE or + / - buttons to adjust the minutes.
- Press the TIME SET button one more time to confirm and exit time setting mode.
5.2 Setting the Alarm (Alarm 1 and Alarm 2)
This unit supports two independent alarms.
- Press and hold the AL1 SET button (for Alarm 1) or AL2 SET button (for Alarm 2) for approximately 3 seconds until the hour digits of the alarm time begin to flash.
- Use the HOUR or + / - buttons to adjust the alarm hour.
- Press the respective AL SET button again. The minute digits will flash.
- Use the MINUTE or + / - buttons to adjust the alarm minutes.
- Press the AL SET button again to select the alarm source: BUZZER or RADIO. Use the + / - buttons to toggle.
- Press the AL SET button one more time to confirm and exit alarm setting mode.
- To activate/deactivate an alarm, press the AL1 ON/OFF or AL2 ON/OFF button (or similar) repeatedly until the alarm indicator appears/disappears on the display.
5.3 Using the Radio
- Press the RADIO ON/OFF button to turn on the radio.
- Press the AM/FM button to switch between AM and FM bands.
- Use the TUNE+ and TUNE- buttons to manually tune to a desired station.
- For automatic scanning, press and hold TUNE+ or TUNE- for a few seconds until the radio finds the next clear station.
- Adjust the volume using the VOLUME + and VOLUME - buttons.
- To turn off the radio, press the RADIO ON/OFF button again.
5.4 Projection Feature
- Locate the projector lens on top of the unit.
- Press the PROJECTOR ON/OFF button to activate the time projection.
- Adjust the angle of the projector head (up to 120 degrees) to direct the time display onto your ceiling or wall.
- Rotate the FOCUS ring around the projector lens to achieve a clear image.
- To turn off the projection, press the PROJECTOR ON/OFF button again.

Image 5.4: The alarm clock radio actively projecting the time and Hello Kitty logo onto a surface.
5.5 Snooze Function
When the alarm sounds, press the large SNOOZE button (usually located on top of the unit). The alarm will pause for approximately 9 minutes and then sound again.
5.6 Sleep to Radio Function
This feature allows you to fall asleep to the radio, which will automatically turn off after a set period.
- Turn on the radio and tune to your desired station.
- Press the SLEEP button repeatedly to cycle through the available sleep timer durations (e.g., 120, 90, 60, 30, 15 minutes, or OFF). The selected duration will appear on the display.
- The radio will play for the chosen duration and then automatically turn off.
6. Maintenance
- Cleaning: Wipe the unit with a soft, dry cloth. Do not use abrasive cleaners or solvents.
- Water Exposure: Keep the unit away from water or excessive moisture.
- Temperature: Avoid exposing the unit to extreme temperatures or direct sunlight.
- Battery Replacement: Replace backup batteries annually or when the low battery indicator appears to ensure continuous functionality during power outages.
7. Troubleshooting
| Problem | Possible Cause | Solution |
|---|---|---|
| Unit does not power on. | Power adapter not connected or faulty outlet. | Ensure the power adapter is securely plugged into the unit and a working wall outlet. Test the outlet with another device. |
| Time/alarm settings are lost after power outage. | Backup batteries are dead or not installed. | Install new CR2025 button cell batteries or replace existing ones. |
| Projection is blurry. | Focus is not adjusted correctly. | Rotate the FOCUS ring around the projector lens until the image is clear. |
| Radio reception is poor. | Antenna not extended or interference. | Extend the FM wire antenna fully. For AM, try repositioning the unit. Avoid placing near electronic devices that may cause interference. |
| Alarm does not sound. | Alarm is not activated or set incorrectly. | Ensure the alarm is set and activated (alarm indicator visible). Check alarm volume if set to radio. |
8. Specifications
| Brand | Hello Kitty |
| Model Number | KT2064P |
| Display Type | Digital LED |
| Power Source | AC Power Adapter |
| Backup Battery | 3 x CR2025 Button Cell (not included) |
| Radio Frequency | AM/FM (FM up to 108 MHz) |
| Product Dimensions (L x W x H) | 14.5 x 11.9 x 17.3 cm (approximately 5.7 x 4.7 x 6.8 inches) |
| Product Weight | 885 g (approximately 1.95 lbs) |
| Projection Angle | Up to 120 degrees |
| Snooze Duration | 9 minutes |
| Sleep Timer | Up to 2 hours |
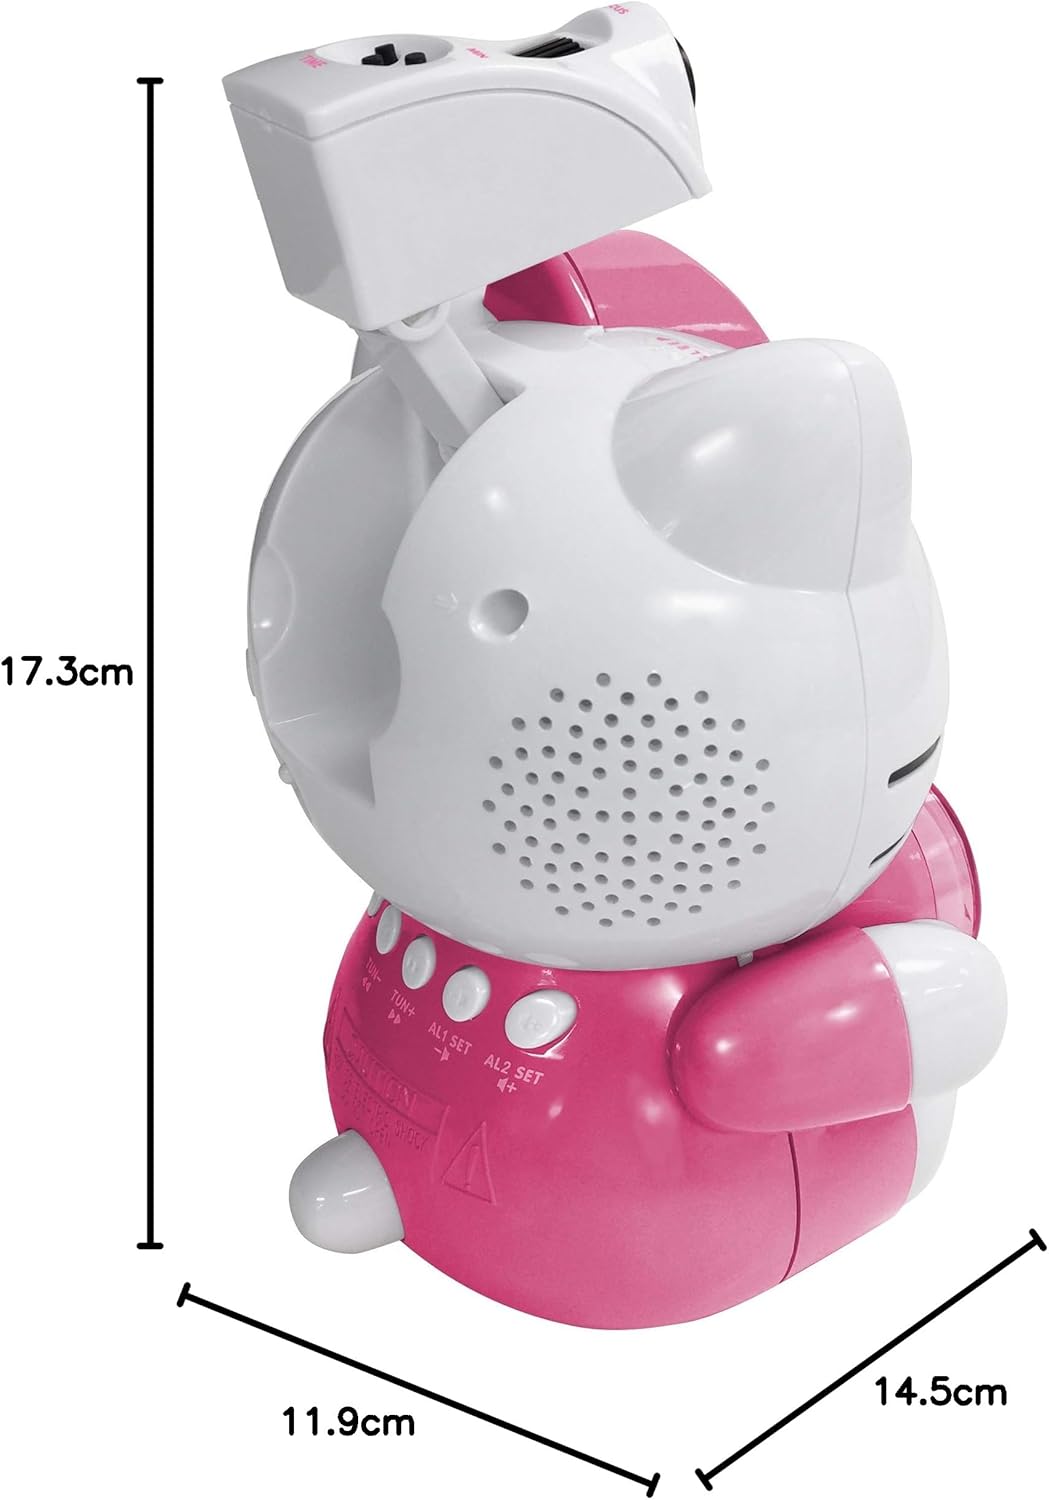
Image 8.1: Dimensions of the Hello Kitty KT2064 Projection Alarm Clock Radio.
9. Warranty and Support
This product comes with a standard manufacturer's warranty. For specific warranty details, please refer to the documentation provided at the time of purchase or contact your retailer. If you encounter any issues not covered in the troubleshooting section, please contact customer support for assistance.
For support inquiries, please visit the official Hello Kitty product support website or contact your local distributor.


