1. Product Overview
This manual provides instructions for the proper use and maintenance of the JH Williams 3732 Double Open End Angle-Head Wrench, 1 by 1-Inch. This tool is designed for efficient fastening and loosening of nuts and bolts in various applications, particularly where access is restricted.

Figure 1: The JH Williams 3732 Double Open End Angle-Head Wrench, 1 by 1-Inch. This image displays the wrench's overall design, highlighting its double open ends and the angle of the heads relative to the handle.
The wrench features a durable construction with a satin chrome finish for enhanced grip and easy cleaning. Its unique angle-head design allows for improved access in confined spaces.
2. Key Features
- Double Open Ends: Both ends of the wrench are 1-Inch in size, providing versatility.
- Angled Heads: Wrench heads are offset at 15 degrees and 60 degrees to the handle, enabling use in four different positions for optimal access.
- Chamfered Ends: A 45-degree chamfer on the wrench ends facilitates easy placement onto fasteners.
- Continuous Arc Design: This design minimizes spreading under load, contributing to increased strength compared to traditional "V" designs.
- Thin Head Profile: The thin head design is specifically engineered for working in tight clearances.
- Satin Chrome Finish: Provides a secure grip and allows for easy cleaning and corrosion resistance.

Figure 2: Illustration of leverage provided by a wrench. The design of the JH Williams wrench ensures effective force application.

Figure 3: Diagram illustrating the maneuverability benefits of angled wrench heads, showing how 15-degree and 30-degree offsets improve access in tight spaces.
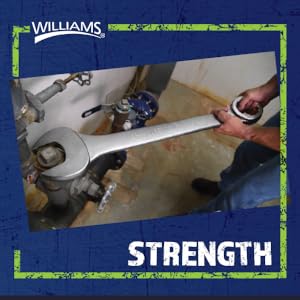
Figure 4: Image depicting the strength of a wrench during use. The continuous arc design of the JH Williams wrench enhances its structural integrity.
3. Operating Instructions
- Selection: Ensure the 1-Inch open end of the wrench matches the size of the fastener (nut or bolt head) you intend to turn.
- Placement: Position the open end of the wrench onto the fastener. The 45-degree chamfer on the ends assists in easy and quick engagement.
- Angle Utilization: The wrench heads are offset at 15 degrees and 60 degrees. This design allows you to flip the wrench or use the opposite end to achieve the best angle for access and leverage, especially in confined or obstructed areas. Experiment with the four possible positions to find the most effective grip.
- Application of Force: Apply steady, firm pressure to the handle in the desired direction (clockwise for tightening, counter-clockwise for loosening). Avoid sudden jerking motions, which can damage the fastener or the wrench.
- Repositioning: If the fastener is tight or requires multiple turns, remove the wrench, reposition it, and reapply force.

Figure 5: A worker demonstrating the use of a wrench on industrial piping, illustrating a typical application where angled heads can be beneficial for access.
4. Care and Maintenance
- Cleaning: After each use, wipe the wrench clean with a dry cloth to remove dirt, grease, and debris. For stubborn grime, use a mild solvent or degreaser and then wipe dry.
- Storage: Store the wrench in a dry environment to prevent rust and corrosion. A tool chest or rack is recommended to protect it from damage.
- Inspection: Periodically inspect the wrench for any signs of wear, cracks, or damage. Do not use a damaged wrench, as it may compromise safety and effectiveness.
- Lubrication: No specific lubrication is required for this type of wrench.
5. Troubleshooting
The JH Williams Double Open End Angle-Head Wrench is a simple, robust tool with minimal components. Most issues arise from improper usage rather than tool malfunction.
| Problem | Possible Cause | Solution |
|---|---|---|
| Wrench slips off fastener | Incorrect size selected; Worn fastener head; Improper seating of wrench. | Ensure the wrench size matches the fastener exactly. Fully seat the wrench onto the fastener before applying force. Replace worn fasteners. |
| Fastener not turning | Fastener is seized or overtightened; Insufficient leverage. | Apply penetrating oil to seized fasteners. Use appropriate leverage, ensuring a firm grip. Avoid using extension pipes unless specifically designed for the wrench, as this can damage the tool. |
| Wrench appears bent or damaged | Excessive force applied; Improper use (e.g., using as a pry bar). | Discontinue use immediately. A damaged wrench can be dangerous. Replace the tool. Always use the wrench for its intended purpose. |
6. Product Specifications
| Attribute | Detail |
|---|---|
| Brand | Williams |
| Model Number | 3732 |
| Manufacturer | JH Williams Tool Group |
| Size | 1-Inch by 1-Inch |
| Head Style | Double Open End, Angle-Head |
| Head Offset Angles | 15 degrees and 60 degrees |
| Chamfer Angle | 45 degrees on wrench ends |
| Colour | Silver |
| Finish | Satin Chrome |
| Material | Steel (with satin finish) |
| Item Weight | 181 g (approximately 0.4 lbs) |
| Measurement System | Inch |
| Country of Origin | USA |
7. Safety Information
WARNING: Always follow basic safety precautions when using hand tools.
- Wear appropriate personal protective equipment (PPE), such as safety glasses, to protect against flying debris.
- Ensure the wrench is correctly sized for the fastener to prevent slipping and potential injury.
- Never use a wrench that is cracked, bent, or otherwise damaged.
- Do not use a wrench as a hammer or pry bar.
- Avoid extending the handle of the wrench with a pipe or other means, as this can overstress the tool and cause breakage.
- Keep hands and fingers clear of pinch points.
- Store tools safely when not in use to prevent accidents.
8. Warranty and Support
For warranty information, product support, or to inquire about replacement parts, please contact the manufacturer, JH Williams Tool Group, or your authorized retailer. Specific warranty terms may vary by region and purchase date.
For general inquiries, you may visit the Williams brand website or contact their customer service department.


