1. Important Safety Information
Please read this entire manual before assembling or operating your ZIPRO One S exercise bike. Retain this manual for future reference. Failure to follow these instructions can result in injury or damage to the product.
- Consult your physician before starting any exercise program, especially if you have pre-existing health conditions.
- The maximum user weight for this device is 110 kg (242 lbs).
- Ensure all bolts, nuts, and connections are securely tightened before each use.
- Place the exercise bike on a flat, stable surface. Use a protective mat if necessary.
- Keep children and pets away from the equipment during operation.
- Wear appropriate exercise clothing and footwear. Avoid loose clothing that could get caught in moving parts.
- Stop exercising immediately if you feel faint, dizzy, or experience pain.
- This product is designed for indoor use only.
2. Product Overview
The ZIPRO One S is a compact exercise bike designed for home cardio training. It features 8 levels of magnetic resistance, an LCD display for tracking workout metrics, and an adjustable saddle for user comfort.

Image 2.1: Front view of the ZIPRO One S Exercise Bike.

Image 2.2: The ZIPRO One S Exercise Bike highlighting its compact dimensions (897mm length, 435mm width, 1100mm height) and key features such as modern design, silent operation, practical adjustment, and compact size.
3. Assembly Instructions
Assembly typically takes 30-40 minutes. All necessary tools are included. Follow these steps carefully.
- Unpack Components: Carefully remove all parts from the packaging and lay them out. Check against the parts list (refer to included diagram in the box) to ensure all components are present.
- Attach Stabilizers: Secure the front and rear stabilizer bars to the main frame using the provided bolts and washers. Ensure they are firmly attached for stability.
- Install Pedals: Identify the left (L) and right (R) pedals. Thread the left pedal counter-clockwise and the right pedal clockwise into their respective crank arms. Tighten securely with a wrench. Ensure the pedal straps are correctly oriented.

Image 3.1: Close-up view of the pedal with an adjustable strap, ensuring proper foot positioning during exercise.
- Assemble Seat Post and Saddle: Insert the seat post into the main frame. Adjust the height to your preference and secure it with the adjustment knob. Attach the saddle to the seat post.

Image 3.2: Detailed view of the saddle and its adjustment mechanism, allowing users to customize seat height for optimal comfort.
- Install Handlebars and Console: Attach the handlebar post to the main frame. Connect any necessary sensor cables from the main frame to the console. Mount the console onto the handlebar post and secure it. Insert 2 AAA batteries (included) into the console.
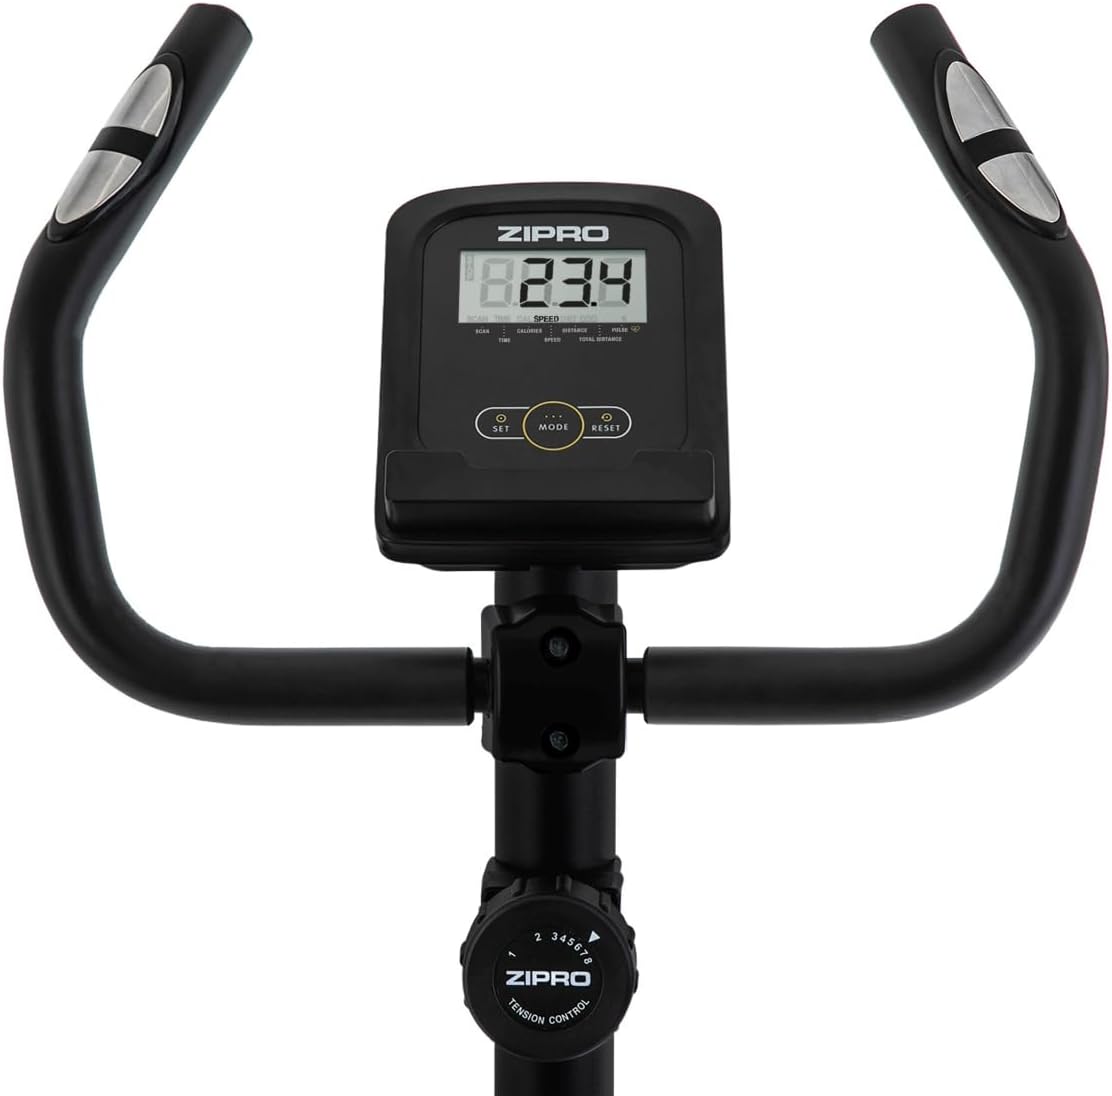
Image 3.3: View of the handlebars, integrated LCD display, and the manual resistance control knob, showing the primary user interface.
- Final Check: Before first use, double-check all connections and ensure the bike is stable.
4. Operating Instructions
4.1 Adjusting the Bike
- Saddle Height: Loosen the adjustment knob on the seat post, raise or lower the saddle to a comfortable height (recommended: 65-80 cm from the ground, 55-75 cm from pedals), and re-tighten the knob. Your leg should have a slight bend at the knee when the pedal is at its lowest point.
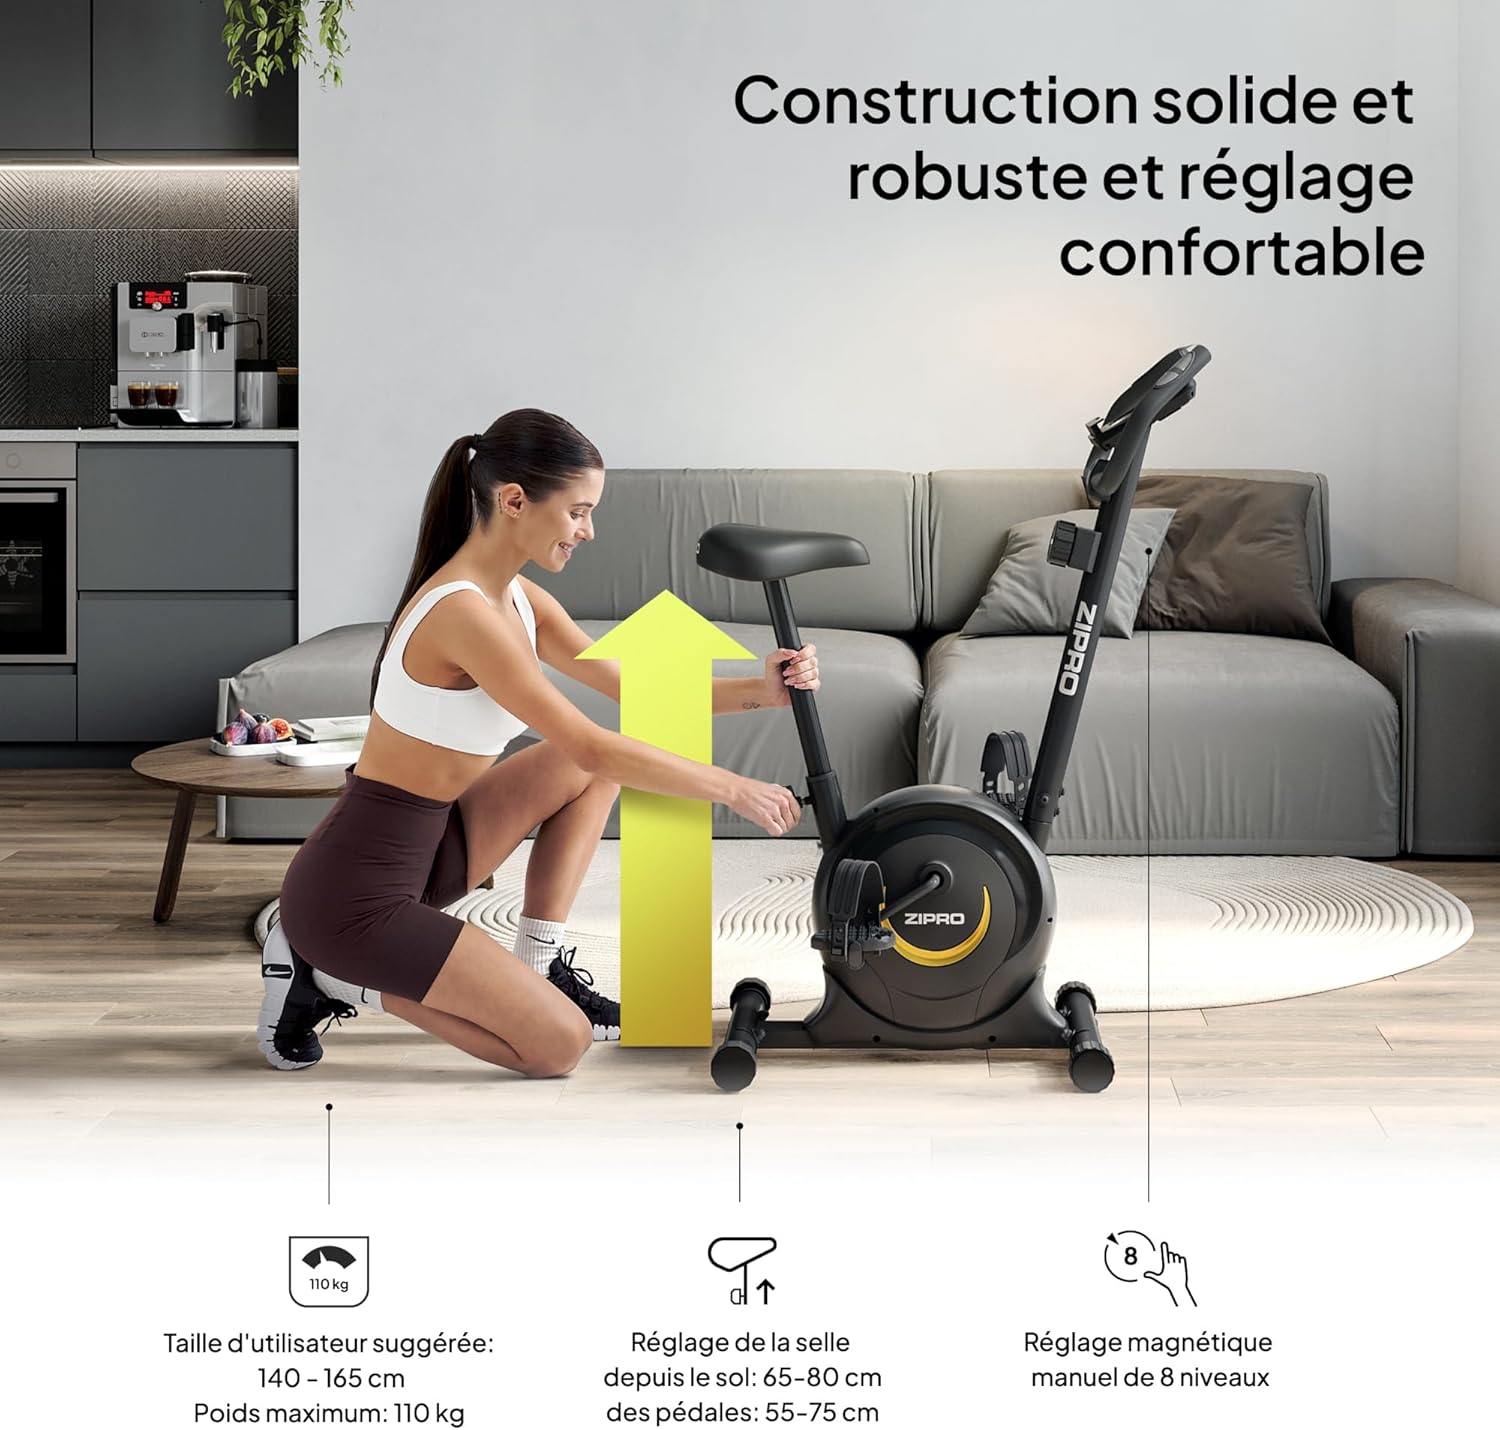
Image 4.1: A user demonstrating the saddle height adjustment, which is crucial for ergonomic and effective training. The image also indicates suggested user height (140-165 cm) and maximum weight (110 kg).
4.2 Using the Console
The LCD console tracks your workout data. It is powered by 2 AAA batteries.

Image 4.2: Detailed view of the LCD display, showing various metrics, and the integrated pulse sensors on the handlebars for heart rate monitoring.
- Display Functions: The console displays Time, Distance, Calories, and Pulse. It also features a SCAN function that cycles through these parameters automatically.
- Pulse Measurement: Grip the pulse sensors on the handlebars to measure your heart rate.
- Smartphone Holder: Use the integrated holder to place your smartphone or tablet for entertainment or tracking during your workout.

Image 4.3: A smartphone securely placed in the integrated holder on the handlebars, allowing for easy access to media or fitness apps during a workout.
4.3 Adjusting Resistance
The ZIPRO One S offers 8 levels of magnetic resistance.
- Resistance Knob: Turn the resistance knob located below the console clockwise to increase resistance (harder pedaling) and counter-clockwise to decrease resistance (easier pedaling).
- Choose a resistance level that challenges you without causing excessive strain.

Image 4.4: This image illustrates the manual resistance adjustment knob, pedal straps, and saddle height adjustment, highlighting the bike's customizable features.
5. Maintenance
Regular maintenance ensures the longevity and safe operation of your exercise bike.
- Cleaning: Wipe down the bike with a damp cloth after each use to remove sweat and dust. Avoid abrasive cleaners or solvents.
- Inspection: Periodically check all bolts, nuts, and moving parts for tightness and wear. Tighten any loose fasteners.
- Lubrication: The magnetic resistance system is generally maintenance-free. Do not attempt to lubricate internal components unless specifically instructed by customer support.
- Storage: When not in use, store the bike in a dry, cool place away from direct sunlight and moisture. The integrated transport wheels allow for easy relocation.

Image 5.1: A user easily moving the ZIPRO One S exercise bike, demonstrating its portability thanks to integrated transport wheels.
6. Troubleshooting
If you encounter any issues, refer to the following common troubleshooting steps:
- Console Not Displaying: Check if the 2 AAA batteries are correctly installed and not depleted. Replace if necessary.
- Inaccurate Pulse Reading: Ensure your hands are firmly gripping both pulse sensors. Dry hands or excessive movement can affect accuracy.
- Unusual Noises: Check all visible bolts and nuts for tightness. Ensure no parts are rubbing against each other. If the noise persists, discontinue use and contact customer support.
- Resistance Not Changing: Verify that the resistance knob is turning freely and engaging with the internal mechanism. If it feels stuck or unresponsive, contact customer support.
7. Specifications
Detailed technical specifications for the ZIPRO One S Exercise Bike.
| Feature | Specification |
|---|---|
| Model Name | One S |
| Model Number | 5941659 |
| Brand | ZIPRO |
| Resistance Mechanism | Magnetic |
| Resistance Levels | 8 (Manual Adjustment) |
| Display Type | LCD |
| Display Metrics | Time, Distance, Calories, Pulse, Scan |
| Power Source (Console) | 2 x AAA Batteries (Included) |
| Maximum User Weight | 110 kg (242 lbs) |
| Recommended User Height | 140 - 165 cm |
| Saddle Height Adjustment (from ground) | 65 - 80 cm |
| Saddle Height Adjustment (from pedals) | 55 - 75 cm |
| Product Dimensions (L x W x H) | 89.7 x 43.5 x 110 cm |
| Product Weight | 15.5 kg |
| Main Material | Carbon Steel |
| Special Features | Compact design, Adjustable saddle, Smartphone holder, Transport wheels |
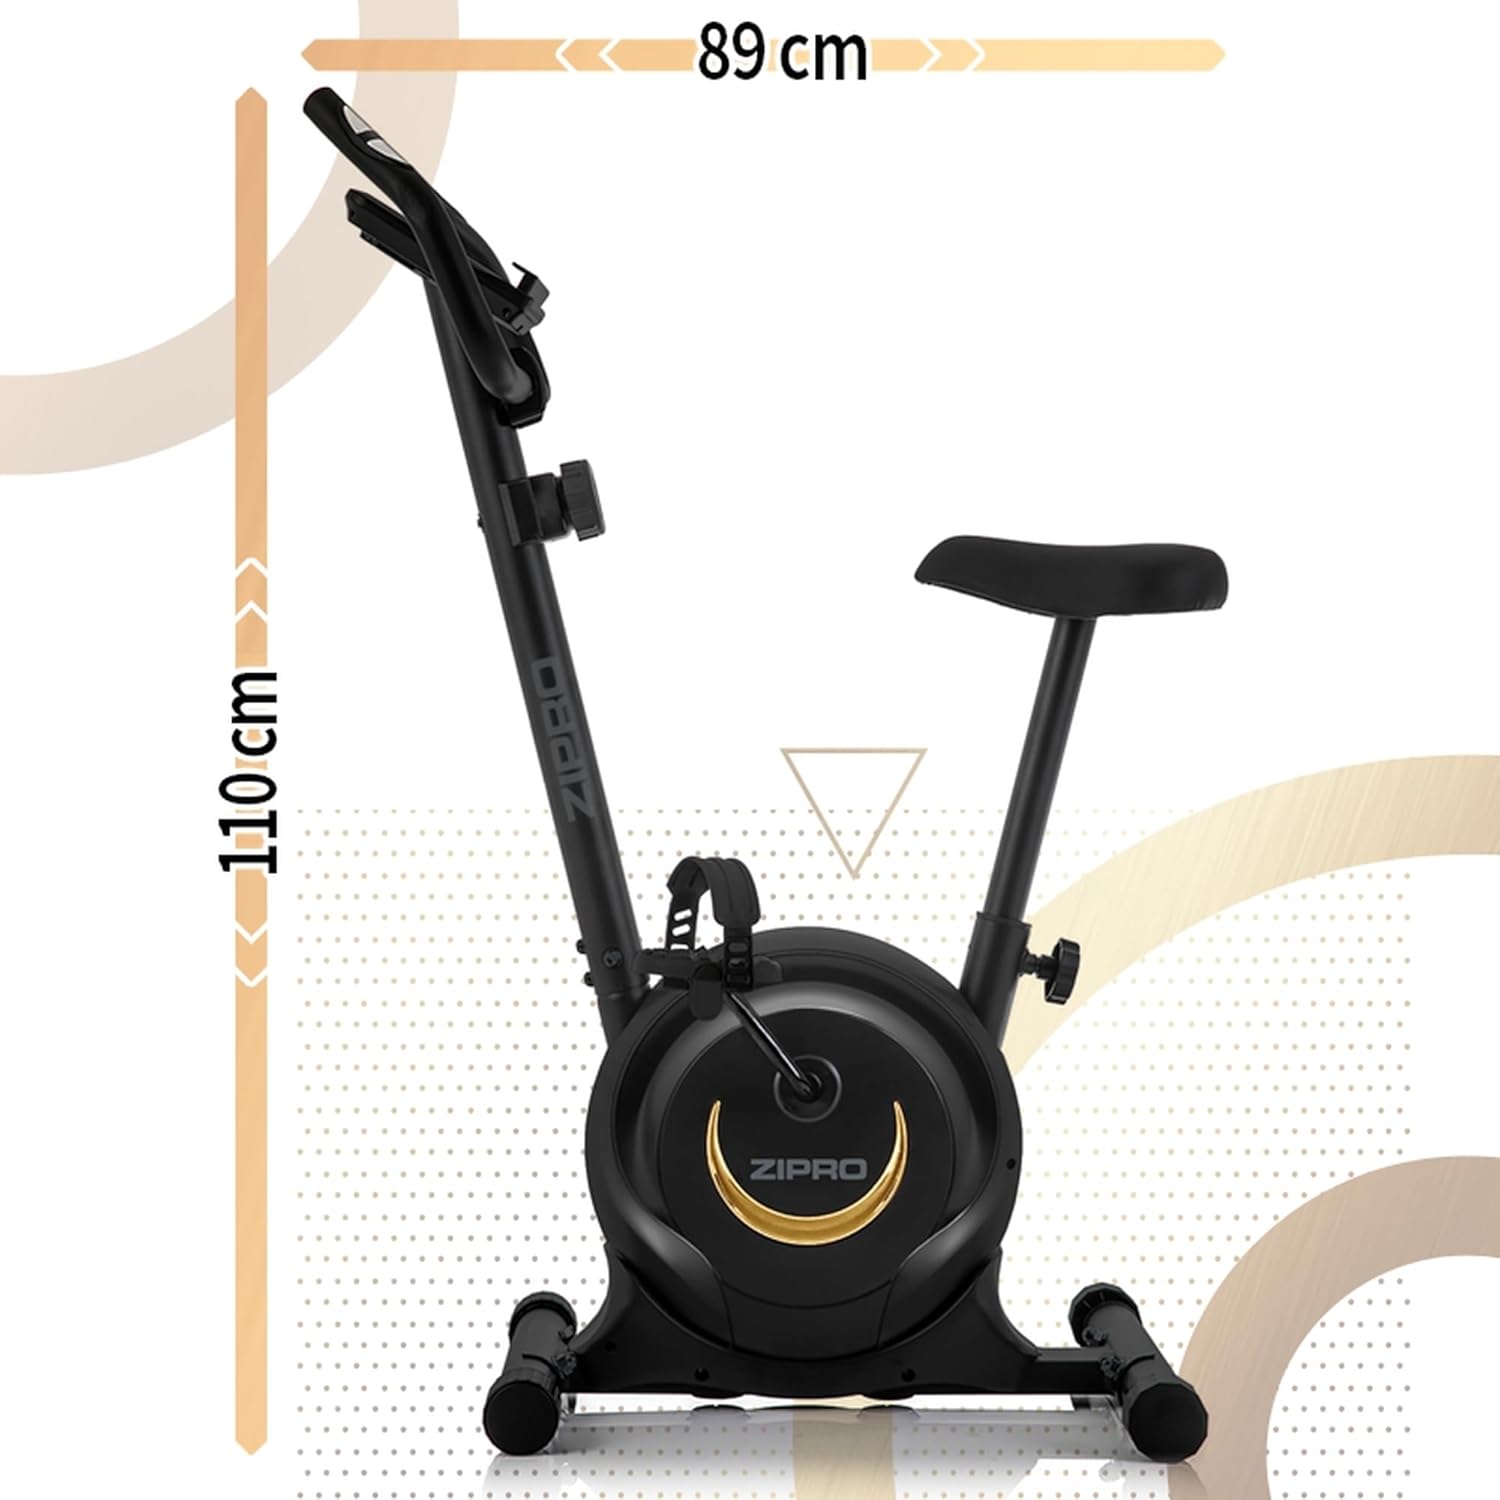
Image 7.1: Side view of the ZIPRO One S Exercise Bike, illustrating its overall dimensions of approximately 110 cm in height and 89 cm in length.
8. Warranty and Support
For warranty information, product support, or to order replacement parts, please contact ZIPRO customer service. Refer to your purchase documentation for specific warranty terms and contact details.
- Keep your proof of purchase (receipt or order confirmation) for warranty claims.
- Do not attempt to repair the product yourself if it is under warranty, as this may void the warranty.


