
ZIPRO 5941402
ZIPRO JumpPro PREMIUM Outdoor Trampoline User Manual
Model: 5941402 | Brand: ZIPRO
Introduction
This manual provides essential information for the safe and effective assembly, operation, and maintenance of your ZIPRO JumpPro PREMIUM Outdoor Trampoline. Please read these instructions carefully before beginning assembly or use to ensure maximum safety and product longevity. This trampoline is designed to provide a fun and active experience for both children and adults, promoting movement, balance, and coordination in a secure garden environment.
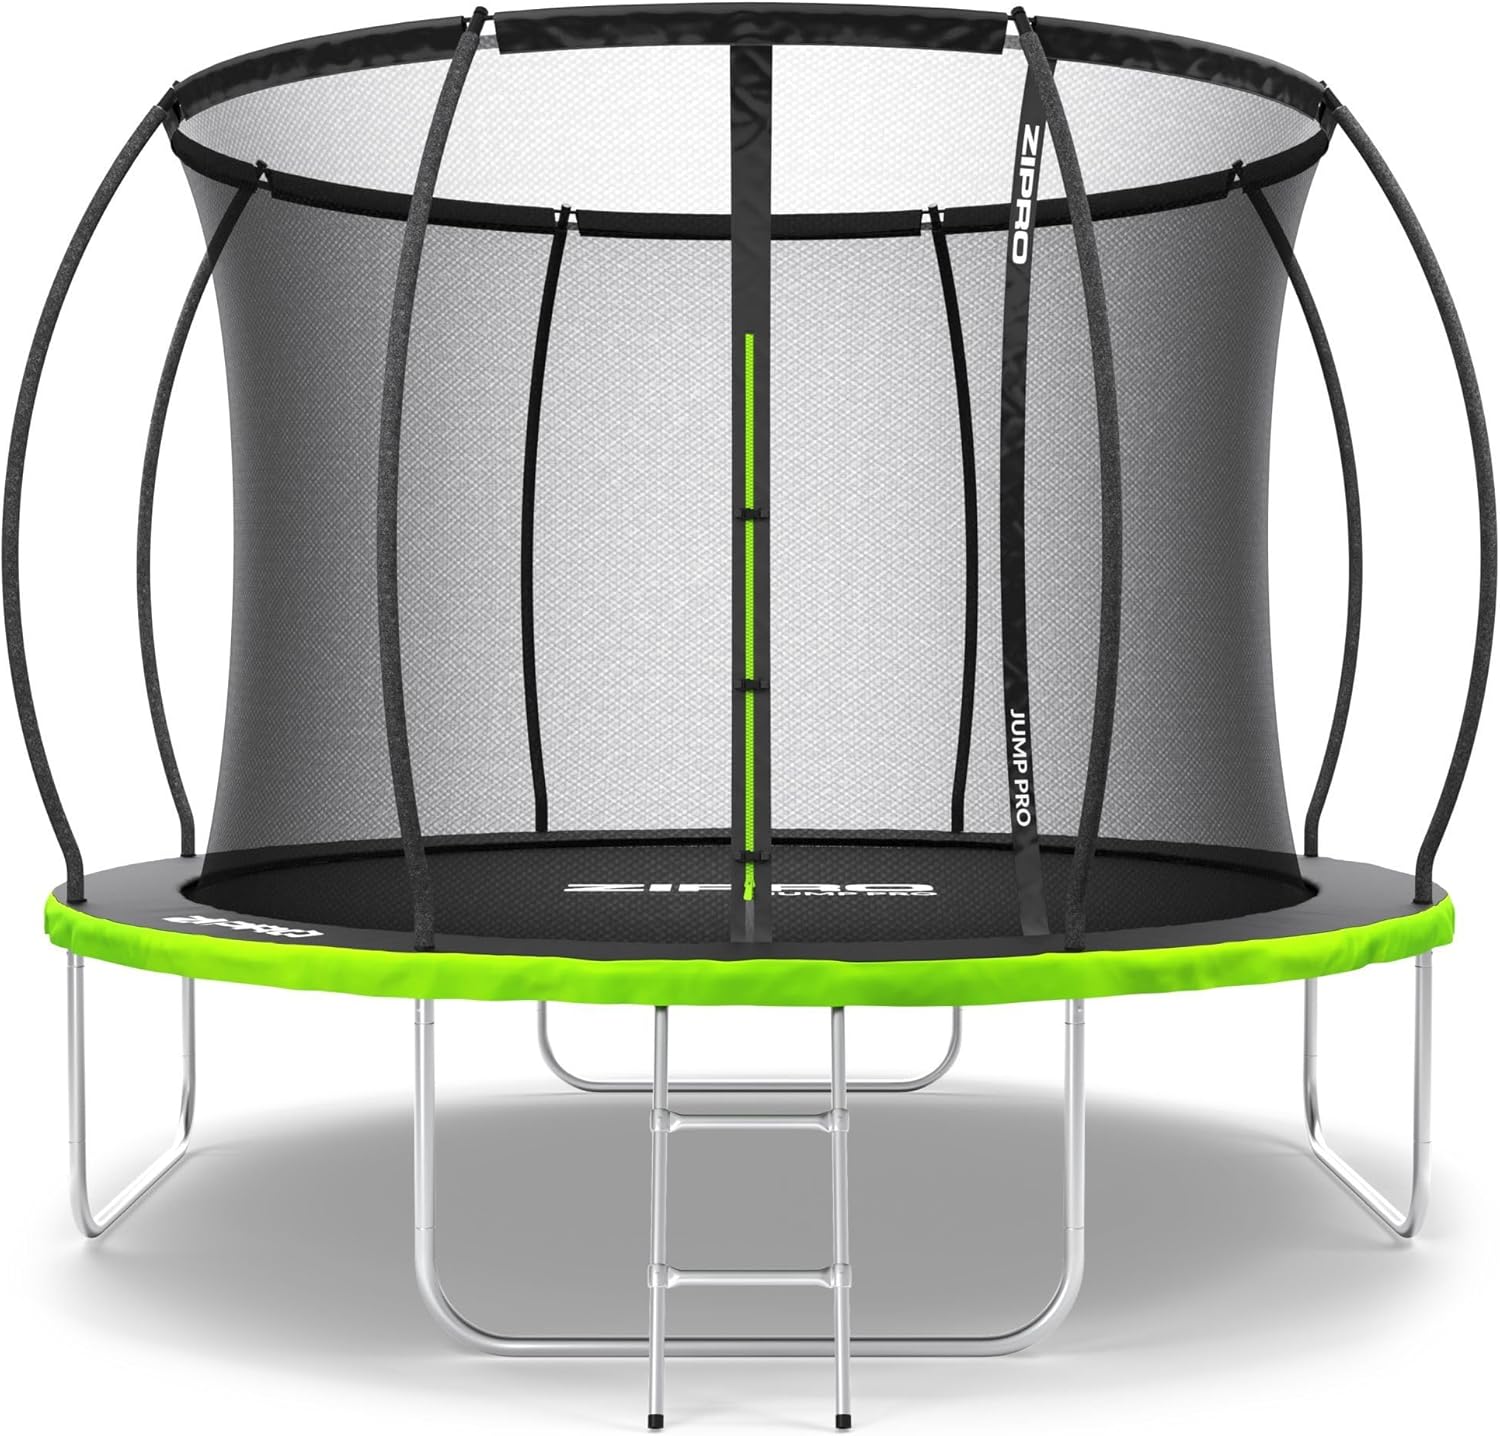
Image: The ZIPRO JumpPro PREMIUM Trampoline, featuring a black jumping mat, green spring cover, and a tall safety net with curved poles.
Safety Information
Your safety is paramount. The ZIPRO JumpPro PREMIUM Trampoline is designed with multiple safety features and complies with stringent European safety standards.
- Certified Safety: The device complies with standards: EN 71:1-2014+A1, EN 71:2, EN 71:3-2019+A1, EN 71-14:2019-03.
- Inner Safety Net: Features an inner net for maximum protection, eliminating any gap between the net and the jumping surface to prevent falls through the springs.
- Stable Frame: Constructed with a stable frame and reinforced padding for secure use.
- Secure Entry: Designed with a secure entry system for safe access.
- Weight Limit: Do not exceed the maximum weight capacity of 150 kg (330 lbs).
- Supervision: Always ensure adult supervision when children are using the trampoline.
- Clearance: Ensure adequate overhead and surrounding clearance from obstacles.

Image: A family enjoying the trampoline, highlighting safety certifications (CE mark) and features like 150 kg resistance, confirmed safety, weather resistance, and quick assembly.

Image: A child smiling inside the trampoline, demonstrating the secure play area provided by the safety net and curved poles.
Package Contents
The complete kit includes all necessary components for assembly and use. Please verify all parts are present before beginning assembly.
- 1x Trampoline Frame (Galvanized Steel)
- 1x Jumping Mat (UV-resistant PP 275 g/m2)
- 1x Safety Enclosure Net (Inner Net)
- 1x Spring Cover Pad (Top PVC + Bottom PE, EPE Foam 10mm)
- 1x Ladder
- Assembly Accessories (Bolts, nuts, tools if included)
- Instruction Manual
- 56 Galvanized Springs (Ø3.1mm x 145mm)
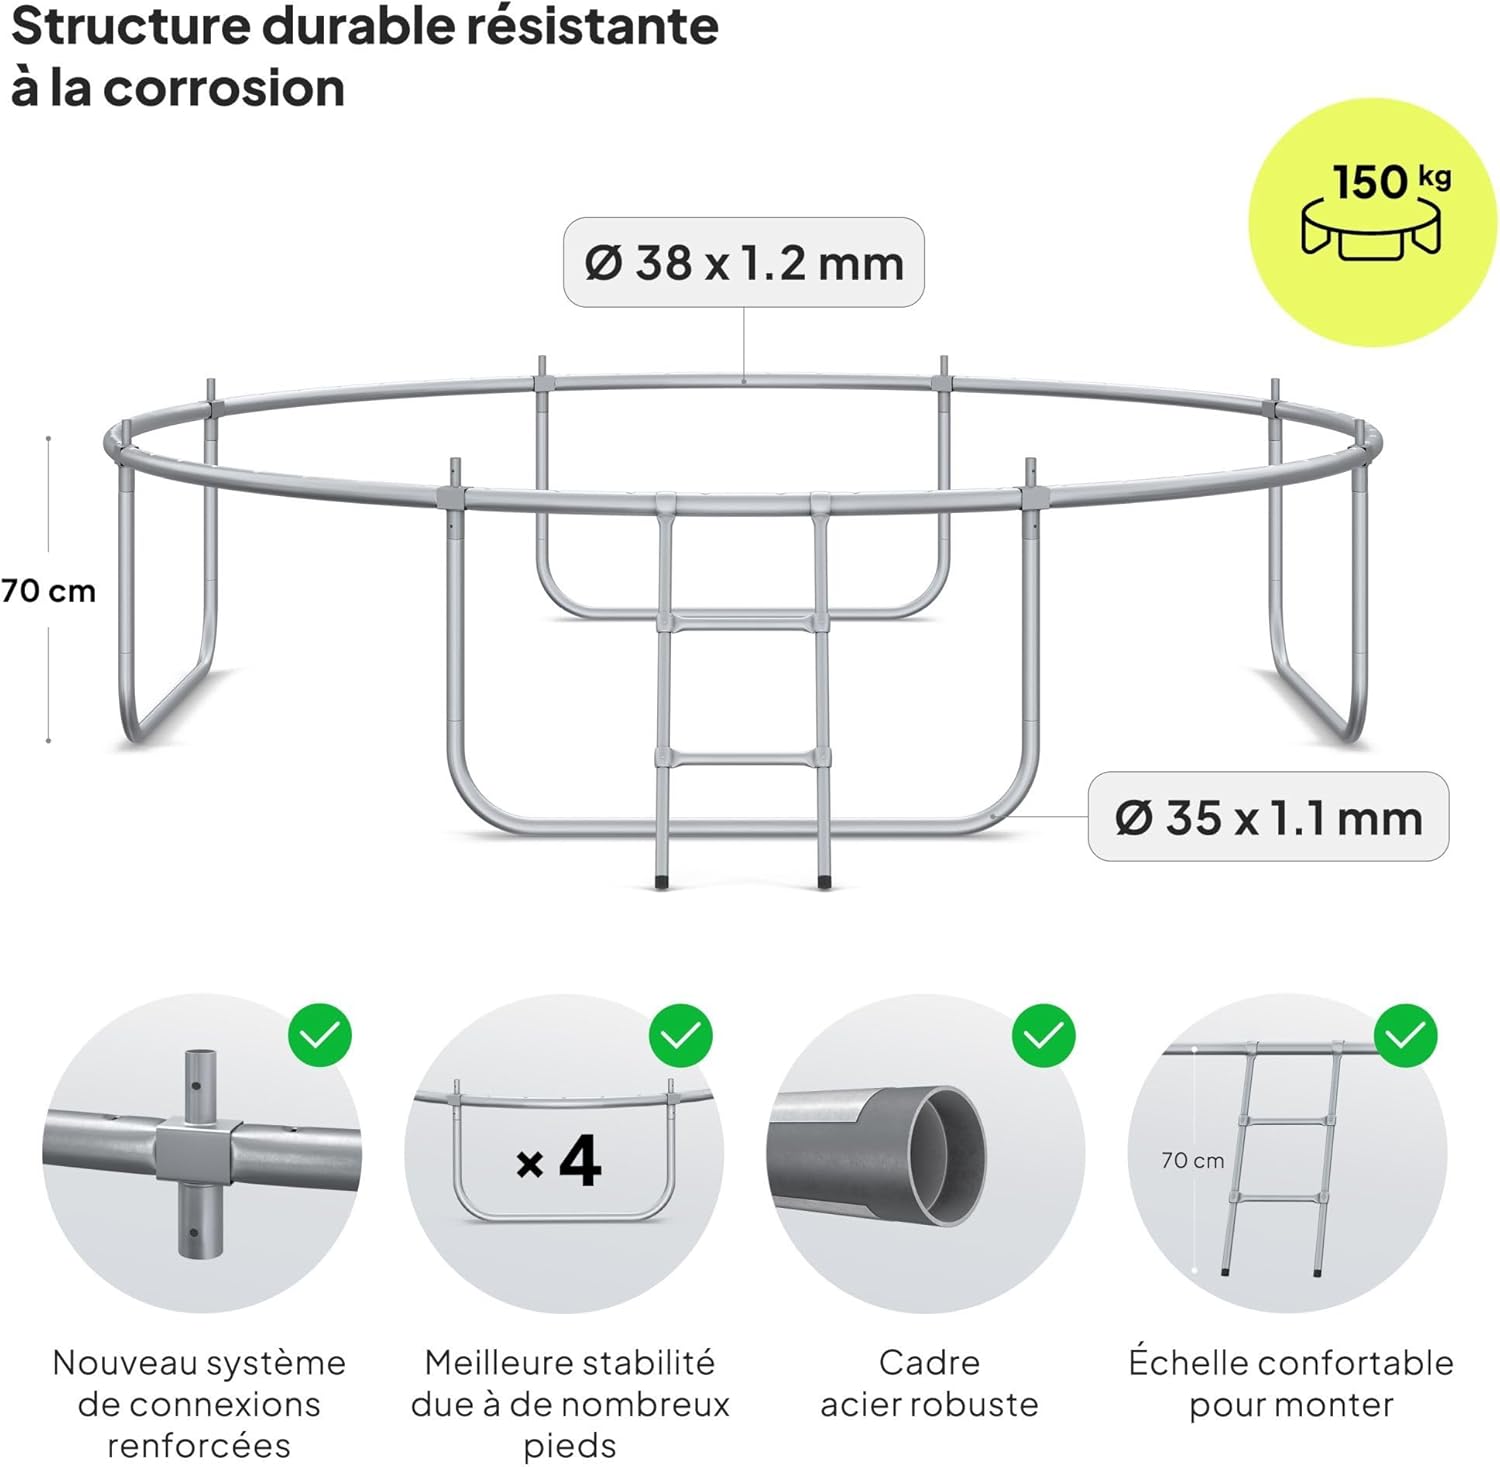
Image: Diagram showing the galvanized steel frame structure, including dimensions (Ø38 x 1.2 mm and Ø35 x 1.1 mm tubing), and highlighting reinforced connections, multiple stable legs, and the comfortable ladder.
Assembly Instructions
The ZIPRO JumpPro PREMIUM Trampoline features an innovative CROSS-SECTION system for quick and stable assembly, typically completed in under 30 minutes.
- Unpack Components: Carefully unpack all parts and lay them out on a clean, flat surface. Verify all components against the package contents list.
- Assemble Frame: Connect the galvanized steel frame sections using the CROSS-SECTION system. The poles are designed to interlock securely without complex screwing.
- Attach Legs: Securely attach the trampoline legs to the main frame. Ensure all connections are tight and stable.
- Install Jumping Mat: Lay the jumping mat evenly across the frame. Attach the galvanized springs to the mat and the frame, distributing tension evenly.
- Place Spring Cover Pad: Cover the springs with the protective spring cover pad. Ensure it is securely fastened to prevent access to the springs during use.
- Erect Safety Net Poles: Install the safety net poles around the perimeter of the trampoline. These poles are often curved for increased safety and stability.
- Attach Safety Net: Secure the inner safety net to the poles and the jumping mat. Ensure there are no gaps between the net and the jumping surface. The net features a double zipper for secure closure.
- Install Ladder: Attach the ladder to the trampoline frame for easy and safe access.
- Final Check: Before first use, thoroughly inspect all connections, springs, and safety features to ensure everything is correctly assembled and secure.
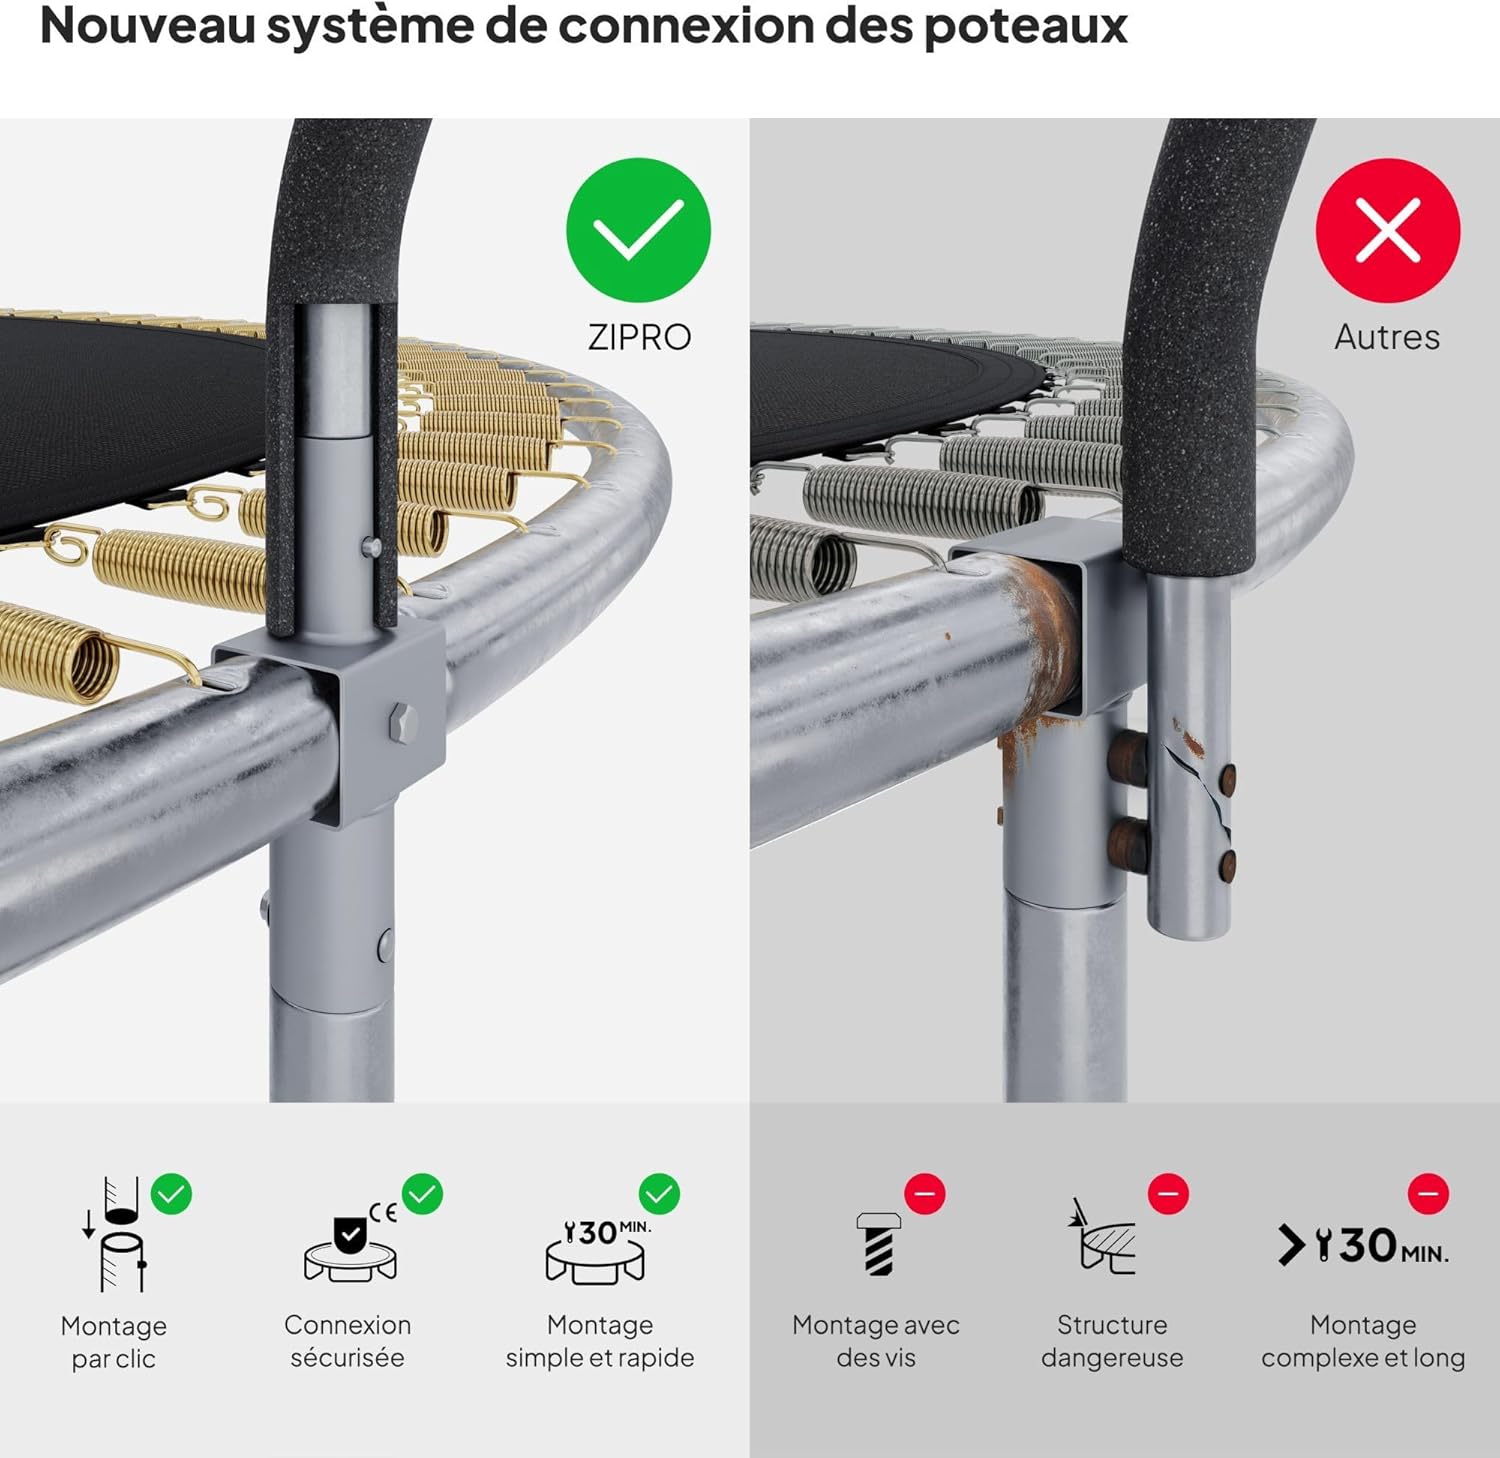
Image: Comparison of ZIPRO's click-assembly connection system versus traditional screw-based systems, highlighting ease and speed of assembly.
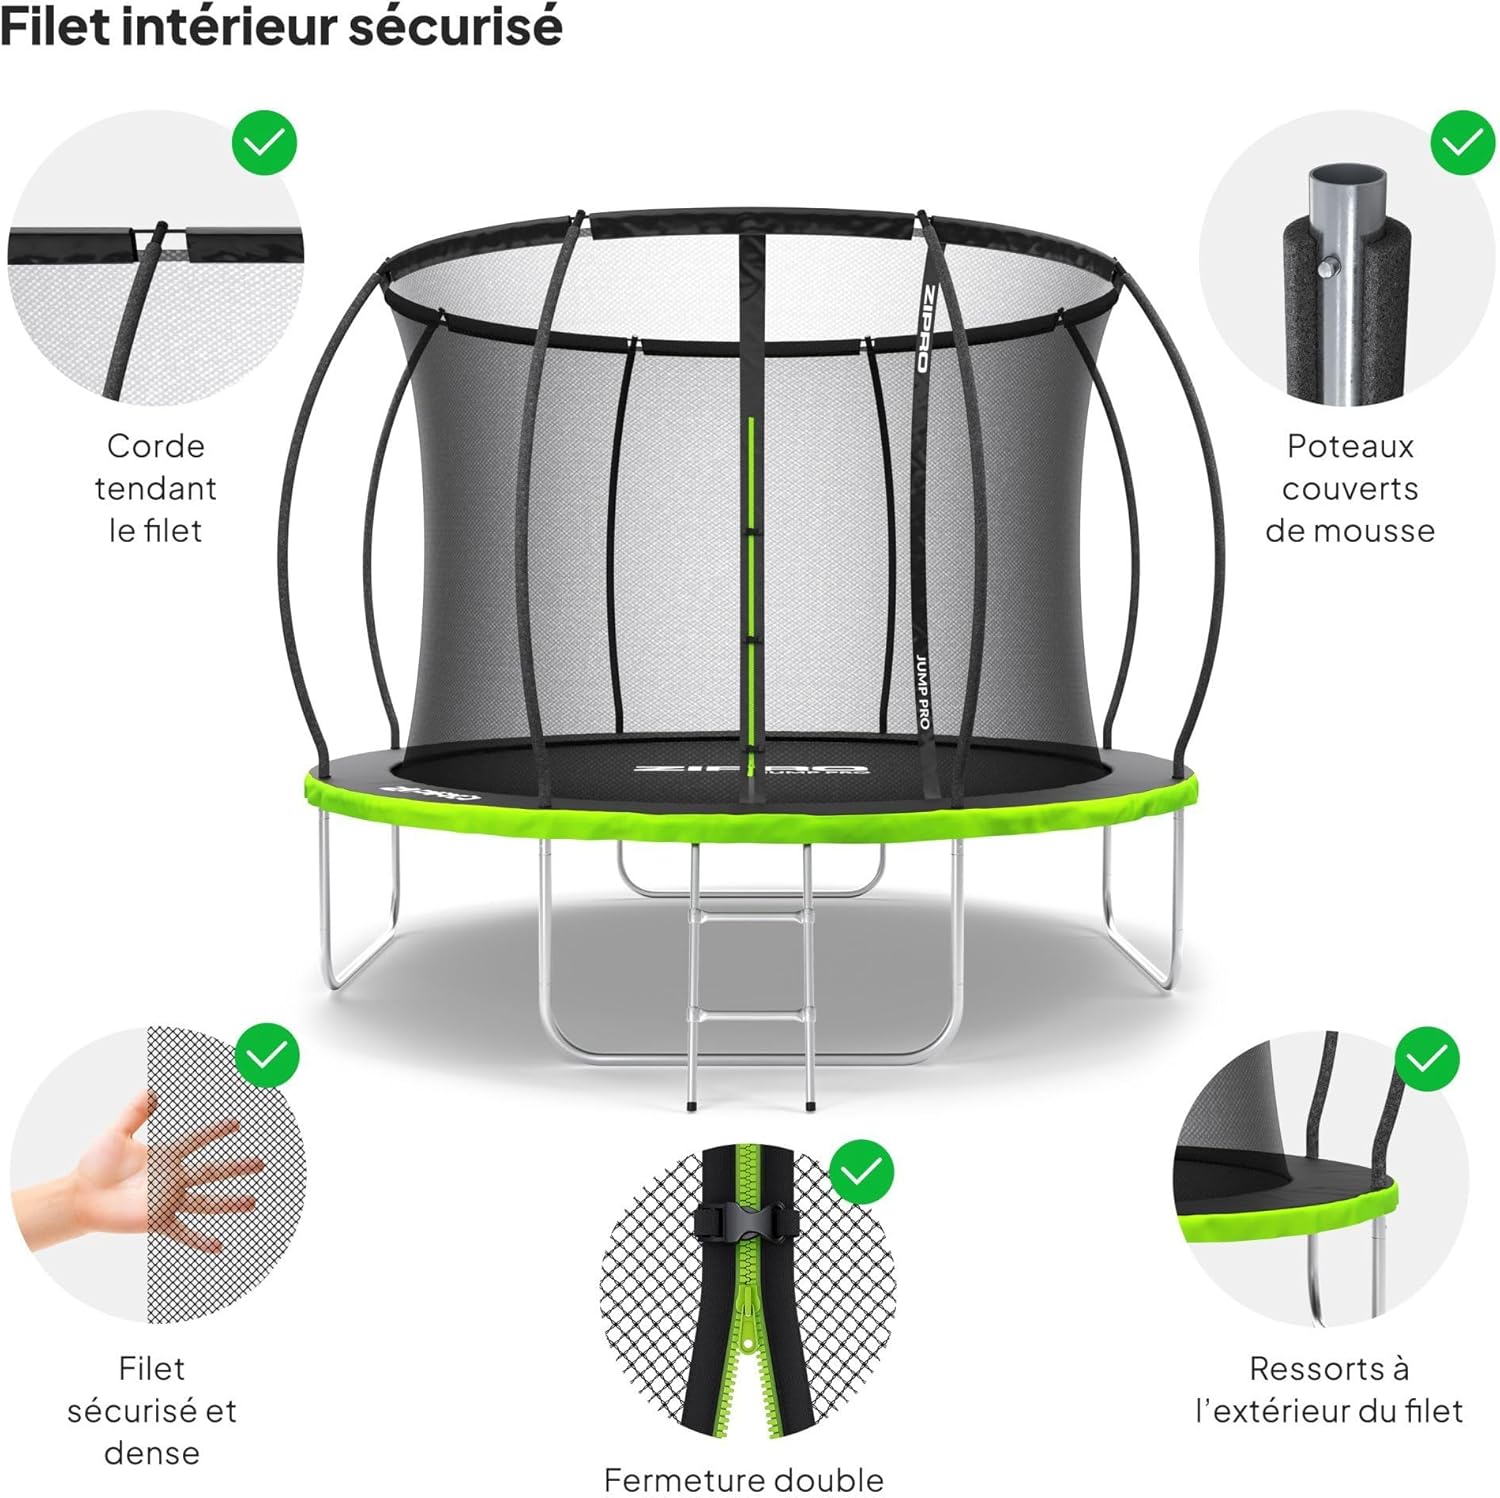
Image: Detailed view of the inner safety net, showing the tension rope, foam-covered poles, secure and dense mesh, double zipper closure, and springs located outside the net for enhanced safety.
Operating Guidelines
To ensure a safe and enjoyable experience, follow these operating guidelines:
- Only one person should jump at a time to prevent collisions.
- Always enter and exit the trampoline using the provided ladder.
- Do not attempt somersaults or other dangerous maneuvers without proper training and supervision.
- Remove shoes, jewelry, and any sharp objects before jumping.
- Do not use the trampoline when wet or in strong winds.
- Ensure the safety net entrance is securely closed before jumping.
Care and Maintenance
Regular maintenance will extend the life of your trampoline and ensure continued safety.
- Regular Inspection: Periodically check all bolts, nuts, springs, and frame connections for tightness and wear. Tighten any loose parts.
- Net and Mat Condition: Inspect the jumping mat and safety net for tears, holes, or signs of deterioration. Replace damaged parts immediately.
- Weather Resistance: The trampoline features a galvanized steel frame, UV-resistant jumping mat, and reinforced net, designed to withstand various weather conditions.
- Cleaning: Clean the jumping mat and net with mild soap and water. Avoid harsh chemicals.
- Winter Storage: For prolonged lifespan, especially in harsh winter climates, consider disassembling and storing the trampoline indoors. The CROSS-SECTION system allows for quick disassembly.

Image: Illustration of the trampoline's weather-resistant materials (PVC, EPE, PE) and its ability to withstand both sunny and rainy conditions.
Troubleshooting
This section addresses common issues you might encounter.
| Problem | Possible Cause | Solution |
|---|---|---|
| Trampoline feels unstable. | Loose frame connections or uneven ground. | Check and tighten all frame connections. Ensure the trampoline is placed on a level surface. |
| Jumping mat not taut enough. | Incorrect spring attachment or missing springs. | Verify all springs are correctly attached and none are missing or damaged. Ensure even distribution. |
| Safety net sagging or loose. | Net not properly secured to poles or frame. | Re-secure the net to all poles and ensure the tension rope is taut. Check zipper functionality. |
Product Specifications
| Feature | Detail |
|---|---|
| Brand | ZIPRO |
| Model Number | 5941402 |
| Product Dimensions (L x W x H) | 312 x 312 x 250 cm (10'' - 312 cm variant) |
| Item Weight | 43 Kilograms |
| Maximum Weight Capacity | 150 Kilograms |
| Frame Material | Galvanized Steel |
| Main Material | EPE Foam, EVA Foam 10mm, PP 275 g/m2, Steel, Top PVC+ Bottom PE |
| Shape | Round |
| Color | Green-Black |
| Included Components | Trampoline, Ladder, Assembly Elements, Manual |
| Spare Parts Availability | 2 Years |
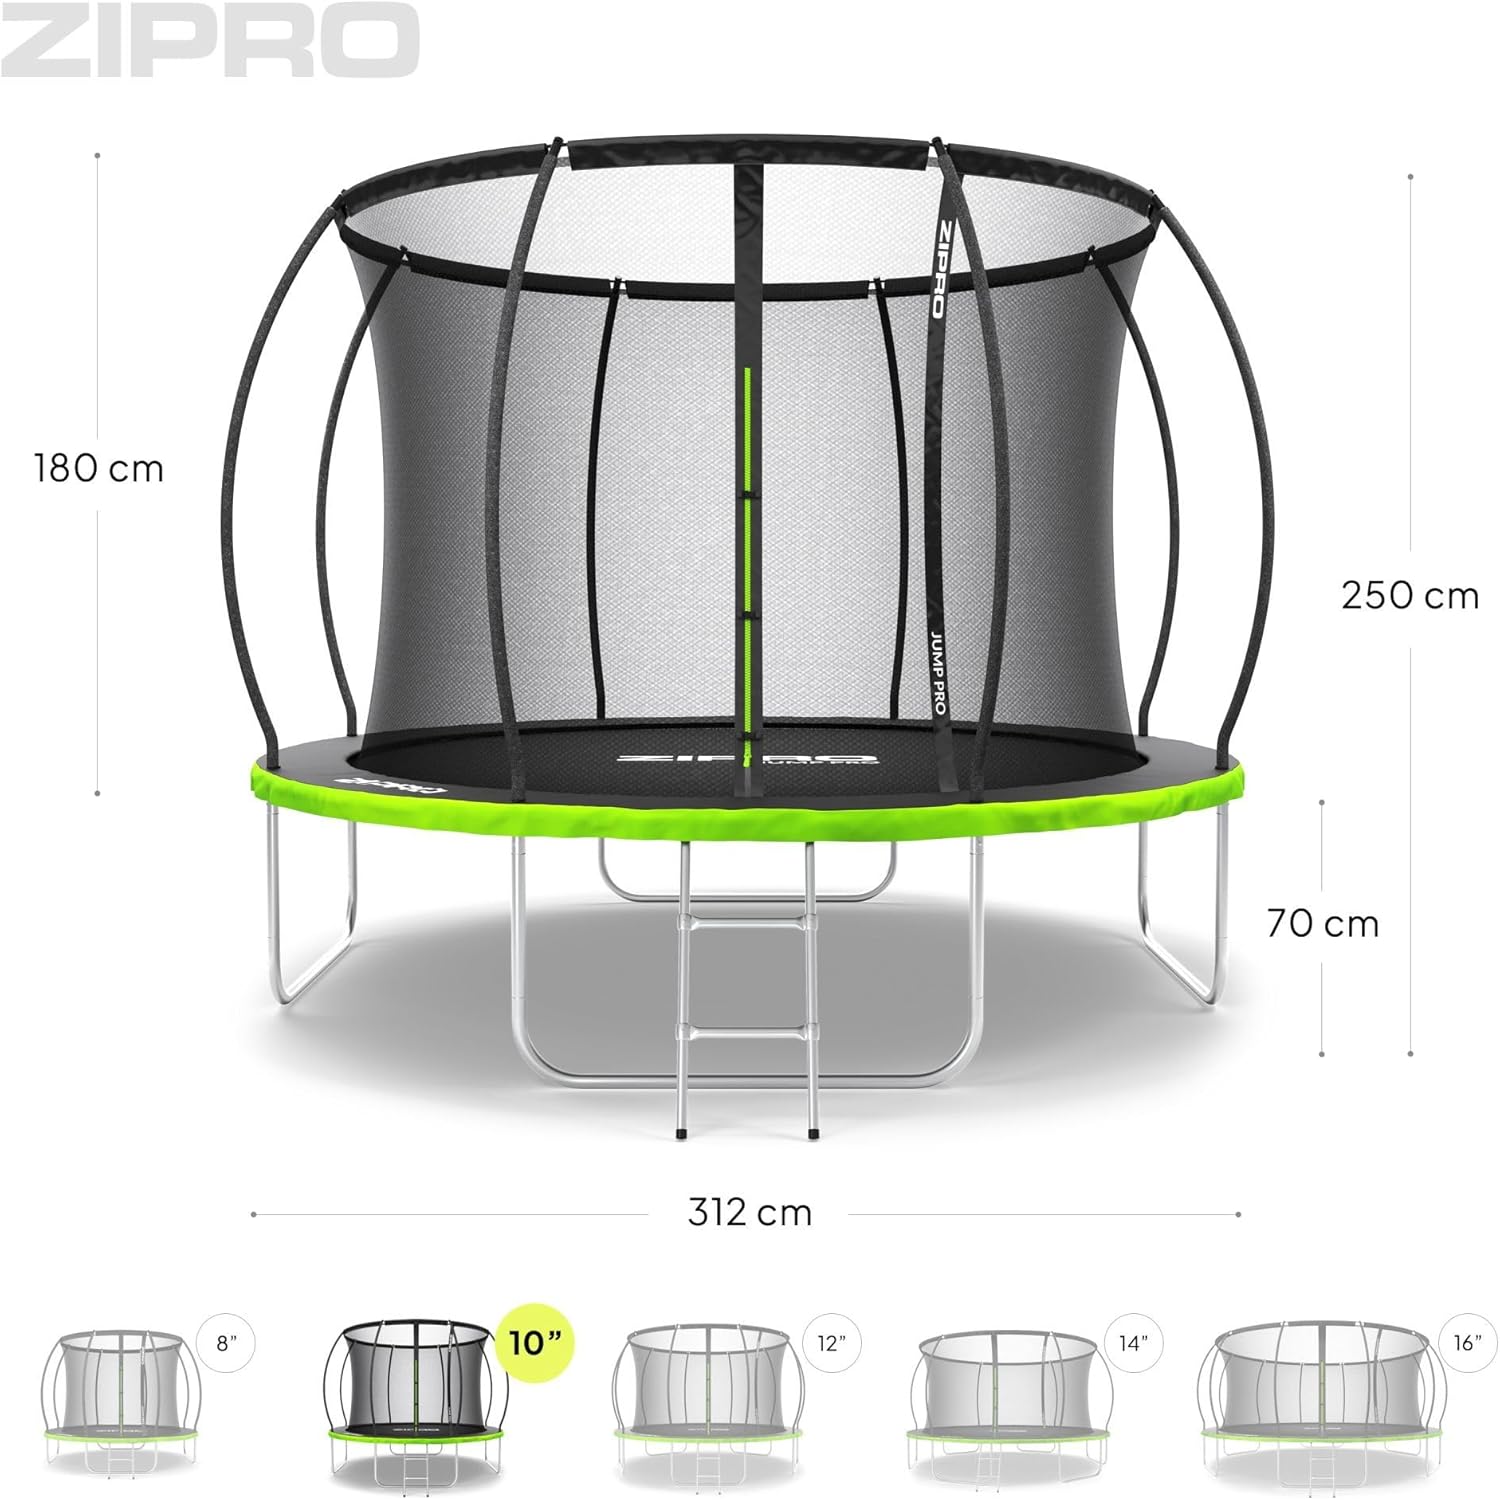
Image: Detailed diagram showing the dimensions of the 10'' - 312 cm trampoline variant, including total height (250 cm), net height (180 cm), frame height (70 cm), and diameter (312 cm).
Warranty and Support
For information regarding warranty coverage, spare parts, or technical support, please refer to the contact details provided with your purchase documentation or visit the official ZIPRO website. Spare parts are indicated to be available for 2 years from the date of first availability.
Related documents5941402


Ask a question about this manual
Ask about setup, troubleshooting, compatibility, parts, safety, or missing instructions. Manuals+ will review the question and use this page’s manual context to help answer it.