1. Introduction
This manual provides essential information for the installation, operation, and maintenance of the Pro Comp 65225K Suspension Lift Kit. This kit is designed to provide a 3.0-inch front lift and a 1.0-inch rear lift for 2007-2021 Toyota Tundra (Non-TRD Series) vehicles, enhancing vehicle stance and allowing for larger tire fitment. Please read this manual thoroughly before proceeding with installation or use.
2. Safety Information
WARNING: Professional installation is highly recommended for this product. Improper installation can lead to vehicle damage, loss of control, and serious injury or death. Always wear appropriate personal protective equipment, including eye protection, during installation.
CALIFORNIA WARNING: Cancer and Reproductive Harm - www.P65Warnings.ca.gov
- Ensure the vehicle is securely supported on jack stands on a level surface before beginning any work.
- Do not work under a vehicle supported only by a jack.
- Follow all torque specifications provided by the vehicle manufacturer and the lift kit instructions.
- After installation, a professional wheel alignment is mandatory to ensure proper vehicle handling and tire wear.
3. Kit Contents
The Pro Comp 65225K Suspension Lift Kit includes the following components:
- Front Strut Spacers (for 3.0-inch front lift)
- Rear Lift Blocks (for 1.0-inch rear lift)
- U-bolts and associated hardware
- All necessary nuts, bolts, and washers for installation

Figure 3.1: Example of a front strut spacer component included in the kit.

Figure 3.2: Various bolts, nuts, and washers included in the Pro Comp 65225K kit.

Figure 3.3: Complete set of components for the Pro Comp 65225K suspension lift kit, including front spacers, rear blocks, and hardware.
4. Setup & Installation
This section provides a general overview of the installation process. Refer to the detailed instructions provided with your physical kit for specific steps and torque values. Due to the complexity and safety implications, professional installation is strongly advised.
4.1. Pre-Installation
- Verify all kit components are present and undamaged.
- Park the vehicle on a level surface and engage the parking brake.
- Loosen lug nuts on all wheels.
- Lift the front of the vehicle using a floor jack and support it securely with jack stands under the frame. Remove the front wheels.
- Repeat for the rear of the vehicle.
4.2. Front Installation
- Disconnect necessary components to allow the front strut assembly to be removed (e.g., sway bar links, brake lines, ABS lines).
- Remove the lower and upper strut mounting bolts and carefully remove the entire strut assembly.
- Install the front strut spacer on top of the strut assembly, ensuring proper orientation and securing with provided hardware.
- Reinstall the modified strut assembly into the vehicle, securing all mounting points and reattaching disconnected components.
4.3. Rear Installation
- Support the rear axle with a jack.
- Remove the factory U-bolts.
- Carefully lower the axle slightly to insert the rear lift block between the leaf spring and the axle pad. Ensure the block is correctly aligned.
- Install the new, longer U-bolts over the leaf spring and around the axle, securing them with the provided hardware.
- Raise the axle back into position and torque U-bolts to specifications.
4.4. Post-Installation
- Reinstall all wheels and torque lug nuts to factory specifications.
- Lower the vehicle to the ground.
- Perform a final check of all fasteners to ensure they are tightened to specifications.
- Drive the vehicle a short distance and re-check all fasteners.
- Immediately schedule a professional wheel alignment. This is crucial for vehicle safety and performance after any suspension modification.
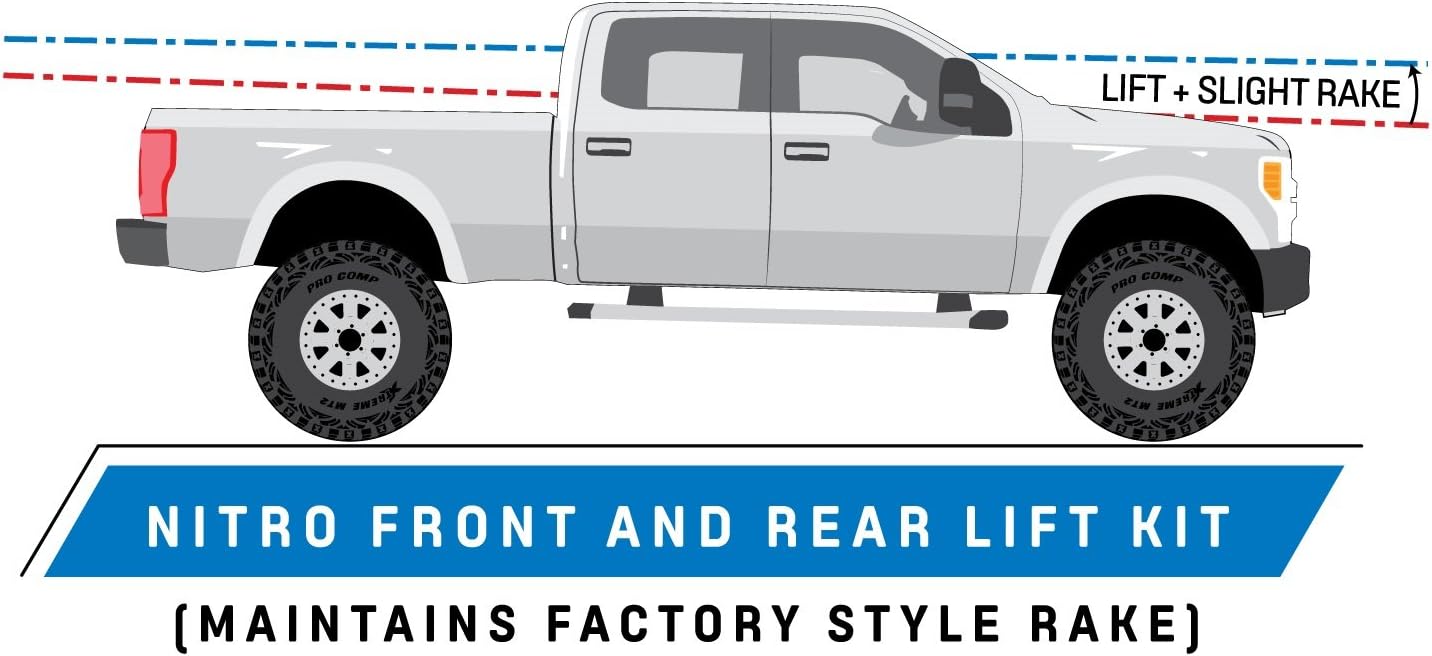
Figure 4.1: Diagram illustrating the effect of a front and rear lift kit on vehicle stance, maintaining a slight factory rake.

Figure 4.2: A Toyota Tundra showcasing the enhanced ground clearance and aggressive stance after installation of a suspension lift kit.
5. Operating Considerations
After installing the Pro Comp 65225K Suspension Lift Kit, your vehicle's driving characteristics will change. Be aware of the following:
- Center of Gravity: The vehicle's center of gravity will be raised, which may affect stability, especially during sharp turns or emergency maneuvers. Drive cautiously until you are accustomed to the new handling.
- Tire Clearance: The lift kit provides additional clearance for larger tires. Ensure that any new tires installed do not rub against suspension components or fender wells during full steering lock or suspension travel.
- Braking: While the kit itself does not directly alter braking performance, larger and heavier tires can increase stopping distances.
- Headlight Aim: The vehicle's headlight aim may be affected by the lift. Adjust headlights to ensure proper visibility and to avoid blinding oncoming traffic.
6. Maintenance
Regular inspection and maintenance are crucial to ensure the longevity and safe operation of your suspension lift kit.
- Periodic Torque Checks: After the first 500 miles and then every 5,000 miles, re-check the torque on all fasteners installed with the lift kit, especially U-bolts and strut mounting hardware.
- Component Inspection: Regularly inspect all suspension components for signs of wear, damage, or corrosion. Pay close attention to bushings, bolts, and the integrity of the spacers and blocks.
- Alignment: Maintain proper wheel alignment. Re-align the vehicle if you notice uneven tire wear or changes in steering feel.
7. Troubleshooting
If you encounter issues after installing the lift kit, consider the following common troubleshooting steps:
- Uneven Stance: Double-check that the correct spacers/blocks were installed on the appropriate axles and that all components are seated correctly. Verify tire pressures are even.
- Vibrations: Vibrations can indicate an issue with driveline angles, tire balance, or loose components. Re-check all fasteners and consider having the driveline angles inspected by a professional.
- Steering Issues/Pulling: This is almost always an alignment issue. Ensure a professional alignment has been performed.
- Noise (Clunking/Squeaking): Inspect all mounting points for loose hardware or components rubbing against each other. Lubricate bushings if necessary.
For persistent or severe issues, consult a qualified automotive technician.
8. Specifications
| Feature | Detail |
|---|---|
| Brand | PRO COMP |
| Model Number | 65225K |
| Front Lift Height | 3.0 Inches |
| Rear Lift Height | 1.0 Inch |
| Vehicle Fitment | Toyota Tundra (2007-2021, Non-TRD Series) |
| Auto Part Position | Front and Rear |
| Material | Alloy Steel, Aluminum |
| Included Components | Suspension Leveling Kits |
| Item Weight | 17.78 pounds |
| Product Dimensions | 15.88 x 13 x 4.5 inches |
| UPC | 614901022223 |
9. Product Videos
No official Pro Comp installation or product overview videos for the 65225K model were found from the seller. For general installation guidance, please refer to the written instructions provided with your kit and consult a professional installer.
10. Warranty & Support
For information regarding the product warranty, please refer to the documentation included with your Pro Comp 65225K Suspension Lift Kit or visit the official Pro Comp website. For technical support or assistance with specific installation questions, it is recommended to contact Pro Comp customer service directly or consult with a certified automotive professional.