
Introduction
This manual provides detailed instructions for the setup, operation, and maintenance of your SYLVANIA SA134 Indoor Daily Digital Timer. Please read this manual thoroughly before using the device to ensure proper function and safety. Keep this manual for future reference.
Safety Information
- For indoor use only. Do not expose to moisture or extreme temperatures.
- Do not exceed the electrical ratings of the timer. Refer to specifications for details.
- Do not disassemble or attempt to repair the unit. Contact qualified service personnel.
- Keep out of reach of children.
- Ensure the timer is securely plugged into a grounded outlet.
Product Overview
The SYLVANIA SA134 is a compact digital timer designed for daily scheduling of electrical devices. It features a clear LCD display and intuitive buttons for programming.
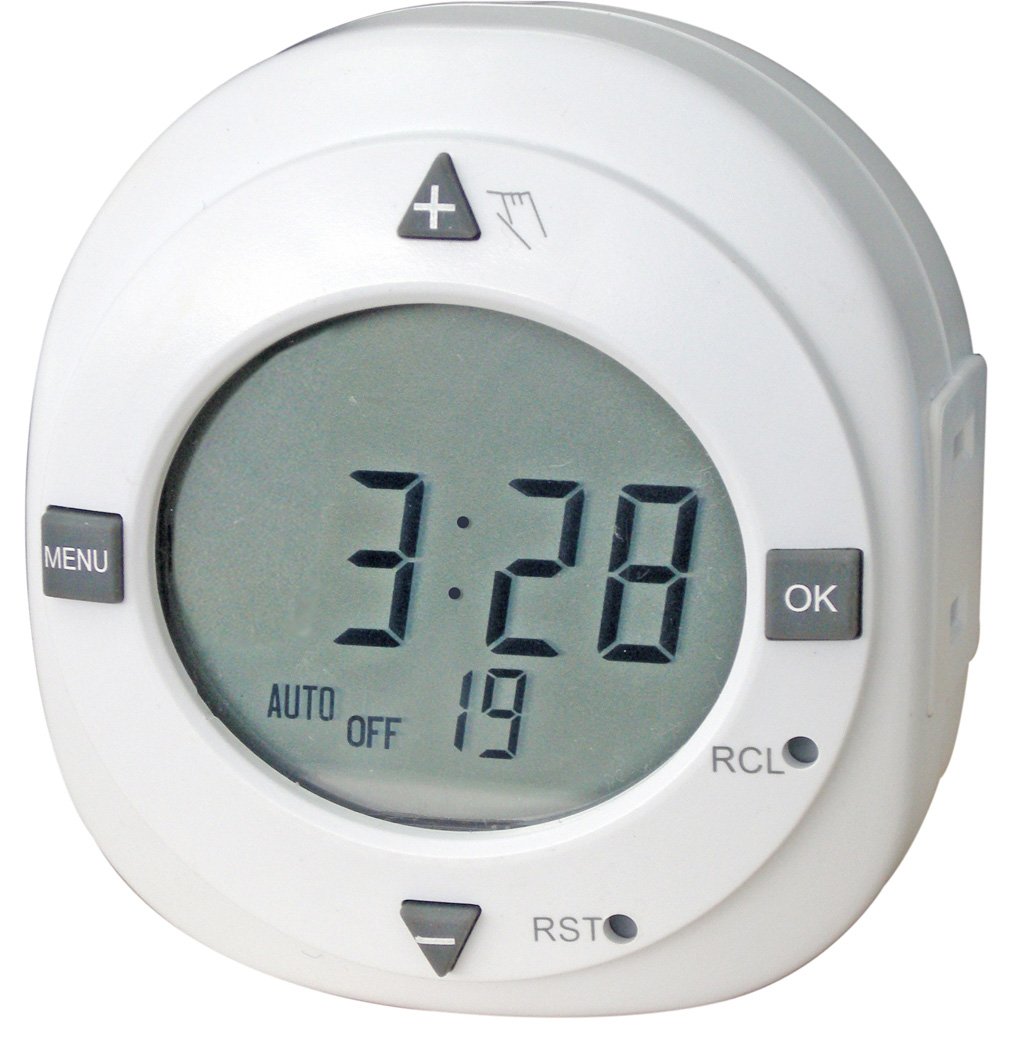
Figure 1: Front view of the SYLVANIA SA134 Digital Timer. The display shows the current time and programming status. Buttons for 'MENU', 'OK', 'Up/Down' (plus/minus arrows), and 'RST' (reset) are visible.
Controls and Display
- LCD Display: Shows current time, program status (AUTO/ON/OFF), and program number.
- MENU Button: Enters programming mode and navigates through settings.
- OK Button: Confirms selections and exits programming mode.
- ▲ (Up) Button: Increases values or moves forward in menus.
- ▼ (Down) Button: Decreases values or moves backward in menus.
- RST (Reset) Button: Resets the timer to factory defaults. This is a small recessed button, typically requiring a pointed object like a pen or paperclip to press.
- RCL (Recall) Button: Recalls programmed settings.
Setup
- Initial Power-Up: Plug the timer into a standard wall outlet. The display should illuminate. If not, ensure the outlet has power.
- Clear All Settings (Recommended): Before first use or after a long period of inactivity, press the recessed RST button using a pen or paperclip. This clears all previous settings and resets the timer to its default state.
- Set Current Time:
- Press the MENU button repeatedly until "CLOCK" or a similar time setting option appears.
- Use the ▲ and ▼ buttons to adjust the hour.
- Press OK to confirm the hour and move to minutes.
- Use the ▲ and ▼ buttons to adjust the minutes.
- Press OK to confirm the minutes. The clock is now set.
Operating Instructions
Programming ON/OFF Times
The timer allows you to set multiple ON/OFF programs for daily operation.
- Press the MENU button repeatedly until "PROG" or "PROGRAM" appears on the display, followed by a program number (e.g., "1 ON").
- Set ON Time:
- The hour for "1 ON" will flash. Use ▲ and ▼ to set the desired ON hour.
- Press OK to confirm the hour and move to minutes.
- Use ▲ and ▼ to set the desired ON minutes.
- Press OK to confirm the minutes.
- Set OFF Time:
- The display will now show "1 OFF" and the hour will flash. Use ▲ and ▼ to set the desired OFF hour.
- Press OK to confirm the hour and move to minutes.
- Use ▲ and ▼ to set the desired OFF minutes.
- Press OK to confirm the minutes.
- Repeat steps 1-3 for any additional programs you wish to set. The timer typically supports multiple ON/OFF pairs.
- After setting all desired programs, press the MENU button repeatedly until the display returns to the current time.
Setting Operating Mode (AUTO/ON/OFF)
The timer can operate in three modes: Automatic (AUTO), Always ON, or Always OFF.
- From the main time display, press the OK button.
- Each press of the OK button will cycle through the modes:
- AUTO: The timer will follow the programmed ON/OFF schedules. This is the standard operating mode.
- ON: The connected device will remain continuously ON, overriding all programs.
- OFF: The connected device will remain continuously OFF, overriding all programs.
- Select AUTO for the timer to function according to your set programs.
Maintenance
- Cleaning: Wipe the timer with a soft, dry cloth. Do not use liquid cleaners or abrasive materials.
- Storage: If storing for an extended period, unplug the timer and keep it in a cool, dry place.
- Battery Backup: The timer may contain an internal battery for retaining settings during power outages. This battery is typically not user-replaceable.
Troubleshooting
| Problem | Possible Cause | Solution |
|---|---|---|
| Timer display is blank. | No power to the outlet; timer not plugged in; internal fault. | Check power to the outlet; ensure timer is fully plugged in. If problem persists, the unit may be faulty. |
| Programs are not activating. | Timer is not in AUTO mode; incorrect program settings; RST button not pressed after power loss. | Ensure the timer is set to AUTO mode. Review and correct program settings. Press RST and reprogram if settings were lost. |
| Timer loses settings. | Prolonged power outage exceeding internal battery backup; internal battery failure. | Reprogram the timer. If settings are lost frequently without power interruption, the internal battery may be depleted or faulty. |
| Difficulty setting time/programs. | Unfamiliarity with controls; unit in an unexpected state. | Refer to the "Setup" and "Operating Instructions" sections. Press the RST button to clear all settings and start fresh. |
Specifications
- Model: SA134
- ASIN: B005FOM1BW
- UPC: 858252002187
- Item Weight: 136 g
- Item Dimensions (LxWxH): 5.1 x 7 x 7.6 Centimeters
- Screen Size: 2 Inches
- Usage: Indoor Only
- Electrical Rating: (Please refer to the label on the device for specific voltage and current ratings.)
Warranty Information
Sylvania products are manufactured to high-quality standards. For specific warranty details, please refer to the warranty card included with your purchase or contact Sylvania customer support. Keep your proof of purchase for warranty claims.
Customer Support
If you have any questions or require assistance with your SYLVANIA SA134 Digital Timer, please contact Sylvania customer support. Contact information can typically be found on the product packaging or the official Sylvania website.
For general inquiries, you may visit the Sylvania brand page on Amazon.