1. Introduction
Thank you for purchasing the Sunmile SM-G50 Electric Meat Grinder. This appliance is designed to efficiently grind various types of meat for home use. With its powerful motor and durable components, it provides a reliable solution for preparing ground meat and sausages. Please read this manual thoroughly before operating the appliance to ensure safe and proper use.

Image 1.1: The Sunmile SM-G50 Electric Meat Grinder with meat on the feeding tray.
2. Important Safety Instructions
To reduce the risk of injury or electric shock, always follow basic safety precautions when using electrical appliances. Read all instructions carefully before use.
- Electrical Safety: Ensure the voltage rating on the appliance matches your local power supply. Do not immerse the motor unit in water or other liquids. Always unplug the grinder from the power outlet before cleaning, assembling, or disassembling parts.
- Personal Safety: Keep hands and utensils away from the feeding tube and grinding components during operation. Always use the food pusher provided. Never feed bones, nuts, or fibrous vegetables into the grinder, as this can damage the motor and components.
- Children and Supervision: This appliance is not intended for use by children. Close supervision is necessary when any appliance is used near children.
- Overload Protection: The unit is equipped with a circuit breaker to prevent motor burnout in case of overload. If the grinder stops, turn it off, unplug it, and allow it to cool before attempting to reset the circuit breaker (if applicable) and resume operation.
- Proper Use: Only use the appliance for its intended purpose of grinding meat. Do not attempt to grind frozen meat.
3. Package Contents
Verify that all items are present in the package:
- Motor Unit
- Feeding Tray (Polished Cast Aluminum)
- Grinder Head (Polished Cast Aluminum)
- Auger (Screw)
- Cutting Blade (Stainless Steel)
- 3 x Cutting Plates (Stainless Steel: Coarse, Medium, Fine)
- Fixing Ring
- Food Pusher (Plastic)
- Sausage Stuffer Attachment
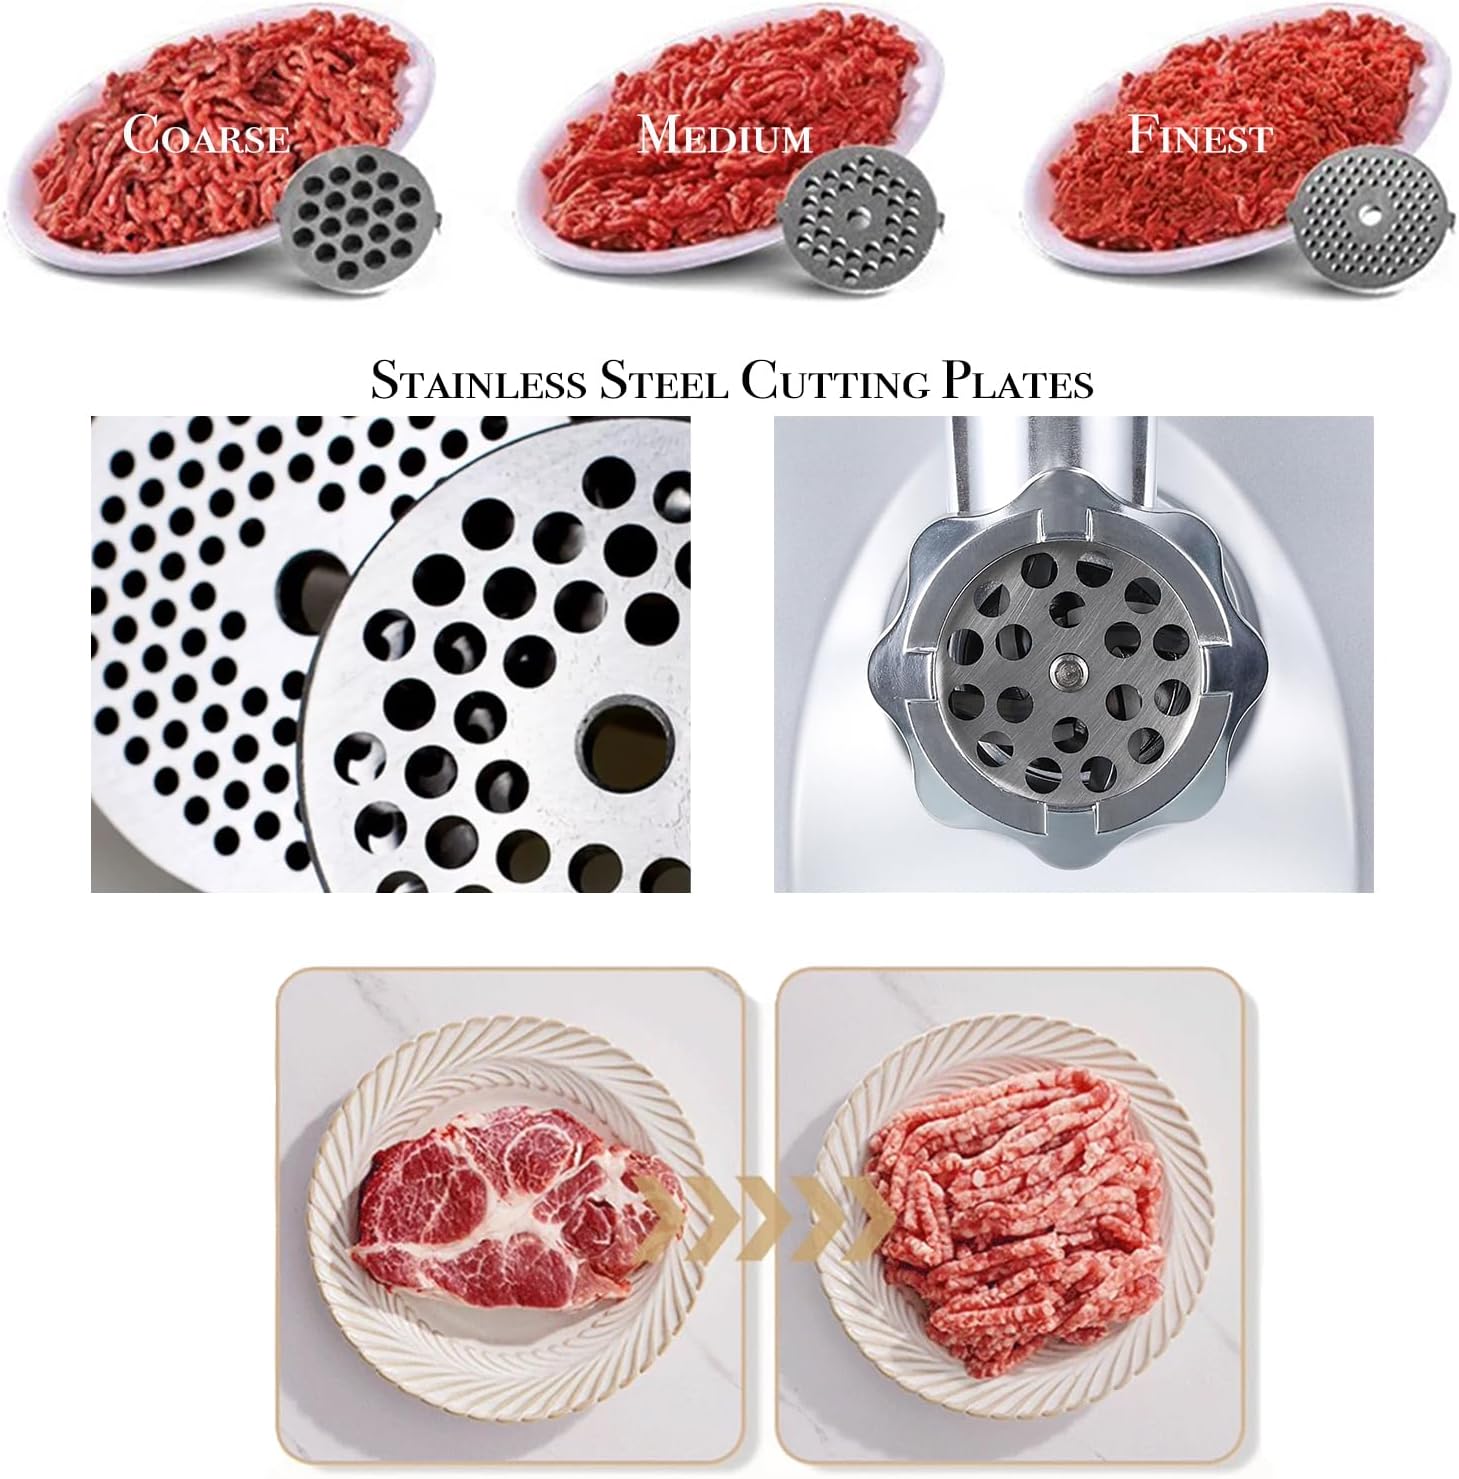
Image 3.1: Three stainless steel cutting plates for coarse, medium, and fine grinding.
4. Product Overview and Parts Identification
Familiarize yourself with the main components of your meat grinder:
- Motor Unit: The main body containing the motor and control switches.
- Feeding Tray: Holds meat before it enters the grinder head.
- Grinder Head: Attaches to the motor unit and houses the internal grinding components.
- Auger (Screw): Feeds meat through the grinder head.
- Cutting Blade: Cuts the meat against the cutting plate.
- Cutting Plates: Determine the fineness of the grind.
- Fixing Ring: Secures the cutting plate and blade in place.
- Food Pusher: Used to guide meat into the feeding tube safely.
- ON/OFF/Reverse Switch: Controls operation and reverse function.
- Circuit Breaker: Safety feature to protect the motor.
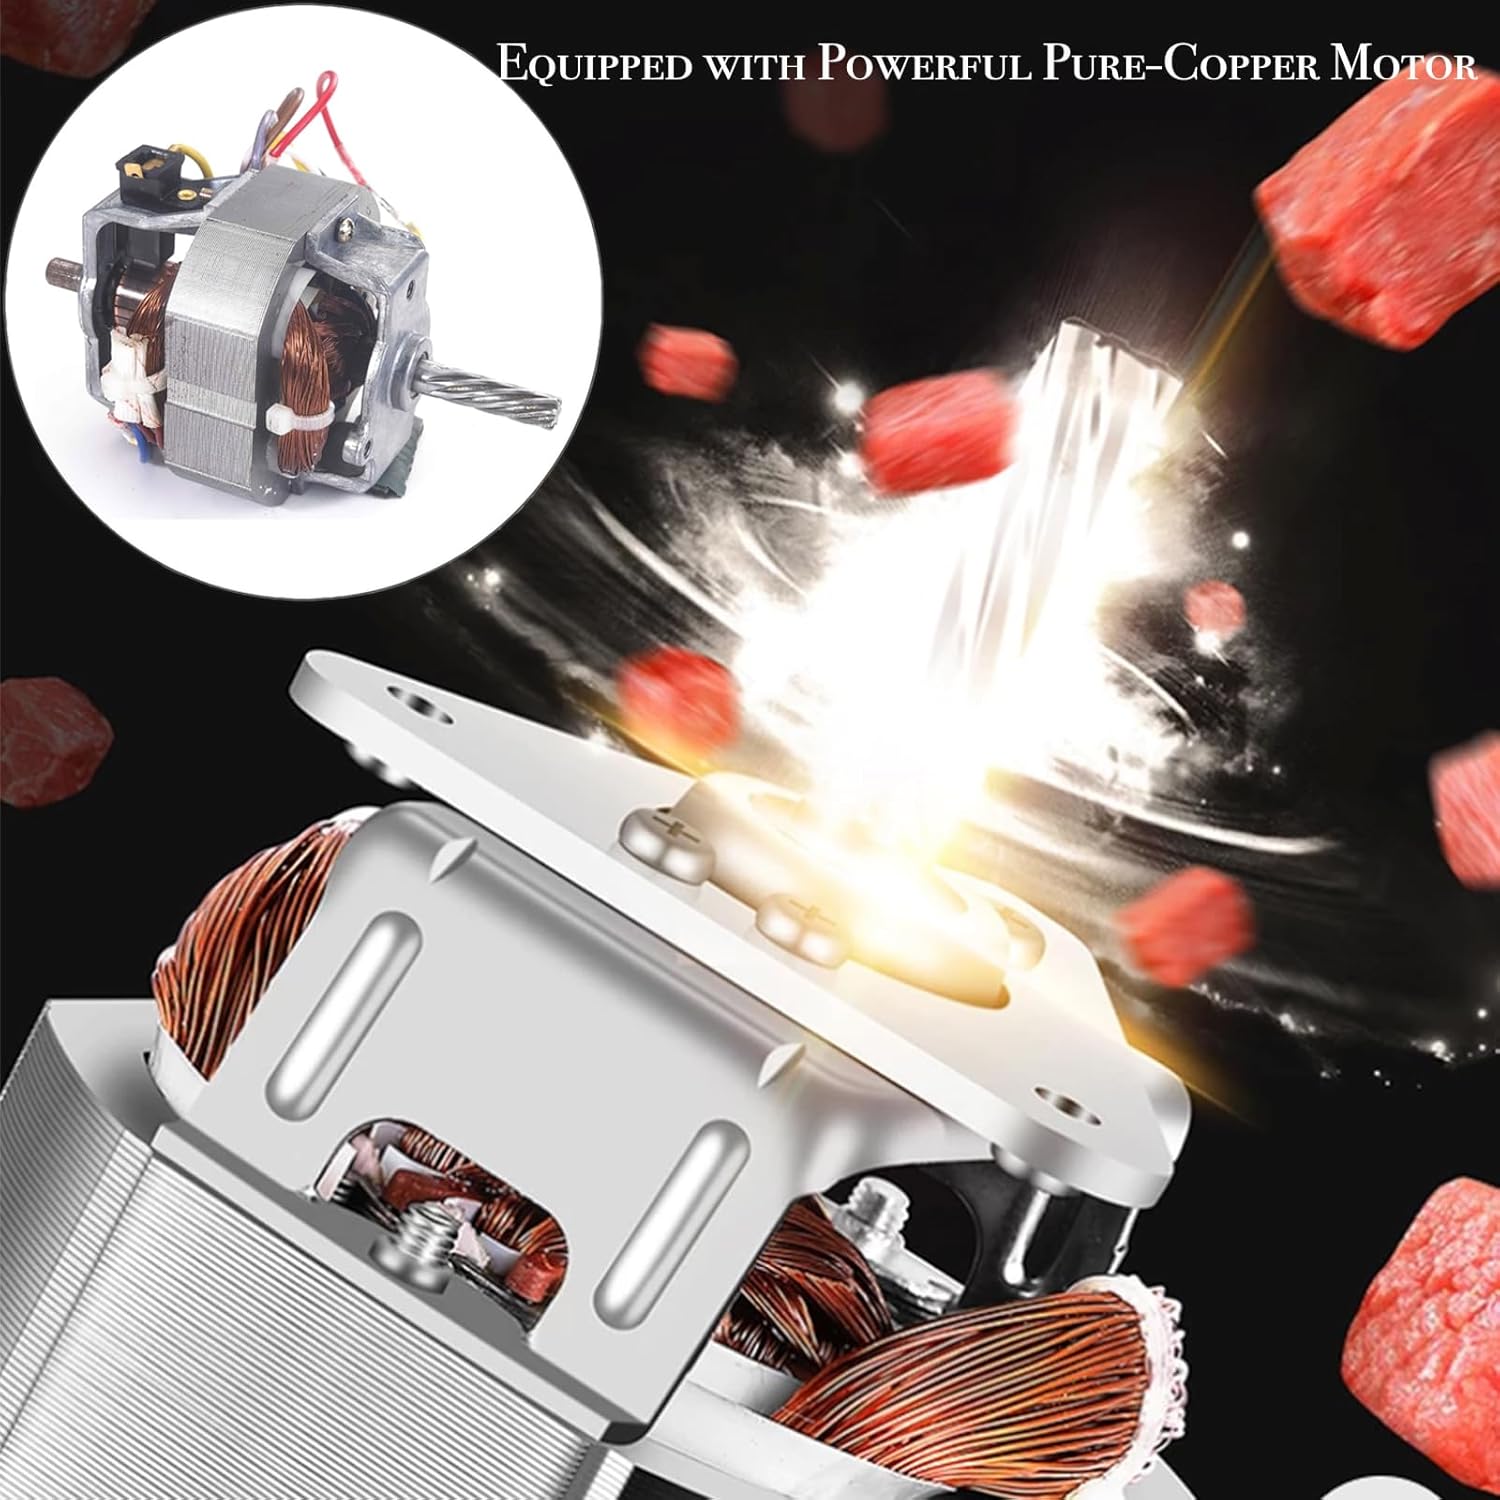
Image 4.1: Detailed view of the powerful pure-copper motor.

Image 4.2: The sharp stainless steel cutting blade.

Image 4.3: Illustration of the 3-section low-speed screw grinding process: Twist, Squeeze, Cut.
5. Setup and Assembly
Before first use, wash all parts that will come into contact with food. Ensure the motor unit is unplugged from the power outlet.
- Attach Grinder Head: Insert the grinder head into the opening on the front of the motor unit. Turn it clockwise until it is securely locked in place.
- Insert Auger: Place the auger (screw) into the grinder head.
- Install Cutting Blade: Position the cutting blade onto the square shaft of the auger. Important: Ensure the flat side of the blade faces outwards, against the cutting plate. Incorrect placement can lead to clogging.
- Place Cutting Plate: Select the desired cutting plate (coarse, medium, or fine) and place it over the cutting blade, aligning the notch on the plate with the pin on the grinder head.
- Secure Fixing Ring: Screw the fixing ring onto the grinder head clockwise until it is hand-tight. Do not overtighten.
- Attach Feeding Tray: Place the feeding tray onto the top of the grinder head.

Image 5.1: Correct and incorrect installation of the cutting blade, emphasizing the flat side facing outwards.
6. Operating Instructions
Ensure the grinder is properly assembled and plugged into a suitable power outlet.
- Prepare Meat: Cut meat into small pieces (approximately 1-inch cubes) that can easily fit into the feeding tube. Remove any bones, large tendons, or excessive fat.
- Start Grinding: Place the prepared meat onto the feeding tray. Turn the ON/OFF/Reverse switch to the 'ON' position.
- Feed Meat: Use the food pusher to gently guide the meat into the feeding tube. Never use your fingers or other utensils. Do not force the meat; allow the grinder to process it at its own pace.
- Reverse Function: If the grinder becomes clogged, turn the switch to the 'OFF' position, then briefly to the 'REVERSE' position to clear the blockage. Once cleared, switch back to 'OFF' before resuming 'ON' operation.
- Sausage Stuffing (Optional): To make sausages, replace the cutting blade and plate with the sausage stuffer attachment. Prepare your sausage casing and feed the seasoned ground meat into the grinder, guiding it into the casing.

Image 6.1: Visual reminder that the grinder is for meat only; avoid bones, tendons, pigskin, wings, nuts, or cookies.

Image 6.2: The sausage stuffer attachment in use, demonstrating how to make sausages.
7. Maintenance and Cleaning
Regular cleaning ensures the longevity and hygienic operation of your meat grinder. Always unplug the appliance before cleaning.
- Disassembly: Reverse the assembly steps to disassemble the grinder head, removing the fixing ring, cutting plate, cutting blade, auger, and grinder head from the motor unit.
- Cleaning Components: Rinse all disassembled parts under running water immediately after use to remove any meat residue. Use a neutral detergent if necessary.
- Dishwasher Safety: The stainless steel cutting blade and cutting plates are dishwasher safe. However, the grinder head, auger, and feeding tray are made of polished cast aluminum and should not be washed in a dishwasher. Dishwashing these aluminum parts can cause discoloration due to oxidation. Hand wash these components.
- Drying: Thoroughly dry all parts with a cloth immediately after washing to prevent rust and water spots.
- Motor Unit: Wipe the motor unit with a damp cloth. Never immerse it in water.
- Storage: Reassemble the dry parts or store them in a dry place. The unit features a special design for cord and accessory storage inside the motor unit for convenience.
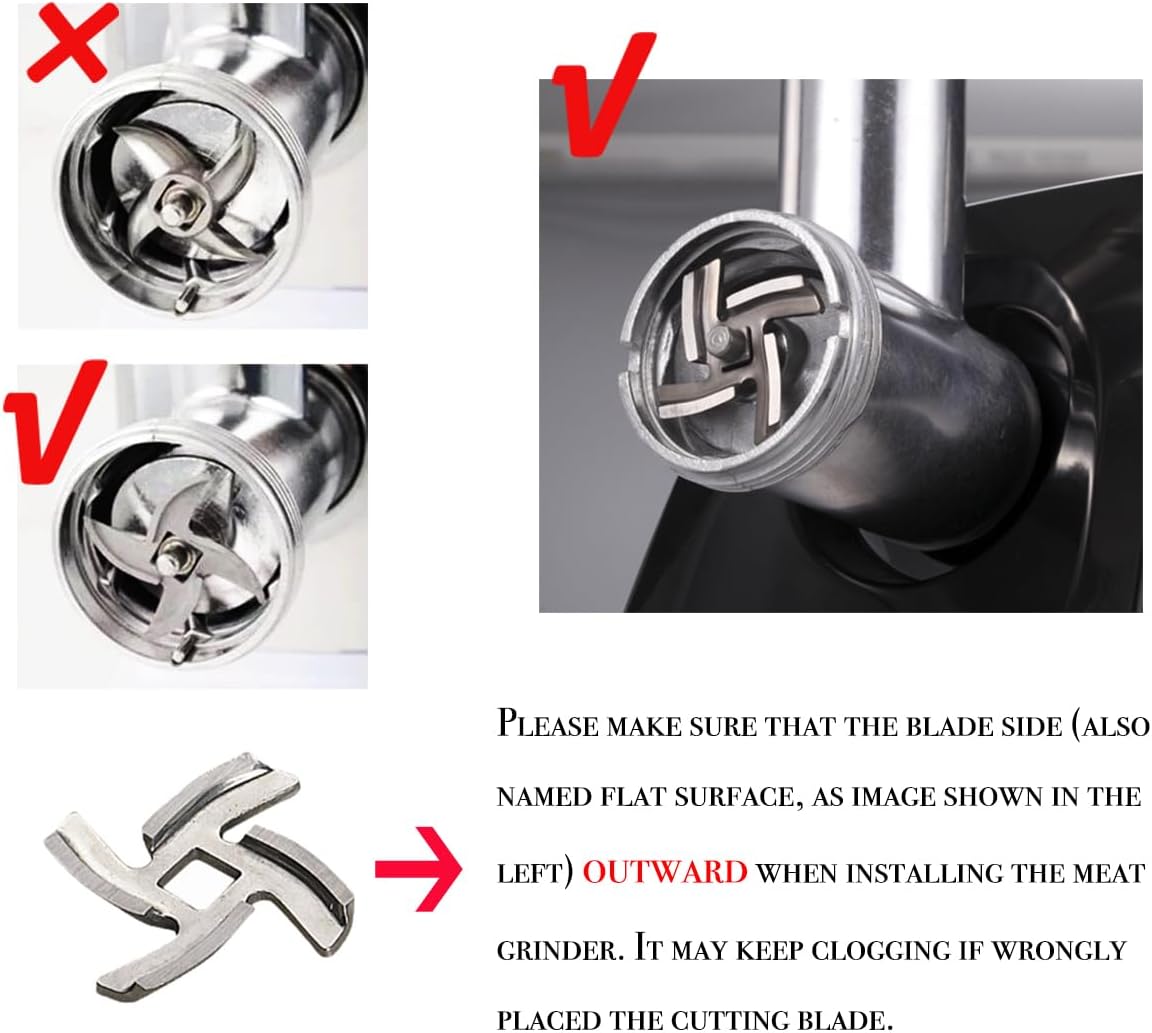
Image 7.1: Illustration of cleaning the grinder head components by hand and highlighting dishwasher-safe vs. hand-wash only parts.

Image 7.2: View of the integrated cord and accessory storage compartment at the back of the motor unit.
8. Troubleshooting
If you encounter issues with your Sunmile SM-G50 meat grinder, refer to the following common problems and solutions:
| Problem | Possible Cause | Solution |
|---|---|---|
| Grinder stops during operation. | Overload or motor overheating. | Turn off the unit, unplug, and allow to cool for 10-15 minutes. Check if the circuit breaker has tripped and reset if necessary. Reduce the amount of meat being fed or cut meat into smaller pieces. |
| Meat is not grinding or is coming out poorly. | Cutting blade installed incorrectly or dull. Meat is too tough or contains bones/tendons. | Ensure the flat side of the cutting blade faces outwards. Sharpen or replace the blade if dull. Ensure meat is properly prepared (no bones, excessive tendons). Use the reverse function to clear blockages. |
| Excessive noise during operation. | Loose parts or foreign object. | Turn off and unplug the unit. Check all assembled parts for tightness. Disassemble and inspect for any foreign objects. |
| Meat leakage between grinder head and motor unit. | Grinder head not securely attached or internal clog. | Ensure the grinder head is fully inserted and locked clockwise. Check for internal clogs and clear them using the reverse function or by disassembling and cleaning. |
If the problem persists after attempting these solutions, please contact customer support.
9. Specifications
- Model: SM-G50
- Rated Power: 350W
- Max Locked Power: 1000W
- Voltage: 230 Volts (AC)
- Product Dimensions: 12.2"L x 11"W x 15.1"H (31cm L x 28cm W x 38.4cm H)
- Item Weight: 13.02 pounds (5.9 kg)
- Capacity: Up to 200 pounds per hour
- Material: Polished cast aluminum grinder head, stainless steel cutting blade and plates.

Image 9.1: Diagram showing the dimensions of the Sunmile SM-G50 meat grinder.
10. Warranty and Support
The Sunmile SM-G50 Electric Meat Grinder comes with a 1-year manufacturer warranty. If you require assistance, replacement parts, or have any questions regarding your product, please contact Sunmile customer support. Refer to the product packaging or the official Sunmile website for contact details.
For further information or to register your product, please visit the official Sunmile website: Sunmile Store


