Introduction
This manual provides comprehensive instructions for the setup, operation, and maintenance of your Futaba 3PRKA 3-Channel 2.4GHz Radio FHSS System. Designed for surface models, this system offers reliable and interference-free control using Futaba's FHSS (Frequency Hopping Spread Spectrum) technology. Please read this manual thoroughly before using the system to ensure proper function and safety.

Image: The Futaba 3PRKA 3-Channel 2.4GHz Radio FHSS System transmitter, showcasing its ergonomic design and pistol grip.
Product Features
- 3-Channel FHSS System: Provides reliable and interference-free 2.4GHz communication.
- Dual-Rate Steering: Convenient thumb dial for on-the-go steering adjustment.
- Throttle Fail-Safe: Automatically moves throttle to a preset position upon signal loss, preventing runaways.
- Low-Battery Warning: Flashing LED indicator for low transmitter battery voltage.
- R203GF S-FHSS Receiver: High-voltage (4.8V-7.4V) compatible with LiPo, LiFe, NiCd, and NiMH packs.
- Adjustable Controls: Includes throttle and steering trims, servo reversing, and throttle end point adjustment (EPA).
- Built-in Antenna: Integrated antenna for a compact design.
- Protective Cover: Shields adjustment dials from accidental changes.
Setup
1. Transmitter Battery Installation
The Futaba 3PRKA transmitter requires four "AA" alkaline batteries. Ensure correct polarity when inserting the batteries.
- Open the battery compartment cover located on the bottom of the transmitter.
- Insert four "AA" batteries according to the polarity markings (+/-) inside the compartment.
- Close the battery compartment cover securely.
Caution: Do not mix old and new batteries, or different types of batteries. Remove batteries if the transmitter will not be used for an extended period.
2. Receiver Installation and Connection (R203GF)
The R203GF receiver is compact and designed for easy installation in your model. Ensure the receiver is mounted securely and protected from vibrations and moisture.

Image: The Futaba 3PRKA transmitter, R203GF receiver, and included accessories, ready for setup.

Image: Close-up view of the Futaba R203GF 3-Channel S-FHSS Receiver, showing its ports and compact size.
- Mount the R203GF receiver in a suitable location within your model, away from electrical noise sources (e.g., motor, ESC). Use double-sided tape or a receiver box for secure mounting.
- Connect your servos to the corresponding channels on the receiver:
- Channel 1: Steering Servo
- Channel 2: Throttle Servo/ESC
- Channel 3: Auxiliary (e.g., lights, gear shift)
- "B" Port: Battery/Power source (4.8V-7.4V)
- Ensure all connections are firm and correctly oriented.
3. Linking the Transmitter and Receiver
The 3PRKA transmitter and R203GF receiver are typically linked at the factory. If re-linking is necessary, follow these steps:
- Turn on the transmitter.
- Turn on the receiver. The receiver's LED will flash red.
- Press and hold the "SW" (Switch) button on the receiver for approximately 2 seconds. The LED will change from flashing red to solid green, indicating successful linking.
- Release the "SW" button.
- Turn off both the receiver and transmitter, then turn them back on to confirm the link.
Note: If the LED flashes red and green simultaneously, it indicates an un-linked state or an error. Repeat the linking process.
Operating Instructions
Basic Controls
- Steering Wheel: Controls the direction of the model. Turn clockwise for right, counter-clockwise for left.
- Throttle Trigger: Controls the speed and direction (forward/reverse) of the model. Pull for forward, push for reverse/brake.

Image: A user's hands demonstrating the natural grip and operation of the Futaba 3PRKA transmitter's steering wheel and throttle trigger.
Adjustments and Functions
The 3PRKA features several adjustable controls located under a protective cover on the side of the transmitter. Gently slide the cover to access these controls.
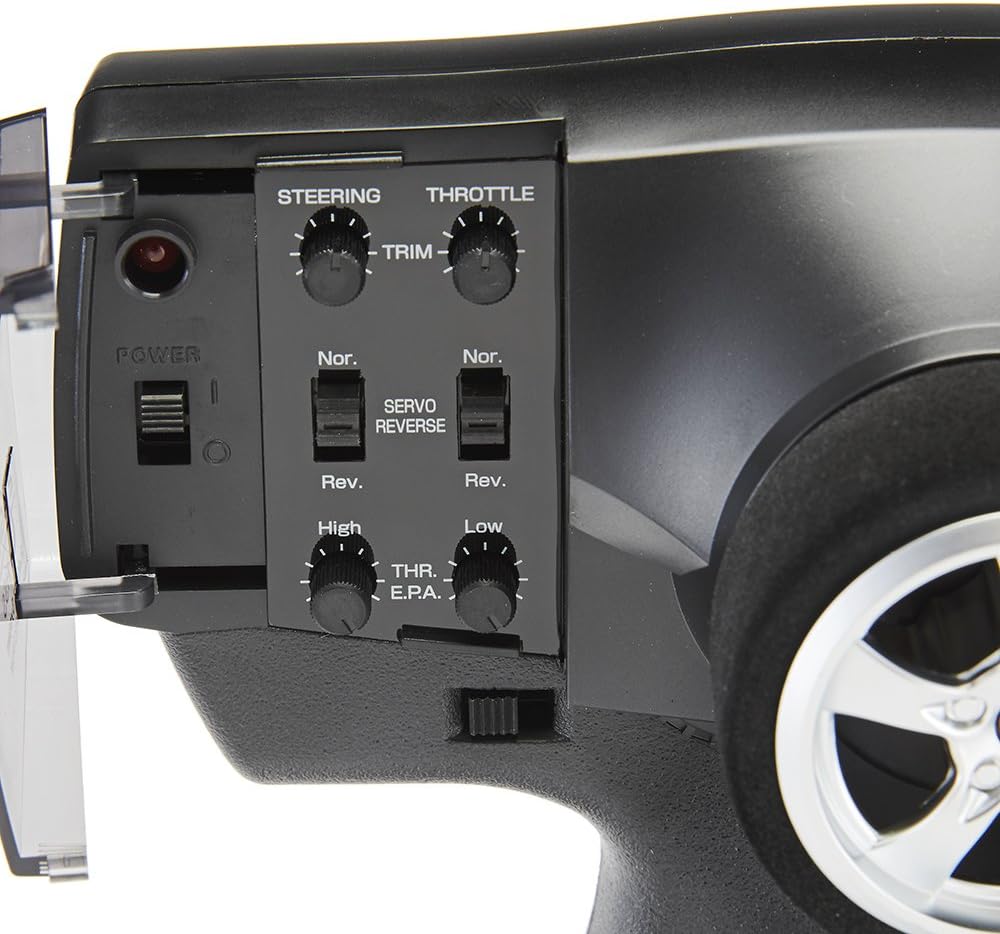
Image: Detailed view of the Futaba 3PRKA transmitter's adjustment panel, showing the steering and throttle trims, servo reverse switches, and EPA dials.
| Control | Description |
|---|---|
| Steering Trim (ST.TRIM) | Adjusts the neutral position of the steering servo. Use to make the model track straight when the steering wheel is centered. |
| Throttle Trim (TH.TRIM) | Adjusts the neutral position of the throttle servo/ESC. Use to ensure the motor stops when the throttle trigger is at neutral. |
| Steering Dual Rate (D/R ST) | A thumb dial that adjusts the maximum steering angle. Turn clockwise for more steering throw, counter-clockwise for less. Useful for tuning steering response. |
| Throttle End Point Adjustment (TH.EPA) | Adjusts the maximum travel of the throttle servo/ESC in both forward (High) and reverse (Low) directions. Prevents over-travel and damage to mechanical linkages. |
| Servo Reversing (ST.REV / TH.REV) | Switches the direction of servo movement. If a servo moves in the opposite direction to your input, flip the corresponding switch. |
| Channel 3 Switching (CH3) | A switch for controlling the third channel, typically used for auxiliary functions like lights or gear shifting. |
| Throttle Fail-Safe (F/S) | Automatically moves the throttle to a preset position (usually neutral or brake) if the radio signal is lost or interrupted. This prevents the model from running away. The R203GF receiver has a battery fail-safe voltage of 3.8V for 4-cell NiCd/NiMH batteries. |
| Low-Battery Warning | A flashing LED on the transmitter indicates when the battery voltage is low, signaling it's time to replace the batteries. |
Maintenance
- Cleaning: Use a soft, dry cloth to clean the transmitter and receiver. Avoid using solvents or harsh chemicals.
- Storage: Store the system in a cool, dry place away from direct sunlight and extreme temperatures. Remove batteries from the transmitter if storing for extended periods.
- Battery Care: Always use fresh batteries for optimal performance. Dispose of used batteries responsibly.
- Antenna: The transmitter has a built-in antenna. Avoid obstructing it during operation. For the receiver, ensure the antenna wire is not cut or damaged and is positioned correctly for optimal range.
Troubleshooting
| Problem | Possible Cause | Solution |
|---|---|---|
| No power to transmitter | Dead or incorrectly installed batteries | Check battery polarity; replace with fresh "AA" batteries. |
| Model does not respond to controls | Not linked; receiver not powered; incorrect connections; low transmitter battery | Perform linking procedure; check receiver power supply; verify all servo/ESC connections; replace transmitter batteries. |
| Servos move in wrong direction | Servo reversing switch set incorrectly | Flip the corresponding ST.REV or TH.REV switch. |
| Model pulls to one side (steering) | Steering trim not centered | Adjust the ST.TRIM dial until the model tracks straight. |
| Motor runs slightly at neutral (throttle) | Throttle trim not centered | Adjust the TH.TRIM dial until the motor stops at neutral. |
| Limited steering angle or binding | Steering Dual Rate (D/R ST) set too low; mechanical binding | Increase D/R ST; check for mechanical obstructions in steering linkage. |
| Reduced range or intermittent control | Interference; low battery voltage; damaged receiver antenna | Operate in an open area away from other 2.4GHz devices; replace batteries; inspect receiver antenna for damage. |
Specifications
Transmitter (3PRKA)
- Type: 3-Channel FHSS
- Transmitting Frequency: 2.4GHz band
- Current Drain: 100mA or less
- Power Requirement: (4) "AA" alkaline batteries (6V DC)
- Dimensions: 10 x 8 x 4 inches (Product Dimensions)
- Weight: 1.26 pounds (Item Weight)
Receiver (R203GF)
- Type: 3-channel FHSS/S-FHSS
- Input Power: 4.8V-7.4V (compatible with LiPo, LiFe, NiCd, NiMH)
- Dimensions: 1-9/16 x 1-1/16 x 3/8 inches (39 x 26 x 10 mm)
- Weight: 0.28 oz (8 g)
- Current Drain: 30mA at no signal
- Battery Fail Safe Voltage: 3.8V (for 4-cell NiCd/NiMH battery)
Note: 2.4GHz FHSS is not compatible with FASST systems. Normal mode frame rate is (FHSS/S-FHSS) 13.63ms and accepts any type of servos or peripherals.
Warranty and Support
This Futaba 3PRKA system includes a one-year limited manufacturer's warranty. For technical support or warranty claims, please contact Futaba customer service or your authorized dealer. Keep your purchase receipt as proof of purchase.
For further assistance, refer to the official Futaba website or contact their support channels.


