1. Introduction
This manual provides detailed instructions for the safe and effective use of your OM SYSTEM Olympus VN-7200 Digital Voice Recorder. Please read this manual thoroughly before using the device and retain it for future reference. The VN-7200 is designed for clear audio recording in various environments, offering ease of use and reliable performance.
2. Package Contents
Verify that all items listed below are included in your package:
- OM SYSTEM Olympus VN-7200 Digital Voice Recorder
- 2 AAA batteries (included)
3. Product Overview
Familiarize yourself with the components and controls of your VN-7200 Digital Voice Recorder.
3.1 Front View and Display

Image 1: Front view of the Olympus VN-7200 Digital Voice Recorder. This image displays the device's screen, which shows recording status, remaining time, and battery level. Below the screen are the STOP and REC buttons, and the central navigation cluster with OK button.
3.2 Side View and Power/Hold Switch
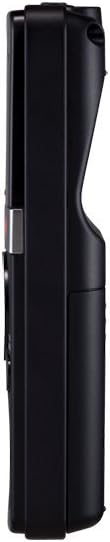
Image 2: Side view of the Olympus VN-7200 Digital Voice Recorder. This view shows the POWER/HOLD slide switch located on the left side of the device, used to turn the recorder on/off or lock its controls.
3.3 Control Panel Detail

Image 3: Detailed view of the control panel. This image highlights the ERASE button, FOLDER/INDEX button, and the central navigation pad with the OK button, along with the DISP/MENU button.
3.4 Back View and Battery Compartment

Image 4: Back view of the Olympus VN-7200 Digital Voice Recorder. This image shows the rear casing, including the battery compartment cover and product information.
3.5 Size Comparison

Image 5: Size comparison of the Olympus VN-7200 Digital Voice Recorder. The device is shown in a hand, illustrating its compact and portable dimensions.
4. Setup
4.1 Battery Installation
- Locate the battery compartment on the back of the recorder.
- Slide the battery compartment cover downwards to open it.
- Insert two AAA batteries, ensuring correct polarity (+/-) as indicated inside the compartment.
- Close the battery compartment cover securely.
4.2 Initial Settings (Date and Time)
Upon first use or after battery replacement, you may need to set the date and time. This ensures accurate timestamping of your recordings.
- Slide the POWER/HOLD switch to the ON position.
- Press the DISP/MENU button to access the menu.
- Navigate using the +/- buttons to find the 'Date/Time' setting.
- Press the OK button to select.
- Adjust the year, month, day, hour, and minute using the +/- buttons and confirm each entry with the OK button.
- Press the STOP button to exit the menu.
5. Basic Operation
5.1 Recording
- Ensure the recorder is powered on.
- Press the REC button to start recording. The recording indicator will illuminate.
- Speak clearly into the built-in microphone.
- To pause recording, press the REC button again. Press it once more to resume.
- To stop recording, press the STOP button. The recording will be saved automatically.
5.2 Playback
- Press the STOP button to ensure the recorder is not in recording mode.
- Use the FOLDER/INDEX button to navigate between folders (A, B, C, D).
- Use the ◀◀ (rewind) or ▶▶ (fast forward) buttons to select a recording.
- Press the OK button (play) to start playback.
- Adjust the volume using the +/- buttons.
- To stop playback, press the STOP button.
5.3 Erasing Recordings
- Select the recording you wish to erase using the ◀◀ or ▶▶ buttons.
- Press the ERASE button.
- The display will prompt you to confirm. Use the +/- buttons to select 'YES' and press OK.
6. Advanced Features
6.1 Voice Activated Recording (VCVA)
The Voice Control Voice Actuator (VCVA) function allows the recorder to start and stop recording automatically in response to sound, conserving memory and battery life.
- Press the DISP/MENU button.
- Navigate to the 'VCVA' setting using the +/- buttons.
- Press OK to select and then use +/- to turn VCVA 'ON'.
- You can also adjust the VCVA sensitivity level in the menu.
- Press STOP to exit the menu. When VCVA is active, recording will begin when sound is detected and pause when silence occurs.
6.2 Recording Modes
The VN-7200 offers three recording modes to suit different needs:
- HQ (High Quality): Provides the best audio fidelity, suitable for music or important conversations. Uses more memory.
- SP (Standard Play): A balanced mode for general use, offering good quality with reasonable memory consumption.
- LP (Long Play): Maximizes recording time, suitable for extended lectures or meetings where absolute fidelity is less critical.
To change the recording mode:
- Press the DISP/MENU button.
- Navigate to the 'REC Mode' setting.
- Press OK and use +/- to select your desired mode (HQ, SP, or LP).
- Press STOP to exit.
6.3 Index Marks
Index marks allow you to tag specific points within a recording for quick navigation during playback.
- During recording or playback, press the FOLDER/INDEX button.
- An index mark will be inserted at that point.
- During playback, use the ◀◀ or ▶▶ buttons to jump between index marks.
7. Maintenance
To ensure the longevity and optimal performance of your recorder, follow these maintenance guidelines:
- Cleaning: Wipe the device with a soft, dry cloth. Do not use liquid cleaners or solvents.
- Storage: Store the recorder in a cool, dry place away from direct sunlight and extreme temperatures.
- Battery Care: Remove batteries if the device will not be used for an extended period to prevent leakage.
- Avoid Impact: Protect the device from drops and strong impacts.
8. Troubleshooting
If you encounter issues with your VN-7200, refer to the following common problems and solutions:
- Device does not power on: Check if batteries are inserted correctly and have sufficient charge. Replace batteries if necessary. Ensure the POWER/HOLD switch is not in the 'HOLD' position.
- No sound during playback: Check the volume level. Ensure headphones are properly connected if used. If using headphones, note that sound may only come from one side; this is a characteristic of some older models and may require a stereo adapter for dual-channel output.
- Poor recording quality: Ensure the microphone is not obstructed. Check the recording mode (HQ offers best quality). Record in a quieter environment.
- Recordings are too quiet: Adjust the microphone sensitivity setting in the menu (if available). Ensure you are speaking close enough to the microphone.
- Cannot erase recordings: Ensure the device is not in 'HOLD' mode. Follow the erasing procedure carefully, confirming the deletion.
9. Specifications
| Feature | Specification |
|---|---|
| Model Number | V404130BU000 |
| Recording Time | Up to 1151 hours (LP mode) |
| Memory Storage Capacity | 2 GB |
| Batteries | 2 x AAA batteries |
| Microphone Form Factor | Built-In |
| Headphones Jack | 3.5 millimeters |
| Product Dimensions | 6.1 x 5.2 x 1.8 inches |
| Item Weight | 1.76 ounces |
| Voice Activation | Yes |
| Fast/Slow Playback | Yes |
| PC Interface | No (Direct USB connection not available) |
10. Warranty and Support
For warranty information and customer support, please refer to the documentation provided with your purchase or visit the official OM SYSTEM website. You can also find the official user manual in PDF format for further details:


